
Export and Import a Website, List, or Library
In addition to farm and site collection backups, SharePoint allows you to back up and restore a website hierarchy or even a single list or library. Unlike a site collection backup, these are not full fidelity since some details—including workflow settings, file checked-out status, alert subscriptions, and personal web part settings—are not captured in the backup.
If you export a website, that website and its subsites are included in the backup. If you export just a list or library, only the list or library is backed up. When performing an import, the content can be either merged with existing content or created.
Exporting content is a resource-intensive operation, much more so than a site collection backup. Thus, we don’t advise you to export content if the total size of the backup exceeds 1 GB. Instead, back up the site collection or content database.
Exports can be run from Central Administration or PowerShell. The resulting backup file is the same, assuming the same options are used. Importing must be done using PowerShell.
Using Central Administration to Export
To use Central Administration to perform an export, follow these steps:
1. Click Backup And Restore, and then select Export A Site Or List.
2. In the Site Collection area, as shown in Figure 16.5, select the site collection where the content you want to export exists.
Figure 16.5: Site Or List Export
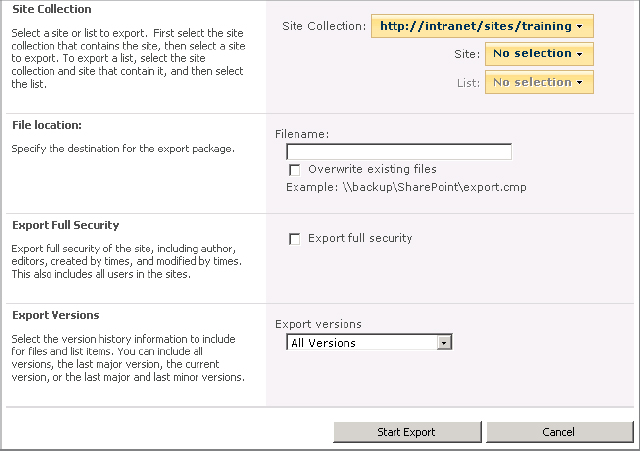
3. Optionally, select a website in the site collection. This can be the top-level website or a website at any other level. If nothing is selected, the website hierarchy from the top-level site and down is exported.
4. Optionally, choose a list or library from the selected website. If you do not choose a list or library, you will get a website export.
5. For Filename, specify the full path and filename where the backup package should be stored. If the amount of data exported is larger than about 25 MB, the backup will be split into multiple files. Each file in the package must be kept in order to import.
6. Optionally check Overwrite Existing Files to replace any previously exported packages.
7. Optionally, check Export Full Security. Enabling this switch preserves object permissions and inheritance settings. It also preserves item create and modified timestamps.
8. Choose how to handle export versions. You have four options: All Versions (the default setting), Last Major Version, Current Version, or Last Major And Last Minor.
9. Click Start Export to begin the export. A timer job is created and is scheduled to run immediately.
Using PowerShell to Export
The cmdlet you use to run an export using PowerShell is Export-SPWeb. Here is the syntax with the most common options:
Export-SPWeb <URL> -Path <ExportFile> [-CompressionSize<number>] [-Force] [-IncludeUserSecurity]
Here is a brief explanation of each parameter:
URL The absolute URL to the website to export.
ExportFile The full path and filename to be exported.
Force Used to replace (overwrite) the current export file.
CompressionSize Sets the maximum size (in MB) for each export file in the package. The default size is 25 MB. If the export package is larger than this, the backup will be split into multiple files.
IncludeUserSecurity Includes information about users, groups, and permissions in the backup.
IncludeVersions Specifies which versions to include in the backup. You have the same four choices available as from Central Administration. This parameter must be used if you want files within libraries to be exported.
ItemUrl Specifies the path to the list or library, relative to the website defined in URL—for example, "Shared Documents".
The following example exports just the tasks list for the IT website:
Export-SPWeb http://intranet/IT -Path
e:BackupsIT-Tasks.cmp -ItemUrl "lists/tasks"
Using PowerShell to Import
An import is able to either merge or create the same content that was exported. When importing websites, the topmost website that was exported must already exist in the destination URL with the same site definition (e.g., team site, blog). Any subsites in the hierarchy that do not exist will be created. When importing a list or library, SharePoint creates the list or library if it doesn’t exist. If it does exist, SharePoint can create just missing items in the list.
This merge concept is very powerful as it can be used to restore missing data. For example, if a few files are accidentally deleted from a library, you can recover these files by doing an import. Of course, always try to recover files from a Recycle Bin first.
The PowerShell cmdlet used for importing is Import-SPWeb. Here is the syntax with the most commonly used options:
Import-SPWeb <URL> -Path <ExportFile>
IncludeUserSecurity re-creates users and groups in the site collection and restores the security permissions included in the export package.
The UpdateVersions parameter defines how the merge works if an item already exists. Append restores the item as the most recent version, keeping original versions. Overwrite replaces the item with the version(s) from the export package. Ignore skips items that already exist.
To perform a basic import:
Import-SPWeb http://intranet/sites/training -Path
e:BackupsTraining.cmp
To perform an import from an exported package and only create files that are missing:
Import-SPWeb http://intranet/IT -Path
e:BackupsIT-Docs.cmp -UpdateVersions Ignore
NOTE If your export package contains multiple files, you only need to reference the first file in the package with the -Path parameter. SharePoint will automatically read each file in sequence when doing the import.