
The alternative model to in-place records management in SharePoint 2010 is to send a copy of each item to a separate site collection built on the Records Center site template that acts as a records repository. A Records Center is used when a specific version of a document must be archived for compliance purposes while the document continues to be edited in its original location as it continues to evolve into new versions. For example, a Human Resources policy might cover the personal use of company-issued cell phones. When a new version of the policy is drafted and approved by management, that version must be archived so that it can be retrieved if a question arises about which version of the policy was applied on a given date. Meanwhile, the policy document will continue to be revised to meet changing business requirements.
While SharePoint 2010 does include a built-in versioning feature that allows users to review and retrieve older versions of the same document, this feature does not meet records compliance requirements for several reasons:
- Older versions of a document can be deleted even when the document is declared as a record.
- SharePoint does not have the ability to execute separate information management policies, such as an expiration policy, on older versions of a document; it can only do it to the entire document.
- SharePoint Search only indexes the last version of a document, so any content in older versions of the same document would not appear in the search.
However, by saving a copy of the document in a separate location, SharePoint can apply policies to and index the document separately from any other versions of it.
One purpose of a Records Center is to serve as a storage location that users can place documents into but for which they do not have edit rights or even, in many cases, read rights. SharePoint 2010 provides this functionality through the Records Center site template and custom Send To links, which allow users to route documents to it.
The following steps are required to create and use a Records Center:
1. Create a separate web application.
2. Create the Records Center site collection.
3. Create libraries in the Records Center.
4. Configure Content Organizer rules to route documents to specific libraries.
5. Create custom Send To connections.
6. Submit documents to the Records Center.
This section describes these tasks in detail.
Creating a Records Center Site
The Records Center is intended to be a secure and relatively isolated site for records to reside under the control of a few select individuals. Usually, the management of the Records Center is delegated to dedicated records managers in the organization, and most users will have either no access to the site or read-only access. For this reason, we recommend that you create the site in its own web application. This approach offers several benefits:
- The new web application will have its own content database, thereby separating the storage of the records from that of other site collections.
- As a separate web application, it will also allow farm administrators the ability to use the web application User Policies security feature (see Chapter 14, “Managing Security,” for more details) to easily grant access to the site to auditors and others who need to reference the archived documents.
To begin, create a new web application from within SharePoint 2010 Central Administration. For the steps to create a new web application, see Chapter 2, “Creating and Managing Web Applications.” The web application can either use a fully qualified URL, such as repository.synergy.com, or a unique port number on an existing URL. In most cases, the Records Center is visited directly by very few users so the reference URL is not as vital as with other web applications. Likewise, because the Records Center will probably be queried infrequently, it is acceptable for it to share the same application pool as an existing web application.
Once the web application is created, create a new site collection at the root of the web application. It is possible to create and use additional site collections for records management for additional segregation of content for security and administration purposes.
To create the Records Center site, perform the following steps:
1. From SharePoint 2010 Central Administration, under Application Management, click Create Site Collections.
2. From the Web Application drop-down menu, select the Records Center web application you created earlier.
3. In the Title box, enter a title that will appear to users (such as Repository), and in the Description box, enter the purpose of this site.
4. In the Web Site Address drop-down list, select the URL root (/).
5. In the Template Selection section, click the Enterprise tab, and then select Records Center.
6. In the Primary Site Collection Administrator box, enter the username for the user who will be the site collection administrator; use the pattern domainusername.
7. Click OK.
Creating Libraries in a Records Center
The Records Center site template includes several libraries, two of which are specifically oriented toward the records management functions of the Records Center:
- The Drop Off Library is created as part of the Content Organizer functionality when that feature is activated.
- The Record Library is a standard library with Major versioning enabled and is configured to automatically declare documents as records when they are uploaded.
To take full advantage of the record routing options in the Content Organizer (discussed in the next step), you may want to create additional libraries in the site. Each library can be configured with different content types, columns, folder structures, policies, and workflows to govern the treatment of the documents stored in them. The actual number and use of libraries will depend on your records management plan. A key factor in setting up the libraries is to ensure that the correct metadata is captured with documents to ensure that they can be retrieved efficiently at a future point during an audit or eDiscovery. If you have implemented a content type syndication hub (as discussed in Chapter 11, “Configuring the Managed Metadata Service”), then the same content types can be applied in the Records Center as are used elsewhere in the farm. By assigning the appropriate content type or types to each library and routing the documents to the correct library, you make it possible to capture the metadata you need.
To create additional libraries in the Records Center:
1. From the Site Actions menu, select More Options.
2. Select the Document Library template and provide a name for the library.
3. Click Create.
4. Once a library is created, edit the library settings to configure it with one or more existing content types or specific columns as needed. For more details on columns and content types, see Chapter 10, “Configuring Document Management.”
Configuring Organizer Rules for Submitted Records
The Records Center leverages the Content Organizer functionality to route documents to a specific library or folder based on criteria specified in rules. When a document is uploaded to a library or submitted using a Send To connection, the Content Organizer determines where the document should be stored and moves it to that location. See Chapter 10 for full details on the Content Organizer.
To configure a Content Organizer rule:
1. From the Site Actions menu, select Site Settings.
2. Under the Site Administration section, click Content Organizer Rules.
3. Click Add New Item. The Edit Rule dialog appears, as shown in Figure 12.11.
Figure 12.11: Edit Rule dialog
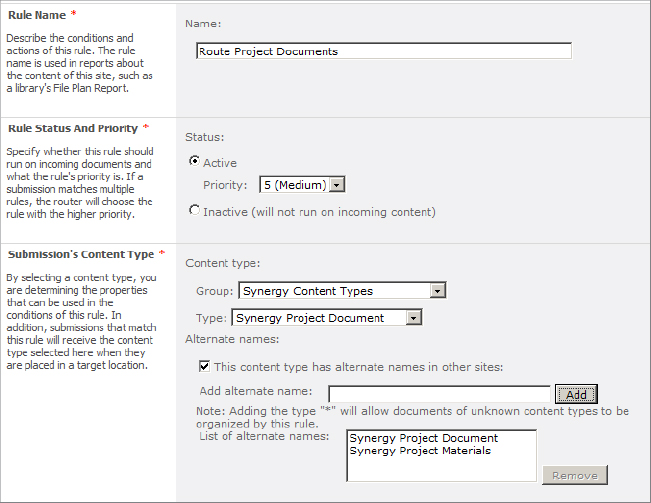
4. In the Rule Name text box, enter a unique name for this rule.
5. In the Rule Status And Priority section, leave Status set to the default of 5 unless you plan to create multiple rules for this type of document. The rule with the highest priority will be applied for routing.
6. In the Submission’s Content Type section, from the drop-down lists, select the content type that this rule will match against. This is the principal value used to route documents. If multiple content types should be routed in the same way, add them in the Alternate Names section.
7. Use the Conditions section (shown in Figure 12.12) to add further selection criteria. You can select from any of the columns contained in the content type chosen in step 6.
Figure 12.12: Specifying conditions and target location
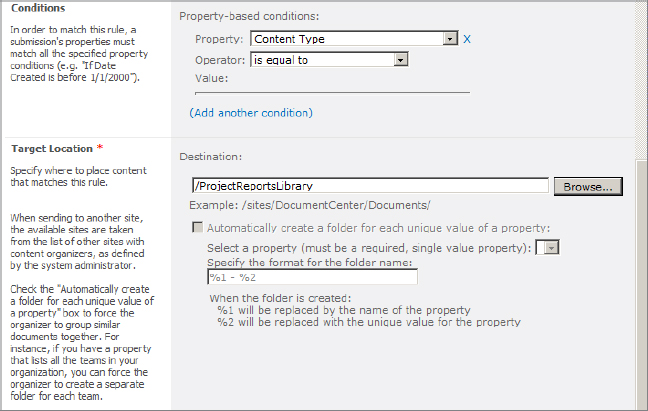
8. Select a destination document library in the Target Location section. Optionally, you can specify a folder within the library where the document will be placed. The folder must be configured with the content type selected in step 6.
9. Click OK.
Creating Custom Send To Connections
Documents may be uploaded directly to the Records Center if users are granted permissions to do so. However, it may be inappropriate to grant multiple staff members edit access to the Records Center, either for confidentiality reasons or to minimize the risk of accidental overwrite or deletion of content. SharePoint 2010 provides Send To connections, a means for users to submit documents to the Records Center even if they do not have permissions to access the site. A Send To connection does the following:
- Calls a built-in web service in SharePoint that handles the copying or moving of the documents.
- Supports the option to move a document into the Records Center and to leave a link to the new location in its place.
- Transfers the metadata values configured on the original document to the file into the Records Center. (However, the metadata will only be applied if the columns in the destination library match those of the metadata on the document being transferred.)
To create a Send To command:
1. From SharePoint 2010 Central Administration, under General Application Settings, click Configure Send To Connections.
2. On the Configure Send To Connections page, select the web application that content will be sent from. This is the web application where the send to links will be displayed for the users to use.
3. The Site Subscription Settings section applies in situations where SharePoint Multi-Tenancy has been configured. Use this section to enable sites to send to locations outside the current subscription. If you have not enabled Multi-Tenancy, then this setting has no effect.
For more information on Multi-tenancy, see the white paper “SharePoint 2010 for Hosters” available at http://technet.microsoft.com/en-us/library/ff652528.aspx.
4. In the Connection Settings section, shown in Figure 12.13, enter a display name for the connection that users will see in their sites.
Figure 12.13: Specifying connection settings
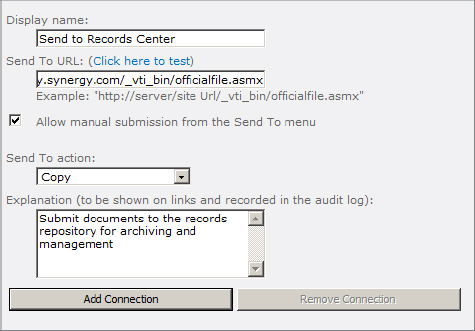
5. In the Send To URL text box, enter the full URL to the Records Center site without including any folder or page portion of the URL. Append to the URL _vti_bin/officialfile.asmx, which is the reference to the XML web service that will be called to transfer the file.
6. If you want to allow users to send documents to the Records Center themselves, make sure the box labeled “Allow manual submission from the Send To menu” is checked. If not, documents must be submitted to the connection through a workflow or custom code.
7. In the Send To Action drop-down list, select how SharePoint should process the document:
- Copy leaves the document in the original location and places a copy in the Records Center.
- Move copies the document to the Records Center and then deletes the original.
- Move And Leave A Link copies the document, then deletes the original and creates a link object that directs users to the new location for the document in the Records Center.
8. In the Explanation text box, enter a description of this connection.
9. Click Add Connection.
Submitting Records
The Records Center is designed to allow submission of records in several ways: manually, through a Send To connection, through a workflow, or through a retention policy.
NOTE If the document is routed to a library with required columns configured and some metadata is missing, the document will be placed into the Drop Off Library and its status will be set to Pending Submission. To complete the process, a user must log into the Records Center and manually edit the document properties to supply the missing metadata. Once that is done and the document is checked in, the Content Organizer will automatically route the document to its final destination.
Submitting Through Manual Upload
One method is to upload a document directly to the site. This method may be best suited for smaller numbers of documents that are being produced outside of SharePoint. Users do not have to know which library to upload the document to. They can click the Submit A Record button, shown on the home page of the Records Center site, which will upload the document to the Drop Off Library and trigger the Content Organizer to route it to the correct library.
One drawback to this method is that users require Add and Edit permissions on the site. Another drawback is that, because the document is being uploaded from outside of SharePoint, the Content Organizer rules cannot route it based on its content type. The routing will be based on the metadata submitted with the document.
Submitting Through a Send To Connection
Another method is to use the Send To connection (configured in the previous section). Any user with Read permissions can submit the document by selecting Send To from the context menu and then selecting the link for the destination Records Center, as shown in Figure 12.14.
Figure 12.14: Submitting a document using a Send To connection
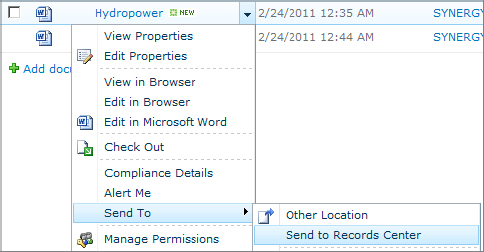
The officialfile.asmx web service is invoked and the document, along with all of its metadata, is submitted to the Records Center and routed based on the Content Organizer rules.
Submitting Through a Workflow
In many cases it is preferable for the submission of content to the Records Center to be automated through a workflow. SharePoint Designer 2010 includes a workflow action that will do this. While you may also want to expose a Send To connection to allow manual submission, this is not necessary as the workflow action supports directly addressing the Records Center. To configure the workflow, follow steps 1–6 in the section “Declaring Records Through Workflow,” earlier in this chapter. Then do the following:
1. From the Action menu, under the Core Actions category, select Send Document To Repository.
2. Click This Action and choose a behavior: Copy, Move, or Move And Leave a Link.
3. Click the This Destination Router link and enter the full URL to the Records Center, including the suffix of _vti_bin/officialfile.asmx, in the same manner as configuring a Send To connection.
4. Click This Explanation and enter a reason for the submission. Then follow the remainder of the steps in the “Declaring Records Through Workflow” section. The results of this configuration are shown in Figure 12.15.
Figure 12.15: Configuring document submission through a workflow

Submitting Through a Retention Policy
The final method that can be configured to submit a document is to configure an information management policy. One of the actions that is supported by the retention policy (discussed in more detail in the next section) is Transfer To Another Location. You do so by referencing an existing Send To connection. Information Management Policies are discussed further in the next section.