
Farm-level security covers broad-stroke security adjustments to the farm and service applications. This section first introduces how to delegate administrative duties to other farm administrators. We then introduce managed accounts and provide the steps for creating, editing, and deleting these accounts. Lastly, you’ll see how you can assign managed accounts to SharePoint components.
NOTE A strong security posture also includes securing the server along with the ports and protocols used. An excellent starting resource is the article “Plan Security Hardening (SharePoint Server 2010)” on TechNet at http://technet.microsoft.com/en-us/library/cc262849.aspx.
Configuring Farm Administrators
Farm administrators are responsible for keeping the farm and its web applications and site collections functional. It is a highly privileged role that must be granted carefully. By and large, a farm administrator’s power extends to most administrative duties in Central Administration. However, there are limits to what a farm administrator can do if they are not also a local Windows administrator on the server where the Central Administration web application is being run. Specifically, a farm administrator who is not a local administrator cannot perform these actions:
- Start and stop SharePoint services
- Configure incoming email
- Create, delete, or extend a web application
- Change authentication settings for a web application
- Back up or restore a farm
Additionally, a farm administrator does not implicitly have access to all site collections, but a farm administrator can obtain access by making themselves a site collection administrator.
This section describes how to add and remove farm administrators, and how to grant PowerShell access to farm administrators.
Adding or Removing a Farm Administrator
SharePoint allows multiple farm administrators, and membership can be granted to a user or AD security group. To grant farm administrator privileges using Central Administration:
1. Click Security and then select Manage The Farm Administrators Group.
2. In the list of current farm administrators, click New ⇒ Add Users.
3. In the Grant Permissions dialog box, enter the name of one or more users or AD security groups. You can add multiple users and/or groups by separating them with a semicolon.
4. Click OK to save your changes.
Removing a user from the farm administrators group can be done from the same screen. Here’s how:
1. Click Security and then select Manage The Farm Administrators Group.
2. In the list of current farm administrators, select the group or user you want to remove.
3. Click Actions ⇒ Remove Users from Group.
NOTE SharePoint allows you to delegate access so that users can only administer service applications from inside Central Administration. How to do this is covered in Chapter 4, “Creating Service Applications.”
Granting PowerShell Access to Farm Administrators
While Central Administration is commonly used for many day-to-day operations, PowerShell is an incredibly powerful way to administer and automate SharePoint functions from a command-line interface. For reasons having to do with database authentication and OS permissions, a farm administrator does not automatically have permissions to run PowerShell cmdlets.
To grant permissions for others to run PowerShell cmdlets, use the Add-SPShellAdmin cmdlet. This command grants necessary permissions on SharePoint servers, the configuration database, and optionally, a SharePoint content database. Here is the basic syntax for the command:
Add-SPShellAdmin <DomainUserName> [-database<SPDatabasePipeBind>]
If you run the command without specifying a database, the user is only granted access to the farm—specifically, the configuration database and the Central Administration content database—but not any other content databases. To be able to run cmdlets within a content database (for example, to use Get-SPWeb to work with a website), the user must be granted access to the content database by using the -database switch. The following grants a user shell access to one content database:
$db = Get-SPContentDatabase SP_Portal_Content
Add-SPShellAdmin -username synergyafuller -database $db
To grant a user shell access to all content databases, you can use a script such as this one:
ForEach ($db in (Get-SPContentDatabase))
{Add-SPShellAdmin -username synergyafuller -database $db}
To revoke PowerShell access, use the Remove-SPShellAdmin cmdlet.
NOTE To grant PowerShell access using the Add-SPShellAdmin cmdlet, you must be a farm administrator, a local administrator on the server where the command is run, a securityadmin on the database server(s) you are granting permission to, and a database owner (dbo) on the database(s).
Configuring Managed Accounts
Managed accounts are AD accounts that SharePoint uses for the farm account, service applications, and application pools. SharePoint securely stores the password for each managed account and can regularly change the password if needed. The benefits that managed accounts offer include the following:
- A farm administrator does not need to know an account’s password when provisioning services.
- SharePoint can be set up to automatically change an account’s password on a recurring schedule.
- An account’s password can be set to automatically change if it will expire prior to the next scheduled password change.
- Email notification is sent when an account’s password will be changed.
NOTE Not every SharePoint function uses managed accounts. For example, the Default Content Access Account, which is used to crawl content for the Search Service Application, is a regular, unmanaged account.
When you create a new web application, you must define which managed account you will use for the application pool. The same is true when creating most service applications. Thus, it’s best to have your managed accounts ready to go prior to provisioning web or service applications.
Creating a New Managed Account
Managed accounts can be created with Central Administration or PowerShell. Before creating a managed account, be sure that the account has been created in AD, either in the same domain in which SharePoint is installed or in a trusted domain. You must also know the account’s current password.
To create a new managed account with Central Administration, follow these steps:
1. Click Security and then select Configure Managed Accounts.
2. In the new page, the list of existing managed accounts is displayed. Click the Register Managed Account link to create a new one.
3. For Service Account Credentials, shown in Figure 14.1, enter the account’s AD username. It is best to use the domainusername format.
Figure 14.1: Creating a managed account
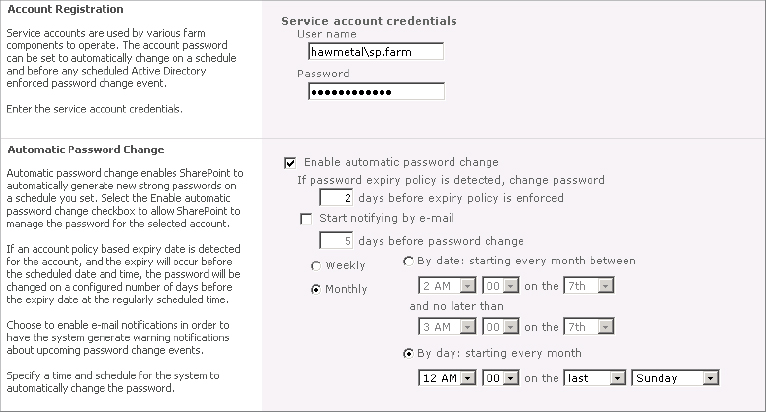
4. Specify the account’s password.
5. If you want SharePoint to automatically change this account’s password on a regular schedule (weekly or monthly), check the Enable Automatic Password Change check box.
6. Specify when to change the password relative to the expiry policy. The default is 2 days. This is applied only if the password is set to expire in AD (as defined by group policy) before SharePoint’s next scheduled password change date.
7. If you want SharePoint to send an email notification before the password is scheduled to change, check the Start Notifying By E-mail check box and specify the number of days before the password change you want to be notified.
8. Specify the schedule for the password change. You can change the password weekly or monthly and specify a time range. You should set changes to occur during scheduled downtime or during light usage, because the password changes will cause momentary service interruptions as application pools are restarted.
9. Click OK to save the new managed account. After the account is saved, you are returned to the list of managed accounts. The date and time for the next password change is shown if you enabled Automatic Password Change.
To create a managed account using PowerShell, use the New-SPManagedAccount cmdlet.
SharePoint sends password change notifications to a single email address. We suggest that you make this an actively monitored account. Here is how you can use Central Administration to set this email address:
1. Click Security and then select Configure Password Change Settings.
2. In the Notification E-Mail Address text box, enter the email address. If you want the notification to go to multiple users, be sure this is a distribution list or group email address.
3. Click OK to save your changes.
Editing a Managed Account
To edit an existing managed account using Central Administration, follow these steps:
1. Click Security and then select Configure Managed Accounts.
2. The list of existing managed accounts is displayed. Click the edit icon for the managed account.
3. Make changes to the account. For details about the settings you can make, see the previous section, “Creating a New Managed Account.”
4. Click OK to save your changes.
To edit a managed account using PowerShell, use the Set-SPManagedAccount cmdlet.
Removing a Managed Account
Before removing a managed account, you should first make sure this managed account is not associated with any SharePoint services or application pools. To determine if it is in use, edit the managed account and look at the Account Information section to see what farm components are using this account.
Once you’ve confirmed the account is not in use, here is how you can use Central Administration to remove the account.
1. Click Security and then select Configure Managed Accounts.
2. Click the delete icon for the managed account you want to remove.
3. In the Remove Managed Account page, confirm the correct account is selected and click OK.
To remove a managed account using PowerShell, use the Remove-SPManagedAccount cmdlet.
To learn more about managed accounts and their passwords, see the article “Updating Passwords on SharePoint 2010” located here:
http://blogs.technet.com/b/seanearp/archive/2011/01/25/updating-passwords-on-sharepoint-2010.aspx
Configuring Service Accounts
From time to time, you may need to make an account change to one of your SharePoint services or application pools after it has been created. For example, you might need to change the application pool account for one of your web applications. This can be easily done in SharePoint from a single screen, and this change is automatically propagated to all WFE and application servers in your farm.
Here’s how you can make this type of change:
1. Click Security and then select Configure Service Accounts.
2. In the drop-down list, select the SharePoint component that you want to change.
3. Select the managed account that you want this component to use.
4. Click OK to save your changes.
These changes are immediately propagated to farm servers and may cause a short period of downtime, depending on the component that was changed. Therefore, it is best to adjust this during scheduled downtime or during light usage.