
Checking Input with Data Validation
When you're entering large amounts of data, it's easy to type an incorrect value by mistake. To help avoid errors in your data, you can use Excel's data validation feature to check entries automatically and flag those that may be wrong. For example, if every entry in a range of cells should be between 250 and 1000 (inclusive), you can validate the data to flag any entry that is not in that range.
CAUTION: Data validation works only when the user types in a value. If the user pastes in a value, Excel doesn't validate it.
To apply validation to cells, follow these steps:
- Click the cell or select the range you want to validate.
- Choose
Data
Tools Validate(clicking the main part of the Validate button) from the Ribbon orData Validationfrom the menu bar to display the Data Validation dialog box. - Click the Settings tab (shown in Figure 4–19 with settings chosen) to bring it to the front of the dialog box if it's not already there.
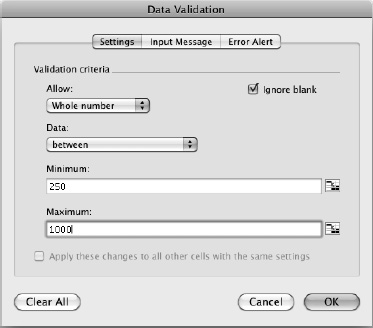
Figure 4–19. Set up the validation criteria on the Settings tab of the Data Validation dialog box. The controls that appear depend on the data type you choose in the Allow pop-up menu.
- In the Allow pop-up menu, choose the type of data you want to validate, and then use the controls that appear to set the details.
- Any value. Select this item when you want to turn off validation for the cell or range. Even with this setting, you can use the Input Message tab (discussed later in this list) to display a message about the cell or range.
TIP: When setting the criteria for your data validation, you can either type in a value or click the Collapse Dialog button and then click the cell that contains the value. Using a value in a cell enables you to change the value easily without editing the data validation.
- Whole number. Select this item to set criteria for a whole number—one with no decimal places. For example, in the Data pop-up menu, click the between item and then set the minimum value in the Minimum box and the maximum value in the Maximum box.
- Decimal. Select this item to set criteria for a number with decimal places. For example, in the Data pop-up menu, click the greater than or equal to item and then set the minimum value in the Minimum box.
- List. Select this item when you need to restrict the cell to a list of valid entries that you specify. You can enter this list in two ways: either type it in the Source box, separating each entry with a comma, or click the Collapse Dialog button at the right end of the Source box, select the worksheet range that contains the data, and then click the Collapse Dialog button again to restore the dialog box. Select the In-cell drop-down check box to make Excel display a pop-up menu with the valid entries in the cell so that the user can enter them easily.
- Date. Select this item to set criteria for a date. For example, click the greater than item in the Data pop-up menu and then enter the start date in the Start date box.
- Time. Select this item to set criteria for a time. For example, click the not between item in the Data pop-up menu, then enter the start time in the Start time box and the end time in the End time box.
- Text length. Select this item to set criteria for a text entry or formula. For example, click the less than or equal to item in the Data pop-up menu, then enter the maximum length in the Maximum box.
- Custom. Select this item when you need to enter a formula that returns a logical value of TRUE or FALSE.
- Any value. Select this item when you want to turn off validation for the cell or range. Even with this setting, you can use the Input Message tab (discussed later in this list) to display a message about the cell or range.
- Select the Ignore blank check box if you want to let the user leave the cell blank. Clear this check box to make the user fill in the cell with valid data.
- Click the Input Message tab to display it. The left screen in Figure 4–20 shows the Input Message tab with settings chosen.
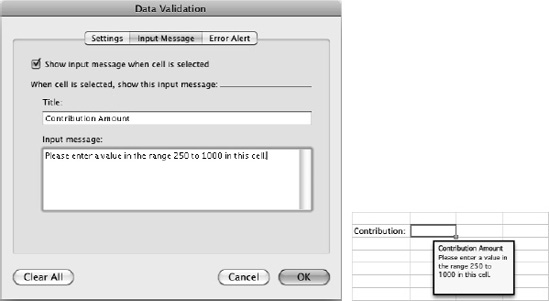
Figure 4–20. On the Input Message tab of the Data Validation dialog box (left), enter the message you want the user to see when the cell is active (right).
- To display a message when the user makes the cell active, select the Show input message when cell is selected check box. Type the title in the Title box and the message in the Input message box. The right screen in Figure 4–20 shows how the message appears.
- Click the Error Alert tab to bring it to the front. The left screen in Figure 4–21 shows the Error Alert tab with settings chosen; the right screen in Figure 4–21 shows how the error message appears.
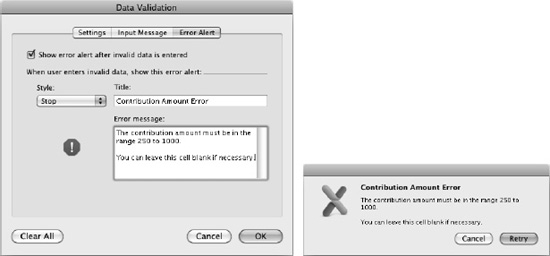
Figure 4–21. On the Error Alert tab of the Data Validation dialog box (left), set up the error to display when the user enters invalid data in the cell (right).
- Select the Show error alert after invalid data is entered check box if you want Excel to display an error message box when the user enters invalid data. Usually, this is helpful.
- In the Style pop-up menu, choose the icon type for the behavior you want:
- Stop. The error dialog box has a Retry button and a Cancel button. If the user clicks the Retry button, Excel selects the entry that failed validation so that the user can change it. If the user clicks the Cancel button, Excel restores the cell's previous entry.
NOTE: On Windows, the Stop, Warning, and Information settings in the Style pop-up menu make the error message box show the different icons that appear under the Style pop-up menu when you make your choice. For example, the Stop style shows the red octagon bearing a white exclamation point that you see on the left in Figure 4–21. On Mac OS X, the error message box displays the same Excel icon (shown on the right in Figure 4–21) for each style, but with different command buttons and behavior.
- Warning. The error dialog box ends with a “Continue?” prompt after your message and has a Yes button, a No button, and a Cancel button. If the user clicks the Yes button, Excel accepts the value, even though it has failed validation. If the user clicks the No button, Excel selects the entry that failed validation so that the user can change it. If the user clicks the Cancel button, Excel restores the cell's previous entry.
- Information. The error dialog box has an OK button and a Cancel button. If the user clicks the OK button, Excel accepts the value, even though it has failed validation. If the user clicks the Cancel button, Excel restores the cell's previous entry.
TIP: To force the user to enter valid data, choose the Stop item in the Style pop-up menu on the Error Alert tab of the Data Validation dialog box. The Warning style and the Information style can be useful for when you're providing gentler guidance on how to use the worksheet and it's not essential that the data conform.
- Stop. The error dialog box has a Retry button and a Cancel button. If the user clicks the Retry button, Excel selects the entry that failed validation so that the user can change it. If the user clicks the Cancel button, Excel restores the cell's previous entry.
- Enter the title and error message for the message box.
- Click the OK button to close the Data Validation dialog box. Excel applies the validation.