
Adding Headers and Footers to Your Worksheets
Before distributing a worksheet for viewing on screen, on paper, or as a PDF file, you'll probably want to add headers, footers, or both to identify the pages. Excel gives each worksheet a separate header and footer, which you can fill with either preset text or custom text. Each header and footer area consists of a left section, a center section, and a right section, so you can easily add several different pieces of information.
You can add information to headers and footers either by using the Header/Footer tab of the Page Setup dialog box or by switching to Page Layout view and working directly in the header and footer areas. We'll start with the Page Setup dialog box, which is the easiest way to add canned text.
Adding Headers and Footers Using the Page Setup Dialog Box
To add headers and footers to the active worksheet using the Page Setup dialog box, follow these steps:
- Choose
Layout
Page Setup Header & Footerfrom the Ribbon orView Header and Footerfrom the menu bar to display the Header/Footer tab of the Page Setup dialog box. Figure 4–25 shown the Header/Footer tab of the Page Setup dialog box with a preset header chosen.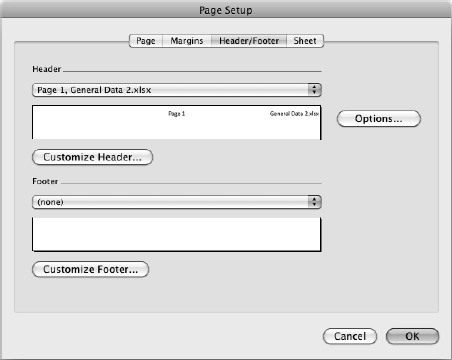
Figure 4–25. From the Header/Footer tab of the Page Setup dialog box, you can quickly add either preset headers and footers or custom headers and footers to the active worksheet.
- If you want to add a preset header or footer, open the Header pop-up menu or the Footer pop-up menu and click the preset. Each pop-up menu has various choices, ranging from just the page number to your name, the page number, and the date. The preset you've chosen appears in the preview box.
- If you want to create a custom header or footer, click the Customize Header button to display the Header dialog box (see Figure 4–26) or the Customize Footer button to display the Footer dialog box (which is the same apart from the name).
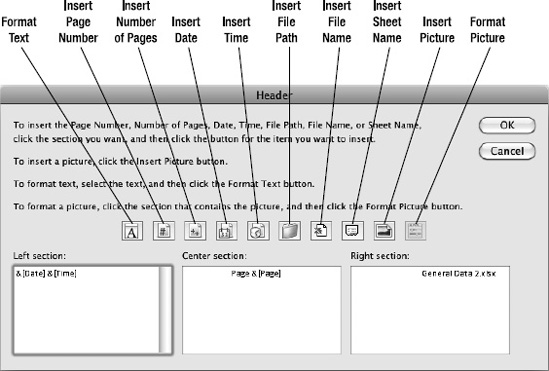
Figure 4–26. Use the Header dialog box or Footer dialog box to enter the text, field codes, or pictures you want in the left section, center section, and right section of the header or footer.
- Click in the Left section box, and then set up the header or footer you need:
- Click a button on the toolbar in the Header dialog box or Footer dialog box to insert a field code (such as &[Date] for the date), a piece of information (such as the sheet name), or a picture.
- Type in any text needed. (You can also type in field codes if you know them—but using the buttons is usually easier.)
- Format the text as needed by selecting it, clicking the Format Text button, and then working in the Font dialog box.
- Click in the Center section box, and then enter the information needed, using the same techniques as in step 4.
- Click in the Right section box, and then enter the information needed.
- Click the OK button to close the Header dialog box or the Footer dialog box. Excel returns you to the Page Setup dialog box, where the Header preview box or the Footer preview box shows the header or footer you just created.
- If you need to change the paper size or orientation, click the Options button to display the different Page Setup dialog box shown in Figure 4–27. Choose the paper size (for example, US Letter) in the Paper Size pop-up menu, and then click the appropriate button in the Orientation area (the left button gives portrait orientation, the right gives landscape orientation). Then click the OK button.
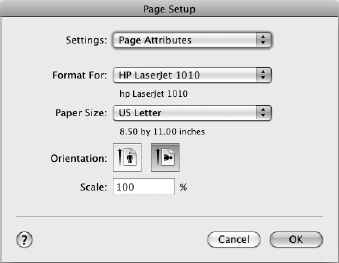
Figure 4–27. In this smaller Page Setup dialog box, you can choose the paper size and orientation for the worksheet.
- When you've finished creating headers and footers, click the OK button to close the Page Setup dialog box.
Adding Headers and Footers Directly on the Worksheet
Instead of using the Page Setup dialog box as described in the previous section, you can add or edit headers and footers directly on the worksheet. To do so, follow these steps:
- If the worksheet is in Normal view, switch to Page Layout view by clicking the Page Layout View button at the left end of the status bar or choosing
View Page Layoutfrom the menu bar. - Scroll the page so that you can see the header area or footer area you want to edit.
- Move the mouse pointer over the header area or footer area so that Excel displays a gray box around it and shows the prompt “Double-click to add header” (see Figure 4–28) or “Double-click to add footer.”
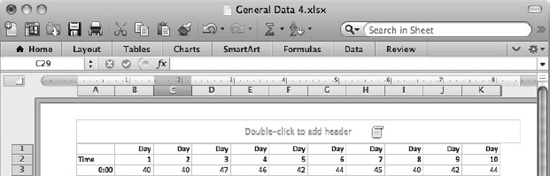
Figure 4–28. In Page Layout view, move the mouse pointer over the header area or footer area, and then double-click to open the area for editing.
- Double-click to open the header area or footer area for editing. Figure 4–29 shows the header area open and editing underway.
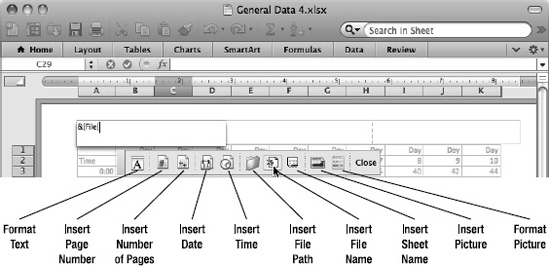
Figure 4–29. When you open the header area or footer area for editing, Excel displays a toolbar of commands for creating headers and footers..
- Click in the area you want to change, and then add the header or footer by following these techniques:
- Click a button on the toolbar to insert a field code (such as &[Date] for the date), a piece of information (such as the sheet name), or a picture.
- Type in any text needed.
- Format the text as needed by selecting it, clicking the Format Text button, and then working in the Font dialog box.
- When you have finished creating or editing the header or footer, click the Close button on the toolbar to close the header or footer. Excel returns you to the worksheet.