
Creating Workbooks from Scratch or from Templates
When you launch Excel, it automatically displays the Excel Workbook Gallery dialog box (see Figure 3–1) so you can create a new workbook or open one you've recently used. In this section, we'll look at how to create a new workbook, either from scratch or based on a template; how to save the workbook in a suitable format; and how to enter information in its properties to make it easier to identify.
NOTE: If you don't want the Excel Workbook Gallery dialog box to open when you launch Excel, select the Don't show this when opening Excel check box at the bottom of the Excel Workbook Gallery dialog box, and then click the Cancel button. To start displaying the Excel Workbook Gallery dialog box again on launch, choose Excel ![]()
Preferences or press Cmd+, (Cmd and the comma key) to display the Excel Preferences dialog box. In the Authoring area, click the General icon to display the General pane. Select the Open Excel Workbook Gallery when application opens check box, and then click the OK button.
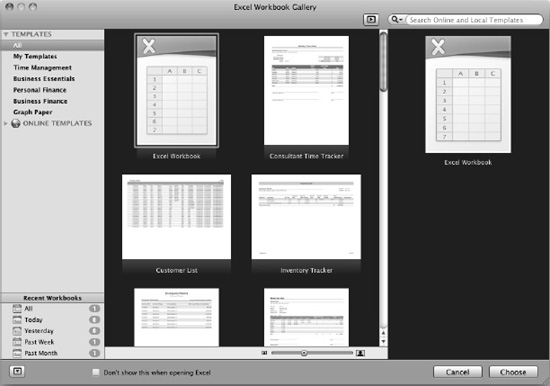
Figure 3–1. From the Excel Workbook Gallery, you can create a blank workbook, a workbook based on a template on your Mac, or a workbook based on an online template. You can also open a workbook you've used recently.
Creating a New Blank Workbook
When you need a new workbook with no contents or formatting, create it in one of these ways:
- Excel Workbook Gallery. Click the Excel Workbook item, and then click the Choose button.
- Keyboard. Press Cmd+N.
- Menu bar. Choose
File
New Workbook.
Creating a New Workbook Based on a Template
To create a new workbook based on a template, you use the Excel Workbook Gallery dialog box (see Figure 3–1). By default, it opens when you launch Excel, but you can also display it at any other time by choosing File ![]()
New from Template from the menu bar or by pressing Cmd+Shift+P.
From here, you can choose the template you want:
- Template on your Mac. To create a new workbook based on a template that's stored on your Mac, follow these steps:
Click the appropriate category in the Templates list in the left pane—or click the All category if you want to see all the templates.
In the middle pane, click the template you want. A preview appears in the right pane. If the workbook has multiple sheets, you can preview them by clicking the Previous (<) button and Next (>) button in the right pane. For an even quicker but smaller preview, move the mouse over the template image in the middle pane.
NOTE: The Excel Workbook item that appears first in the list of templates produces a blank workbook.
Click the Choose button to create a workbook based on the template.
- Online template. To create a workbook based on a template from Microsoft's
Office.comsite, follow these steps:- In the left pane, click the disclosure triangle to the left of the Online Templates item to expand it.
- Click the category of templates you want—for example, Budgets. The middle pane displays the available templates.
- In the middle pane, click the template you want. The right pane displays details about the template.
- Click the Choose button to download the template and create a workbook based on it.
Creating a New Workbook Based on an Existing Workbook
Templates can save you a lot of time if you set them up right, but often the easiest way to create a new workbook is to base it on an existing workbook. To do this, follow these steps:
- Choose
File Opento display the Open: Microsoft Excel dialog box. - Navigate to the existing workbook, and then click it.
- Click the Open pop-up menu, and then click Copy.
- Click the Open button. Excel closes the dialog box and opens a new workbook containing the same contents as the existing workbook.
- Choose
File Saveto display the Save As dialog box, and then save the workbook under a name you specify, just as when you create a new workbook.
NOTE: If you don't choose Copy in the Open pop-up menu in the Open: Microsoft Excel dialog box, you open the original workbook. You can then use the File ![]()
Save As command to save it under a different name or in a different folder—but it's easy to get distracted, forget to use Save As, and then save changes to the original file by mistake.
Saving a Workbook
To save a workbook for the first time, give the Save command in any of the usual ways—by clicking the Save button on the Standard toolbar, by choosing File ![]()
Save from the menu bar, or by pressing Cmd+S. In the Save As dialog box, select the folder in which to save the workbook, type the workbook name, and then click the Save button.
When you save a workbook, Excel selects the file type that's set in the Compatibility preferences pane. If you've chosen the format you want, as discussed in the section “Choosing the Default Format for Saving Workbooks” in Chapter 2, you're all set. If you haven't chosen a different format, Excel uses the format called Excel Workbook, which works well for the four latest versions of Excel—Excel 2011 and Excel 2008 for Mac, and Excel 2010 and Excel 2007 for Windows—but may cause problems with earlier versions..
TIP: If you start recording or writing macros to automate your work in Excel, you'll need to use a workbook format that can contain macros, because the Excel Workbook format can't. Use the Excel Macro-Enabled Workbook format if the workbook is for Excel 2011, Excel 2010 for Windows, or Excel 2007 for Windows; use the Excel 97–2004 format if the workbook is for Excel 2004, Excel 2003, or an earlier version. Excel 2008 for Mac doesn't run macros.
If you need to save the workbook in a different format than the default one, open the Format pop-up menu and click the format you want to use. For example, if you will share the workbook with people who use Excel 2004 for Mac or Excel 2003 for Windows, choose the Excel 97–2004 Workbook format.
NOTE: The latest Excel file format (the one called simply Excel Workbook) is technically superior to the earlier file format (Excel 97–2004 Workbook or Excel 97–2003 Workbook). Using the Excel Workbook format, you can create workbooks containing more worksheets and each worksheet can have many more rows and columns. This file format is also more resistant to data corruption. But for normal-size spreadsheets, such as those most business users and home users create, the earlier file format works just fine.
Protecting a Workbook with Automatic Backups and Passwords
For any workbook that contains valuable data you can't risk losing, it's a good idea to set Excel to create automatic backups.
TIP: Setting Excel to create automatic backups is a good safety measure, but you'll still want to back your valuable workbooks up to media outside your Mac in case the Mac's hard disk crashes. For example, save copies of your workbooks to a USB stick or to an online storage service such as Apple's MobileMe service.
Similarly, you may need to protect important or confidential workbooks with a password. Excel lets you use two different types of passwords:
- Password to open. This is a password that anyone who wants to open the workbook must provide. Without the right password, Excel won't open the workbook. Use a password to open when you want to make sure that only authorized people can open the workbook.
- Password to modify. This is a password that anyone who wants to open the original copy of the workbook must provide. Without the right password, Excel lets you open a copy of the workbook, but not the original file. Use a password to modify when you need to protect a particular workbook against changes but want to allow free access to the information in the workbook.
The best time to put these safety nets in place is the first time you save the workbook. Follow these steps:
- In the Save As dialog box, click the Options button to display the Save Options dialog box (see Figure 3–2).
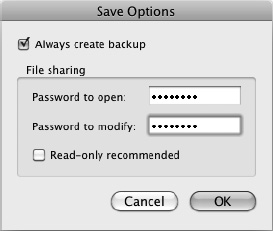
Figure 3–2. In the Save Options dialog box, you can apply a password to open, a password to modify, or both. You can also set Excel to automatically make a backup of the workbook or to recommend that others open it as read-only.
- Select the Always create backup check box if you want Excel to automatically create a backup of this workbook each time you save it.
NOTE: Excel creates the automatic backup by renaming the existing saved version of the workbook with the name “Backup of” and the original filename (for example, “Backup of Office Performance.xlsx”), and then saving the current version of the workbook in a new file. This means the backup is of the previously saved version of the workbook rather than the latest version, but as long as you save frequently, it enables you to recover almost all of your work. Excel keeps the backup file in the same folder as the original file.
- To apply a password to open, type it in the Password to open text box.
- To apply a password to modify, type it in the Password to modify text box.
- If you want to recommend that people open the workbook in a read-only state, so that they can't save changes to it, select the Read-only recommended check box.
CAUTION:Avoid using the Read-only recommended feature. Unless your colleagues are exceptionally amenable, it won't prevent them from editing the workbook. To force them to open the workbook as read-only, give the workbook a password to modify, and don't share it with your colleagues.
- Click the OK button. If you set either kind of password, Excel displays the Confirm Password dialog box (see Figure 3–3) prompting you to enter it again (to make sure you got it right). Type the password, and then click the OK button.
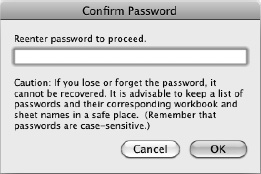
Figure 3–3. Type the password again in the Confirm Password dialog box. If you set both a password to open and a password to modify, the Confirm Password dialog box opens twice—the first time for the password to open (which it calls the “password to proceed”), the second time for the password to modify.
- After Excel returns you to the Save As dialog box, finish saving the workbook as usual.
When you open a workbook protected with a password, Excel displays the Password dialog box. The left screen in Figure 3–4 shows the Password dialog box for a password to open; either you provide the password, or you can't open the workbook. The right screen in Figure 3–4 shows the Password dialog box for a password to modify; here, you can either provide the password and click the OK button to open the workbook for editing, or click the Read Only button without providing the password to open the workbook without being able to save changes to it.
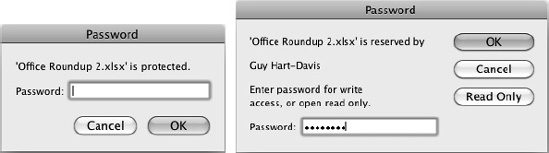
Figure 3–4. When you try to open a workbook protected with a password to open, the Password dialog box requests the password (left). If the workbook has a password to modify, the Password dialog box includes the Read Only button (right), allowing you to open the workbook without providing the password.
To remove the password from a workbook, follow these steps:
- Open the workbook, providing the password when Excel demands it.
- Choose
File Save Asto display the Save As dialog box. - Click the Options button to display the Save Options dialog box.
- Delete the password in the Password to open text box or the Password to modify text box, as appropriate.
- Click the OK button to close the Save Options dialog box. Excel returns you to the Save As dialog box.
- Click the Save button, saving the workbook with its original name and location. Excel displays a dialog box to confirm that you want to overwrite the file.
- Click the Replace button. Excel saves the workbook without the password.
Entering Workbook Properties
If you selected the Prompt for workbook properties check box in the General preferences pane, Excel displays the Properties dialog box automatically when you save a workbook for the first time. As you can see in Figure 3–5, the Properties dialog box contains five tabs: General, Summary, Statistics, Contents, and Custom. You can enter data on only the Summary tab and Custom tab, so start by clicking the Summary tab to bring it to the front.
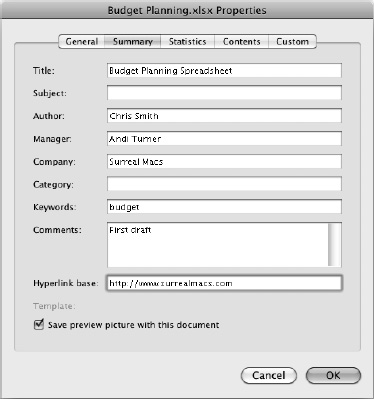
Figure 3–5. Enter the workbook's details in the fields on the Summary tab of the Properties dialog box.
NOTE: The General tab of the Properties dialog box contains readouts for the file name, type (for example, Microsoft Excel Workbook), location (the folder that contains the workbook), created date (when you first saved the workbook), and last-modified date (when you last saved the workbook). Excel doesn't compile this information until you first save the workbook, so the fields will be blank when Excel displays the Properties dialog box automatically when you're saving a file for the first time. The General tab also contains a Read-Only check box and a Hidden check box. The Statistics tab contains readouts of when the file was created, last modified, and last printed; the name of the user who last saved it; the revision number; and the total editing time. The Contents tab contains a list of the document's worksheets, chart sheets, macro sheets, and dialog sheets.
Entering Standard Properties on the Summary Tab
Enter the relevant details in the fields on the Summary tab—the workbook's title and subject, your name, your manager's name, and so on. Excel puts your user name in the Author box but leaves the others up to you. Even if Excel enters your name correctly (rather than something like Authorized User, which may be set as your user name), you may want to change the Author field to include coworkers or a business team—or to put the blame for the workbook on your manager.
NOTE: In the Hyperlink base box, you can enter the URL that forms the basis for hyperlinks in the workbook. For example, if all the URLs start with http://www.surrealmacs.com, enter that URL in the Hyperlink base box. You then need enter only the remaining part of each URL in the worksheet. (For URLs that don't use the hyperlink base, enter the full URL in the worksheet.)
Select the Save preview picture with this document check box if you want Excel to include a preview in the workbook. Saving a preview can make the workbook easier to recognize in Quick Look, and it makes the workbook file only a little larger, so it's usually a good idea.
TIP:You can use Spotlight to search using the Title, Subject, Authors, Keywords, and Comments fields—so you'll probably want to fill in these fields in your workbooks.
Entering Extra Data on the Custom Tab
The fields on the Summary tab are enough to store essential metadata, but if you need to manage your workbooks tightly, you'll want to store more property information in them. To do so, click the Custom tab to display it (see Figure 3–6). Here you'll find a list of built-in properties including Client, Department, Date Completed, and Project. You can also create your own properties.
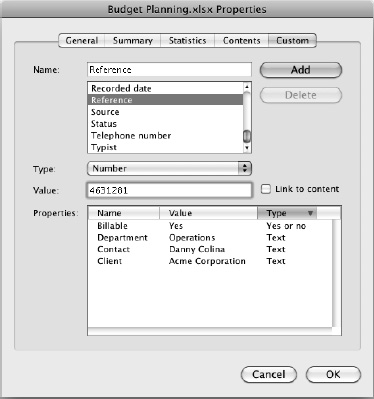
Figure 3–6. On the Custom tab of the Properties dialog box, you can enter data for a wide range of built-in properties or create extra properties of your own. You can also link a property to content in the workbook.
To create custom properties, you type their names in the Name text box. You can also assign to a property the contents of the first cell in a named range in the workbook. This capability enables you to store the contents of specific cells automatically in the properties and thus have them indexed along with the other property information.
To add property information, follow these steps:
- Choose the property:
- If the property is built-in, click its name in the Name list box.
- To create a custom property, type a new name in the Name box.
- In the Type pop-up menu list, select the appropriate type for the property: Text, Date, Number, or Yes or No. This choice isn't relevant if you're linking the property to a range in the workbook.
- Enter the data for the property as appropriate:
- Text, Date, or Number value. Type the value in the Value text box.
- Yes or No. Select the Yes option button or the No option button.
- Information contained in a named range in a worksheet. Select the Link to Content check box. Excel displays a Source pop-up menu that contains the named ranges in the workbook. Select the range from this list.
- Click the Add button. Excel adds the property and data to the Properties list box.
To delete a field, select it in the Properties list box and click the Delete button.
Finding Your Workbooks by Using Properties
When you've entered properties in your workbooks, you can use the property information to identify the workbooks more easily when searching with Spotlight. This is great when you have many workbooks and need to find the right one quickly.
To search using property information in Spotlight, follow these steps:
- Ctrl+click or right-click the Finder icon on the Dock, and then click New Finder Window on the context menu to open a new Finder window. If you don't have any other Finder windows open, you can also simply click the Finder icon on the Dock to open a new window.
- Navigate to the folder where you want to start the search. For example, if you keep all your workbooks in the same folder, select that folder rather than searching your whole Mac and its connected drives.
- Choose
File Findor press Cmd+F to switch to Search mode. - In the Search bar at the top of the window, click the folder you selected in step 2.
- Click the + button at the right end of the Search bar to display a line of controls for setting up the search. Figure 3–7 shows a search window with a search underway.
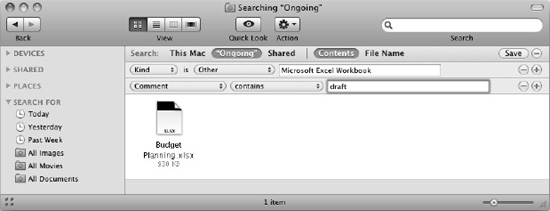
Figure 3–7. After adding property information to your workbooks, you can locate workbooks using their properties.
- On the line of search controls, open the Any pop-up menu, and then click Other.
- Type Microsoft Excel Workbook in the text box that the Finder displays when you select Other in the pop-up menu.
- Click the + button at the end of the first line of search controls to display another line.
- Open the left pop-up menu, and then click Other to display the Select a search attribute dialog box (see Figure 3–8).
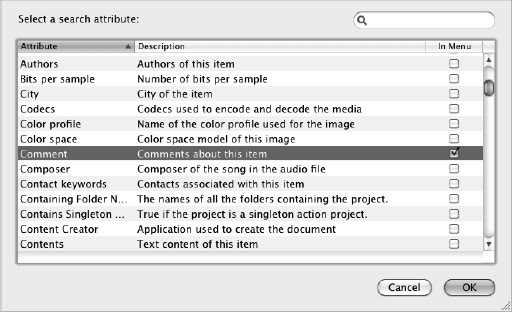
Figure 3–8. In the Select a search attribute dialog box, click the attribute you want to search by. Select the In Menu check box if you want to make the attribute easier to use in searches.
- Click the attribute (in other words, the property) you want to use for the search. Using the Title, Subject, Authors, Keywords, or Comment attributes is usually the best way of finding Excel workbooks for which you've set properties.
TIP:If you will need to search by a particular property frequently, select the In Menu check box on its row to make Mac OS X include the property in the pop-up menu. That way, you won't need to open the Select a search attribute dialog box to reach the property.
- Click the OK button to close the Select a search attribute dialog box. The attribute you selected appears in the pop-up menu.
- Use the remaining controls on the line to specify the comparison. For example, use Title contains budget to search for workbooks whose Title property includes the word “budget.”
- Add any other search criteria needed. For example, you may want to find only workbooks modified in the past two weeks, or ones whose Authors property includes your boss.
As you complete each condition, the Finder window displays the list of matching workbooks. As soon as you identify the workbook you want, you can open it by double-clicking it. Or if you need to look quickly at its contents without opening it, press Spacebar or click the Quick Look button on the toolbar.
TIP:When you've created a search like this, you can save it as a Smart Folder by clicking the Save button in the upper-right corner of the Search window. A Smart Folder is Mac OS X's name for a saved search. In the Save As dialog box that opens, type the name for the Smart Folder and select the folder in which to store it; the default folder, the Saved Searches folder, works well unless you have somewhere better. Select the Add To Sidebar check box if you want to add the Smart Folder to the Search For list in the Sidebar, where you can reach it in moments.