
We continue our trip into the space. As you have realized, we started within the Earth and from the previous recipe onwards, we continue in our spaceship. In this recipe, we visit the constellations.
Another accurate trip to work with constellations is to travel back in time and tell our students how sailors used to guide themselves with stars. However, we are not going to use that kind of trip or going back in time; it's just a tip for you to take into account!
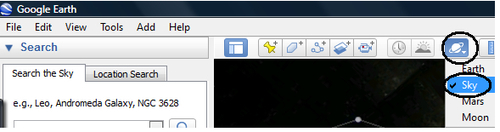
We are going to work with space; therefore, we may use Google Earth.
We click on the planet icon and choose Sky, as shown circled in the following screenshot:
Another option is to use the following website: http://www.astroviewer.com/index.php, which is better because we can embed the map of the constellations. Click on For your website and click on interactive night sky map. Copy the HTML code so as to embed the map in our Moodle course afterwards.
We have just found what to use to work with constellation maps. It is time to design the activity in our trip. We are traveling, and from the window of our spaceship we can see many stars; as you know, these stars together seen from Earth form different constellations.
We work with this map because students can travel in space and see the constellations in 3D. After they explore the universe, they complete a glossary in our Moodle course with the names of the constellations. They add the necessary information about them. Another option would be to design a Database activity instead of a Glossary.
Then, they can play a game in which they have to name the constellation. We can add this game as a final task of our project because they already have the necessary information to recognize the constellations in the sky. Thus, we choose the weekly outline section where we want to place the activity and follow these steps in order to carry out the activity in our Moodle course:
- Click on Add an activity| Glossary.
- Complete the Name and Description blocks.
- Click on the HTML icon. Paste the HTML code that you have copied from the website in order to embed the sky map of constellations.
- Click on Update.
- Click on Save and return to course. The activity looks as shown in the following screenshot:
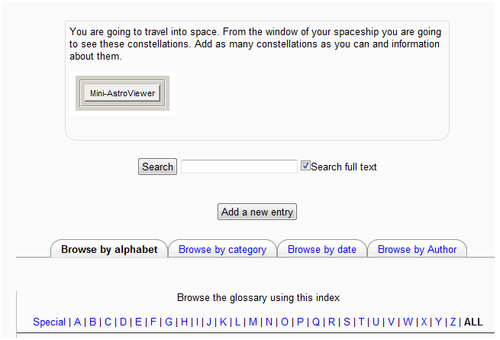
Image credit of the Mini - AstroViewer icon embedded in Moodle course: http://www.astroviewer.com. Copyright by Dirk Matussek.
After so much work, students deserve to play. Therefore, we make a link to a website in which students can play the constellations game. Follow these steps in order to add the resource:
- Click on Add a resource | URL.
- Complete the Name and Description blocks.
- Complete the External URL block within the Content box. Copy the following URL: http://www.kidsastronomy.com/astroskymap/constellation_hunt.htm.
- Click on Save and return to course. The activity looks as shown in the following screenshot:
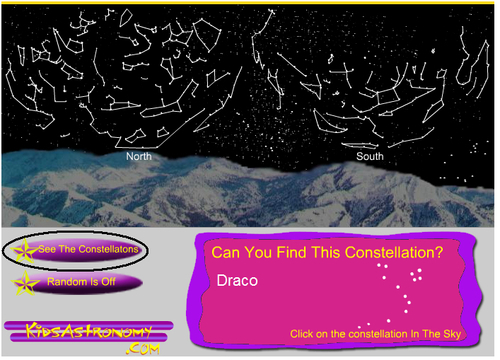
Image credit: http://www.kidsastronomy.com/astroskymap/constellation_hunt.htm.
Whenever you click on See The Constellations, they are seen with the lines in the sky, as shown in the previous picture.