Exploring Different Uses for Custom Fields
In this chapter, we use the example of adding your current mood to your blog posts by using Custom Fields. But you can use Custom Fields to define all sorts of different data on your posts and pages; you're limited only by your imagination when it comes to what kind of data you want to include.
Obviously, we can't cover every possible use for Custom Fields, but we can give you some ideas that you may want to try out on your own site — at the very least, you can implement some of these ideas just to get yourself into the flow of using Custom Fields, and hopefully they can spark your imagination on what types of data you want to include on your site:
- Music: Display the music you're currently listening to. Use the same method we describe in this chapter for your current mood, except create a Custom Field named Music: Use the same code template, just define the key as: $key=“music”; and alter the wording from My Current Mood is: to I am Currently Listening to:.
- Books: Same as the mood or music Custom Field, you can display what you're currently reading by creating a Custom Field named Book and define the key in the code as $key=“book”;, and then alter the wording from My Current Mood is: to I Am Currently Reading:.
- Weather: Let your readers know what the weather is like in your little corner of the world by adding your current weather conditions to your published blog posts. By using the same method that we describe in this chapter, create a Custom Field named Weather and use the same code for the template, just define the key as $key=“weather”; and alter the wording from My Current Mood is: to Current Weather Conditions:.
If you want to get really fancy with your Custom Fields, you can also define an icon for the different metadata displays. For example, using the mood Custom Field, you can add little emoticons (or smiley-face icons that portray mood) after your mood statement to give a visual cue of your mood, as well as a textual one. Follow these steps to add an emoticon to the mood Custom Field that you add in theprevious sections in this chapter:
- Visit the Posts page in the Dashboard.
- Click the title of the post that you want to edit.
- Add a new Custom Field by selecting Enter New from the drop-down list and entering mood-icon in the Name text box.
- Click the Add an Image icon above the Post text box to open the Upload Image window.
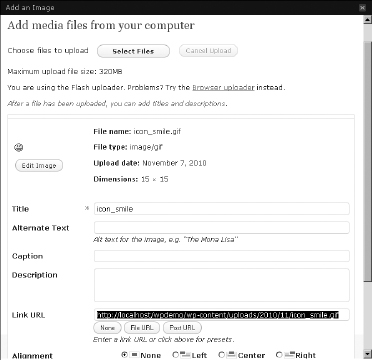
Upload an image from your computer by clicking the Select Files button (see Book IV, Chapter 3 for information on uploading images).
- From the Link URL text box, copy the file URL of the image you uploaded.
You can see the Add an Image window in Figure 5-6.
Figure 5-6: The Link URL in the Add an Image window.
- Click the X in the top-right corner to close the Add an Image window.
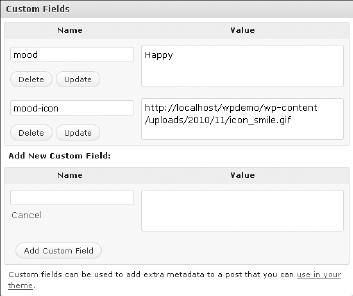
- Paste the Link URL in the Value text box for the mood-icon Name (see Figure 5-7).
- Click the Add Custom Field button.
The Name and Key values are saved.
- Click the Update button.
This step saves the changes in your post and updates it on your site.
- Update the function code in your template file to include the new mood icon.
Follow these steps to add that code:
- Open the Edit Themes page in your Dashboard.
- Click the Single Page (single.php) file.
The single.php template displays in the text box on the left side of the page.
- Locate the code you added for the mood Custom Field.
- Before the closing </strong> HTML tag, add the following line of code:
<img src="<?php $key="mood-icon"; echo get_post_meta($post->ID, $key,
    true); ?>" />
The <img src=“ that precedes the Custom Field code is the HTML tag used to display an image on your site. The “ /> code that appears after the Custom Field code is part of the HTML tag and it closes the <img src=“ HTML tag. We changed the $key to indicate that we're calling the mood-icon Custom Field.
- Click the Update File button to save your changes.
- Visit the post on your site to view your new mood icon.
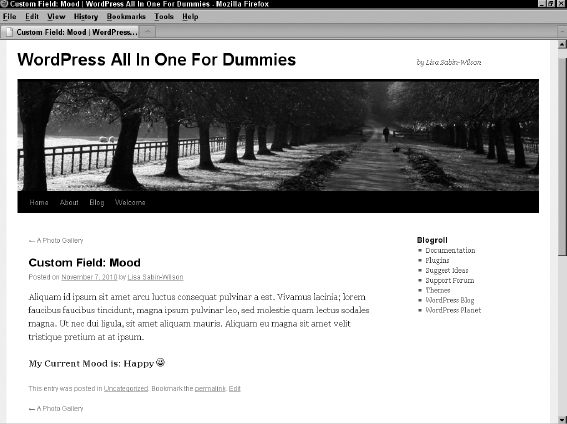
You can see Lisa's mood icon in Figure 5-8.
Figure 5-7: Adding a mood icon.
The entire snippet of code you add in the preceding steps should look like this, when put all together (be sure to double-check your work!):
<?php if ( get_post_meta($post->ID, "mood", true) ) : ?>
<p><strong>My Current Mood is: <?php $key="mood"; echo get_post_
    meta($post->ID, $key, true); ?> <img src="<?php $key="mood-icon";
    echo get_post_meta($post->ID, $key, true); ?>" /></strong></p>
<?php endif; ?>
Figure 5-8: Lisa displays her current mood with a mood icon.