
Creating Shortcodes
You can use the the_content filter to add new sections of content to posts and pages. For example, you can add a form for subscribing to new posts. However, this type of all-or-nothing method of adding content often adds content where it isn't wanted. Using a shortcode is often a much better solution because it offers flexibility and ease of use.
Shortcodes, introduced in WordPress 2.5, can be employed for a wide variety of uses. WordPress includes a shortcode, [gallery], which you can add to any post to display a gallery of images assigned to that post in place of the shortcode. (See Book IV, Chapter 4 on adding photo galleries to you posts.) Many plugins (such as a forum or contact form plugin) use shortcodes to allow the plugin users to designate specific pages for the plugin front end to appear. They can surround sections of content, allowing the code that powers the shortcode to modify the content.
The main features of a shortcode include
- A shortcode can stand by itself. The [gallery] shortcode (built into WordPress) is a good example of this; simply adding [gallery] to the content of a page or post is all that is needed to allow the shortcode to insert a gallery of uploaded images and display them within the body of a post or page.
- A shortcode can support arguments that pass specific information to the code that powers the shortcode. For example, [gallery width=”400” caption=”My Venice Vacation”].
- Shortcodes can be used around a section of content the way HTML tags can. This allows for the code that powers the shortcode to modify specific sections of content, such as [code lang=”php”]<?php the_title(); ?>[/code]. The “code” shortcode doesn't exist by default in WordPress. We build it in the upcoming “Building a simple shortcode” section.
Setting up the plugin structure
This plugin, Example: My Shortcodes, will reside in a directory called /example-my-shortcodes with a main plugin file named init.php.
The reason for the relatively generic name is that we will use this plugin to create multiple shortcodes. To get started, the following plugin header is added to the init.php file. (Follow the same steps you took earlier in this chapter to create the directory and main plugin file.)
<?php
/*
Plugin Name: Example: My Shortcodes
Description: This plugin provides the digg and code shortcodes.
*/
Building a simple shortcode
In many ways, shortcodes are coded like filters (similar to the way we did earlier in this chapter) except that with shortcodes, the content to be filtered is optional. For this shortcode, we won't worry about content filtering or shortcode attributes. This shortcode is about familiarizing you with the shortcode concept.
The shortcode we create in this section is named digg. Adding this shortcode to a post displays a Digg This Post link that allows that post to be submitted to digg.com, a site for keeping track of interesting links.
Creating a shortcode requires two things:
- Shortcode function: A function that will handle the creation of the shortcode and a call to the add_shortcode function.
- Shortcode arguments: The add_shortcode function accepts two arguments: the name of the shortcode and the function used by the shortcode.
To get started with your shortcode, add the following code to the end of the Example: My Shortcodes plugin's init.php file.
function my_digg_shortcode() {
return "<p><a href='http://digg.com/submit?url=".urlencode(get_
    permalink())."&bodytext=".urlencode(get_the_title())."'>Digg This
    Post</a></p>";
}
add_shortcode('digg','my_digg_shortcode'),
![]() HTML links have to follow some rules because only certain characters are permitted. The urlencode function used for both get_permalink and get_the_title ensures that the information added to the link results in a valid link being created.
HTML links have to follow some rules because only certain characters are permitted. The urlencode function used for both get_permalink and get_the_title ensures that the information added to the link results in a valid link being created.
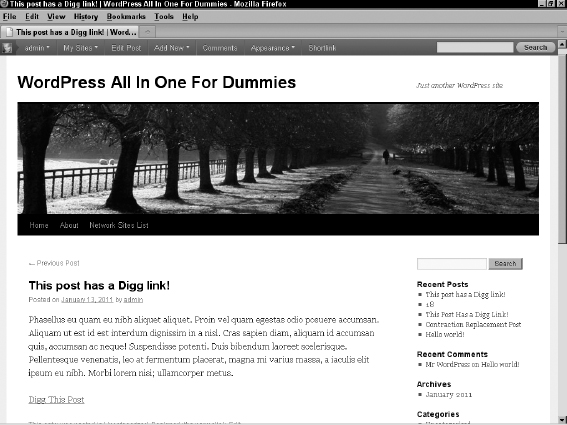
After the changes are saved, make sure that the plugin is active and then add a post that has [digg] in the content. If everything works properly, you should see a Digg This Post link in place of the shortcode when viewing the post on your Web site (see Figure 5-7).
Shortcodes can be displayed depending on specific criteria. It's easy to modify the [digg] shortcode to display the Digg This Post link if an individual post is being viewed rather than a listing, such as the home page or a category archive. The following code shows an updated my_digg_shortcode function that uses the is_single template tag function to return an empty string if an individual post is not being viewed:
function my_digg_shortcode() {
if(!is_single()) return '';

return "<p><a href='http://digg.com/submit?url=".urlencode(get_
    permalink())."&bodytext=".urlencode(get_
    the_title())."'>Digg This Post</a></p>";
}
add_shortcode('digg','my_digg_shortcode'),
Notice the exclamation point (!) in front of the is_single function call. In PHP language, the exclamation point means not. Therefore, the if statement translates to “if the current view is not a single post, return an empty string.” Because the if statement fails when the view is a single post, the original functionality of returning the Digg This Post link is used. The function fires only when a visitor is viewing a single, individual post page, not when they are viewing any other type of page (such as a static page or a category archive page).
Figure 5-7: Digg This Post link added to a post, using the Example: My Shortcodes [digg] shortcode.
Using shortcode attributes
By using attributes, the shortcode output can be customized to meet specific needs without having to rewrite an existing shortcode or create a new one.
The [digg] shortcode, from thepreceding section, is a good example of how an attribute can be used to customize the shortcode output. Notice that the generated digg.com link includes bodytext=. The text added after bodytext= is the default description text for the submitted link, which is the text that displays on your site. The shortcode sends the title of the post (get_the_title). Using an attribute, this behavior can be made default while allowing the user to supply a customized description.
To add the attribute support, the my_digg_shortcode function needs to be updated again. Update the function to match the following:
function my_digg_shortcode($attributes=array()) {
if(!is_single()) return '';

$attributes=shortcode_atts(
array('description'=>get_the_title()),
$attributes
);
extract($attributes);

return "<p><a href='http://digg.com/submit?url=".urlencode(get_
    permalink())."&bodytext=".urlencode($description)."'>Digg This
    Post</a></p>";
}
add_shortcode('digg','my_digg_shortcode'),
We should discuss a few changes. The first change is the addition of the $attributes argument to the my_digg_shortcode function declaration. Without this argument, the shortcode function is unable to receive any of the attributes set on the shortcode. The =array() ensures that the $attributes variable is set to an empty array if the shortcode doesn't have any attributes set.
The call to the shortcode_atts function passes in an array of default attribute values and merges these defaults with the attributes used in the actual shortcode. It then stores this resulting array back to the $attributes variable. Without this section, the attributes will not have a default value. It's a good idea to set the defaults, even if the default is an empty string.
The extract function takes the array of attributes and breaks the information into individual plugins. In this example, it creates the $description variable because that is the used attribute. If a shortcode uses title and id attributes, then using extract will create $title and $id variables.
Finally, because the $description variable holds the description that should be used, the get_the_title function call in the returned string is replaced with the $description variable.
Update your shortcode in the body of your test post (see Figure 5-8) to use this new description attribute. For example:
[digg description="Shortcodes are awesome!"]
After saving the post changes, view the updated post, hover on the Digg This Post link, and you should see a link with the following format:
http://digg.com/submit?url=http://domain.com/testing-shortcodes/&bodytext=Shortcodes+are+awesome!
Adding content to shortcodes
The final piece of the shortcodes puzzle is content. By wrapping a shortcode around a section of content, the shortcode function can modify the content in creative ways.
Going back to the earlier example given for using content with shortcodes, the example we present in this section creates a new shortcode called code. The purpose of this shortcode is to allow designated sections of content to be formatted as code.
To get the new code shortcode running, add the following to the bottom of your plugin init.php file.
function my_code_shortcode($attributes=array(),$content=';) {
if(empty($content)) return '';

$attributes=shortcode_atts(
array('lang'=>''),
$attributes
);
extract($attributes);

$content=str_replace("</p>
<p>","

",$content);
$content=str_replace('<p>','',$content);
$content=str_replace('</p>','',$content);
$content=str_replace('<br />','',$content);

$style='white-space:pre;overflow:auto;';
$style.='font:"Courier New",Courier,Fixed;';

if('php'==$lang) {
$style.='background-color:#8BD2FF;color:#FFF;';
}
else if('css'==$lang) {
$style.='background-color:#DFE0B0;color:#333;';
}
else {
$style.='background-color:#EEE;color:#000;';
}

return "<pre class='$lang' style='$style'>$content</pre>”;
}
add_shortcode('code','my_code_shortcode'),
Before digging into how everything works, save the changes to the plugin and add the following shortcodes to a post:
[code]This is a basic code test[/code]

[code lang="php"]<?php echo "This is PHP code."; ?>[/code]

[code lang="css"]p { color:#FFF; }[/code]
Figure 5-8 shows that these shortcodes produce some fixed-space boxes with different background colors and styling to contain the code.
Figure 5-8: Code added to a post, using the code shortcode.

Now that it's clear what the shortcode is doing, we can tear apart the function to find out how it works. The first line for the [code] shortcode looks like this:
function my_code_shortcode($attributes=array(),$content='') {
Just as it was important to add the $attributes variable to the function declaration to get access to the shortcode attributes, adding the $content variable is needed to access the content of the shortcode. The next line in our code shortcode looks like this:
if(empty($content)) return '';
This line states that if the $content variable is empty, the function returns an empty string because going any further with empty content is unnecessary. The next five lines of the code are
$attributes=shortcode_atts(
array('lang'=>''),
$attributes
);
extract($attributes);
As with the [digg] shortcode, from the previous section, the shortcode_atts function is used to establish some base defaults. By default, the lang attribute is an empty string. The extract function is then used to fill out the $lang variable. The next four lines contain the str_replace function, which we discuss in the “Replacing contractions in your content” section, earlier in this chapter:
$content=str_replace("</p>
<p>","

",$content);
$content=str_replace('<p>','',$content);
$content=str_replace('</p>','',$content);
$content=str_replace('<br />','',$content);
This set of str_replace function calls allows for proper handling of multi-line content by the [code] shortcode. The problem is that WordPress always tries to add the <p> (paragraph) and <br /> (line break) HTML markup tags even when it shouldn't. The str_replace calls replace the separation of two <p> tag sections with two new lines (a new line is represented by the code) and then remove all the remaining <p> and <br /> tags inserted by WordPress. This allows the content to display properly when it is wrapped in a <pre> (preformat for code) tag.
The next two lines of the shortcode deal with CSS styling:
$style='white-space:pre;overflow:auto;';
$style.='font:"Courier New",Courier,Fixed;';
The $style variable stores the basic CSS styling for the [code] shortcode output, and the next few lines add styles for specific types of code:
if('php'==$lang) {
$style.='background-color:#8BD2FF;color:#FFF;';
}
else if('css'==$lang) {
$style.='background-color:#DFE0B0;color:#333;';
}
else {
$style.='background-color:#EEEEEE;color:#000;';
}
This set of conditional code determines the background and text color based on the lang attribute used in the shortcode — php receives a blue background with white text, css receives a khaki background with dark text, and the default is a gray background with black text.
The last line of the function returns the shortcode output by wrapping the content in a <pre> HTML markup tag. The <pre> tag uses the generated style and adds the $lang as a class. The addition of the class allows for more customization through a stylesheet:
return "<pre class='$lang' style='$style'>$content</pre>";
While not everyone needs to display code on their site, this example gives you a large set of options when creating new shortcodes. Through creative use of attributes, content handling, and WordPress's built-in functions, you can create very powerful tools that make managing your site much easier.