
Examining the Main Index and The Loop
Your theme is required to have only two files. The first is style.css. The other is a main index file, known in WordPress as index.php. The index.php file is the first file WordPress tries to load when someone visits your site. Extremely flexible, index.php can be used as a stand-alone file or include other templates. The Main Index template drags your blog posts out of the MySQL database and inserts them into your blog. This template is to your blog what the dance floor is to a nightclub — where all the action happens.
The filename of the Main Index template is index.php. You can find it in the /wp-content/themes/twentyten/ folder.
The first template tag in the Main Index template calls in the Header template, meaning that it pulls the information from the Header template into the Main Index template, as follows:
<?php get_header(); ?>
Your theme can work without calling in the Header template, but it will be missing several essential pieces — the CSS and the blog name and tagline, for starters.
The Main Index template in the Twenty Ten theme calls in three other files in a similar fashion:
- get_template_part( ‘loop’, ‘index’ ); — this function calls in the template file named: loop.php.
- get_sidebar(); — this function calls in the template file named: sidebar.php.
- get_footer(); — this function calls in the template file named: footer.php.
Each of these three functions and template files is covered in upcoming sections of this chapter.
![]() The concept of calling in a template file by using a function or template tag is exactly what the Main Index template does with the four functions for the header, loop, sidebar, and footer templates explained later in this section.
The concept of calling in a template file by using a function or template tag is exactly what the Main Index template does with the four functions for the header, loop, sidebar, and footer templates explained later in this section.
Generally, one of the important functions of the main index is to contain The Loop. In WordPress, The Loop displays posts and pages on your site. Any PHP or HTML that you include in The Loop will repeat for each of your posts that it displays. The Loop is a function that WordPress uses to display the posts, and pages, on your site. The Loop has a starting point and an ending point; anything placed in between is used to display each post, including any HTML, PHP, or CSS tags and codes.
Here's a look at what the WordPress Codex calls “The World's Simplest Index.”
<?php
get_header();
if (have_posts()) :
  while (have_posts()) :
    the_post();
    the_content();
  endwhile;
endif;
get_sidebar();
get_footer();
?>
First, the template starts by opening the php tag. Next, it includes the header, meaning that it retrieves anything contained in the header.php file and displays it. Now the good stuff starts happening. The Loop begins with the while (have_posts()) : bit. Anything between the while and the endwhile repeats for each post that displays. The number of posts that displays is determined in the settings section of the WordPress Dashboard.
If your blog has posts (and most do, even when you first install it), WordPress proceeds with The Loop, starting with the piece of code that looks like this:
if (have_posts()) :
  while (have_posts()) :
This code tells WordPress to grab the posts from the MySQL database and display them on your blog page.
Then The Loop closes with this tag:
endwhile;
endif;
Near the beginning of the Loop template, there is a template tag that looks like this:
if (have_posts()) :
To read that template tag in plain English, it says: If [this blog] has posts.
If your blog meets that condition (that is, if it has posts), WordPress proceeds with The Loop and displays your blog posts. If it does meet that condition (that is, it does not have posts), WordPress displays a message that no posts exist.
When The Loop ends (at the endwhile), the index template goes on to execute the files for sidebar and footer. Although it is simple, The Loop is one of the core functions of WordPress.
 Misplacement of the while or endwhile statements causes The Loop to break. If you're having trouble with The Loop in an existing template, check your version against the original and see whether the while statements are misplaced.
![]() In your travels as a WordPress user, you may run across plugins or scripts with instructions that say something like this: “This must be placed within The Loop.” That's The Loop that we discuss in this section, so pay particular attention. Understanding The Loop arms you with the knowledge you need for tackling and understanding your WordPress themes.
In your travels as a WordPress user, you may run across plugins or scripts with instructions that say something like this: “This must be placed within The Loop.” That's The Loop that we discuss in this section, so pay particular attention. Understanding The Loop arms you with the knowledge you need for tackling and understanding your WordPress themes.
The Loop is no different from any other template tag; it must begin with a function to start PHP, and it must end with a function to stop PHP. The Loop begins with PHP and then makes a request: “While there are posts in my blog, display them on this page.” This PHP function tells WordPress to grab the blog post information from the database and return it to the blog page. The end of The Loop is like a traffic cop with a big red stop sign telling WordPress to stop the function completely.
![]() You can set the number of posts displayed per page in the Reading Settings page in the WordPress Dashboard. The Loop abides by this rule and displays only the number of posts per page that you've set.
You can set the number of posts displayed per page in the Reading Settings page in the WordPress Dashboard. The Loop abides by this rule and displays only the number of posts per page that you've set.
WordPress uses other template files besides the main index, such as the header, sidebar and footer templates. The next section gives you a closer look at a few of them.
Header template
The Header template for your WordPress themes is the starting point for every WordPress theme because it tells Web browsers the following:
- The title of your blog
- The location of the CSS
- The RSS feed URL
- The blog URL
- The tagline (or description) of the blog
In many themes, the first elements in the header are a main image and the navigation. These two elements are usually in the header.php because they load on every page and rarely change. The following statement is the built-in WordPress function to call the header template:
<?php get_header(); ?>
![]() Every page on the Web has to start with a few pieces of code. In every header.php file in any WordPress theme, You'll find these bits of code at the top:
Every page on the Web has to start with a few pieces of code. In every header.php file in any WordPress theme, You'll find these bits of code at the top:
- The DOCTYPE (which stands for document type declaration) tells the browser which type of XHTML standards you're using. The Twenty Ten theme uses <!DOCTYPE html>, which is a declaration for W3C standards compliance mode and covers all major browser systems.
- The <html> tag (HTML stands for Hypertext Markup Language) tells the browser which language you're using to write your Web pages.
- The <head> tag tells the browser that the information contained within the tag shouldn't be displayed on the site; rather, it's information about the document.
In the header template of the Twenty Ten, these bits of code look like the following example, and you should leave them intact:
<!DOCTYPE html>
<html <?php language_attributes(); ?>>
<head>
![]() On the Edit Themes page, click the Header template link to display the template code in the text box. Look closely, and you see that the <!DOCTYPE html> declaration, <html> tag, and <head> tag show up in the template.
On the Edit Themes page, click the Header template link to display the template code in the text box. Look closely, and you see that the <!DOCTYPE html> declaration, <html> tag, and <head> tag show up in the template.
The <head> tag needs to be closed at the end of the Header template, which looks like this: </head>. You also need to include a fourth tag, the <body> tag, which tells the browser where the information you want to display begins. Both the <body> and <html> tags need to be closed at the end of the template, like this: </body></html>.
Using bloginfo parameters
The Header template makes much use of one WordPress template tag in particular: bloginfo();.
What differentiates the type of information that a tag pulls in is a parameter. Parameters are placed inside the parentheses of the tag, enclosed in single quotes. For the most part, these parameters pull information from the settings in your WordPress Dashboard. The template tag to get your blog title, for example, looks like this:
<?php bloginfo('name'), ?>
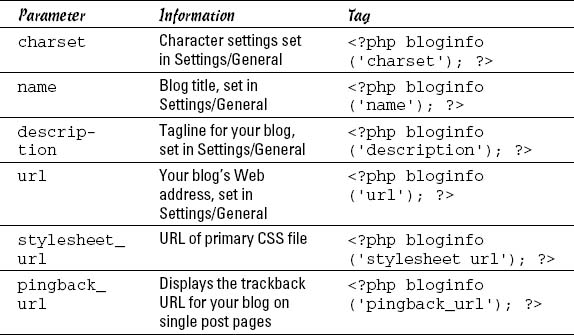
Table 3-2 lists the various parameters you need for the bloginfo(); tag and shows you what the template tag looks like. The parameters in Table 3-2 are listed in the order of their appearance in the Twenty Ten header.php template file, and pertain to the bloginfo(); template tag only.
Table 3-2 Tag Values for bloginfo();
Creating title tags
Here's a useful tip about your blog's <title> tag: Search engines pick up the words used in the <title> tag as keywords to categorize your site in their search engine directories.
The <title></title> tags are HTML tags that tell the browser to display the title of your Web site in the title bar of a visitor's browser window.
Search engines love the title bar. The more you can tweak that title to provide detailed descriptions of your site (otherwise known as search engine optimization or SEO), the more the search engines will love your Blog site. Browsers will show that love by giving your site higher rankings in their results. For more information and tips on SEO with WordPress, see Book V.
The blog <title> tag is the code that lives in the Header template between these two tag markers: <title></title>. In the default Twenty Ten theme, this bit of code looks like this (don't let this code scare you! we promise we'll break it down for you!):
<title><?php
   /*
    * Print the <title> tag based on what is being viewed.
    */
   global $page, $paged;

   wp_title( '|', true, 'right' );

   // Add the blog name.
   bloginfo( 'name' );

   // Add the blog description for the home/front page.
   $site_description = get_bloginfo( 'description', 'display' );
   if ( $site_description && ( is_home() || is_front_page() )   )
     echo " | $site_description";

   // Add a page number if necessary:
   if ( $paged >= 2 || $page >= 2 )
   echo ' | ' . sprintf( __( 'Page %s', 'twentyten' ), max(
   $paged, $page ) );

   ?></title>
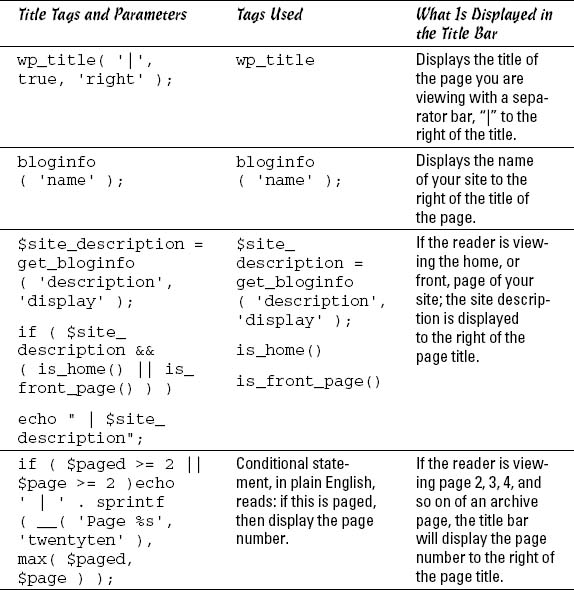
It may help for us to put this example into plain English. The way the Twenty Ten Header template displays the title is based on the type of page that is being displayed — and it shrewdly uses SEO to help you with the browser powers that be. Table 3-3 breaks down what's happening.
Table 3-3 Title Tags and What They Do
![]() The title bar of the browser window always displays your blog name unless you're on a single post page. In that case, it displays your blog title plus the title of the post on that page.
The title bar of the browser window always displays your blog name unless you're on a single post page. In that case, it displays your blog title plus the title of the post on that page.
Within some of the WordPress template tags, such as the <title> tag in the earlier example, you may notice some weird characters that look like a foreign language. You may wonder what » is, for example. It isn't part of any PHP function or CSS style. Rather, it's a character entity — a kind of code that enables you to display a special character in your blog. The » character entity displays a double right-angle quotation mark.
Displaying your blog name and tagline
The default Twenty Ten theme header displays your blog name and tagline on the top of your site, on every page.
You can use the bloginfo(); tag plus a little HTML code to display your blog name and tagline. Most blogs have a clickable title, which is a site title that takes you back to the main page when it's clicked. No matter where your visitors are on your site, they can always go back home by clicking the title of your site in the header.
To create a clickable title, use the following code:
<a href="<?php bloginfo('url'), ?>"><?php bloginfo('name'), ?></a>
The bloginfo(‘url’); tag is your main blog Internet address, and the bloginfo(‘name’); tag is the name of your blog (refer to Table 3-1). So the code creates a link that looks something like this:
<a href="http://yourdomain.com">Your Blog Name</a>
The tagline generally isn't linked back home. You can display it by using the following tag:
<?php bloginfo('description'), ?>
This tag pulls the tagline directly from the one that you set up on the General Settings page in your WordPress Dashboard.
This example shows how WordPress is intuitive and user-friendly; you can do things such as changing the blog name and tagline with a few keystrokes in the Dashboard. Changing your options in the Dashboard creates the change on every page of your site — no coding experience required. Beautiful, isn't it?
In the Twenty Ten templates, these tags are surrounded by tags that look like these: <h1></h1> or <h4></h4>. These tags are <header> tags, which define the look and layout of the blog name and tagline in the CSS of your theme. We cover CSS further in Chapter 4 of this minibook.
Sidebar template
The sidebar template in WordPress has the file name: sidebar.php. The sidebar is usually found on the left or right side of the main content area of your WordPress theme (in the Twenty Ten theme, the sidebar is displayed to the right of the main content area). It is a good place to put useful information about your site, such as a site summary, advertisements, or testimonials.
Many themes use widget areas in the sidebar template. This allows you to display content easily on your WordPress pages and posts. The following statement is the built-in WordPress function to call the sidebar template:
<?php get_sidebar(); ?>
This code calls the Sidebar template and all the information it contains into your blog page.
Footer template
The footer template in WordPress has the file name: footer.php. The footer is generally at the bottom of the page, and contains brief reference information about the site. This usually includes copyright information, template design credits, and a mention of WordPress. Similarly to the Header and Sidebar templates, the Footer template gets called into the Main Index template through this bit of code:
<?php get_footer(); ?>
This code calls the Footer and all the information it contains into your blog page.
The default Twenty Ten theme shows the site title and a statement that says “Proudly powered by WordPress.” You can use the footer to include all sorts of information about your site; however, you don't have to restrict it to small bits of information.