Filtering Content
Now that you know how a plugin is created, it's time to have some fun and create a WordPress plugin that actually does something, and in the process, discover more basics of WordPress plugin development.
A powerful feature of WordPress is its numerous filters. By latching code to a filter, you can modify information as it flows through WordPress, and therefore modify the information WordPress displays or stores.
Imagine that you have a habit of using contractions far too often. Your readership mocks you and your penchant for the commoner practice of merging words together. At night, you worry about whether you missed an instance of it's, we're, or I'll.
It is causing you to lose sleep. You tried listening to the self-help tapes, you review every word and you have been to therapy to find the deep-seated cause of your craving for contractions. Despite your best efforts and the constant ridicule, you cannot help but sound like an etiquette contrarian.
Fortunately, there is a cure. With a simple filter and a bit of code, your grammatical ailment can be disguised easily with a simple WordPress plugin that you create in the next section of this chapter.
Setting up the plugin structure
The plugin we create in this section is Example: Contraction Compulsion Correction that will reside in a directory called /example-contraction-compulsion-correction with a main plugin file named init.php. Apply the same steps to create the directory and main plugin file as you did in the “Creating Your First Plugin” section, earlier in this chapter.
Add the following plugin header to the top of the main plugin (init.php) file:
<?php
/*
Plugin Name: Example: Contraction Compulsion Correction
Description: This plugin cannot solve your contraction issues, but it can
    hide them by fixing them on the fly.
*/
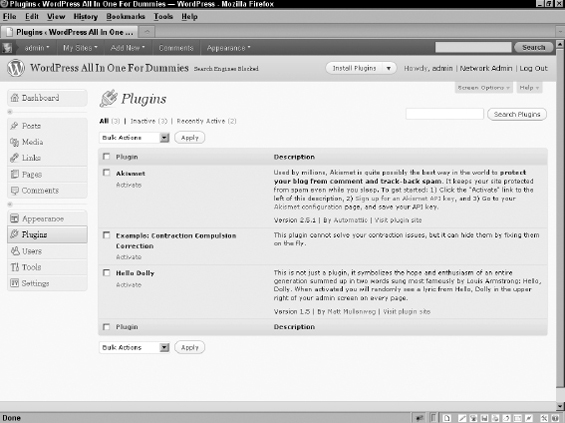
Save the init.php file and then visit the Plugins page in your Dashboard. The Example: Contraction Compulsion Correction plugin appears there, as shown in Figure 5-3.
Figure 5-3: The Plugins page showing your new plugin in the list.
Using curly brackets (complex syntax)
You see curly brackets within code. Curly brackets (referred to as complex syntax in the PHP Manual: http://www.php.net/manual/en/language.types.string.php) serve to open and then close the function definition, or expression. For example, the code samples in thepreceding steps name the function function my_filter_the_content ($content). An open curly bracket, indicating the start of the function expression, immediately follows that line. Immediately after the two lines, $content=”Test content replacement.”; and return $content, that are the expression for the function, is the closing curly bracket that indicates the end of the function expression. Without these curly brackets, your code will not work correctly. Check out the entire PHP manual online at http://php.net/manual to brush up on correct PHP code syntax, including when you need to use single quotation versus double quotation marks and the importance of the semi colon (;).
Testing the filter
The filter we use here is the the_content filter. To make sure that this has the desired effect, we use the filter to replace all the content in your blog posts and pages with a simple message. If the filter works as expected, you can expand it to hide the contractions that you published in your posts (or pages).
![]() The the_content filter is just one of hundreds of available filters in WordPress. You can find information about filters in the WordPress.org Codex (http://codex.wordpress.org/Plugin_API/Filter_Reference).
The the_content filter is just one of hundreds of available filters in WordPress. You can find information about filters in the WordPress.org Codex (http://codex.wordpress.org/Plugin_API/Filter_Reference).
Follow these steps to include the the_content filter in your plugin, which will replace all the content on your Web site (posts and pages) with a single phrase. (We change this in the following section to filter the contractions out of your published content.)
- Connect to your Web server via FTP.
- Browse to this directory / wp-content/plugins/-contraction-compulsion-correction.
- Open the init.php file in your text editor.
- Type the following lines of code at the end of the file (after the plugin header):
- Save your init.php file and upload it to the /wp-content/plugins/-contraction-compulsion-correction folder.
The last line of code in Step 4 tells WordPress to apply the filter after the plugin is activated. The earlier lines of code define the function (function my_filter_the_content ($content)) with a variable ($content), define the $content variable ($content = “Test content replacement.”;), and tell WordPress to return $content ($content was defined in the second line) within the body of your published posts and pages. (Check out the nearby “Using curly brackets (complex syntax)” sidebar about using correct PHP syntax.)
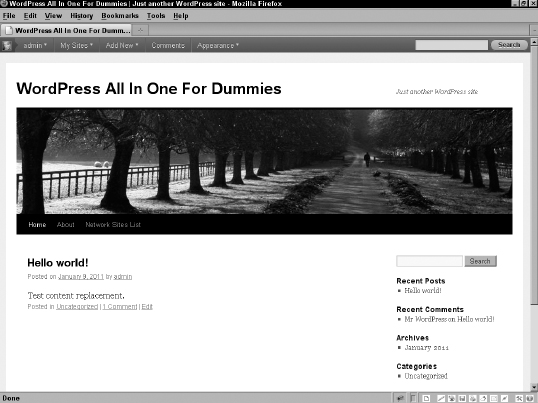
With the the_content filter in place in your plugin, visit the Plugins page in your Dashboard and activate the Example: Contraction Compulsion Correction plugin. After activation, view any post or page on your Web site. The result: Test content replacement replaces the content of that entry. Your new plugin is filtering content on your Web site (see Figure 5-4). In the next section, we apply the real filter that fulfills the purpose of the plugin we're creating.
Figure 5-4: Your plugin filters content on your Web site.
Replacing contractions in your content
To replace all the contractions within your content with the full phrases or words, the following steps take you through the process of changing the code in the init.php plugin file:
- Connect to your Web server via FTP.
- Browse to the / wp-content/plugins/-contraction-compulsion-correction directory.
- Open the init.php file in your text editor.
- Remove the following lines of code:
function my_filter_the_content($content) { $content = "Test content replacement."; return $content; } add_filter('the_content','my_filter_the_content'), - Type the following lines of code at the end of the file (after the plugin header):
function my_filter_the_content($content) { $replacements = array( "isn't" => "is not", "we'll" => "we will", "you'll" => "you will", "can't" => "cannot", ); foreach($replacements as $search => $replace) { $search = str_replace("'","’",$search); $content = str_replace(ucfirst($search),ucfirst($replace),$content); $content = str_ireplace($search,$replace,$content); } return $content; } add_filter('the_content','my_filter_the_content'), - Save your init.php file and upload it to the /wp-content/plugins/-contraction-compulsion-correction folder.
To do the replacement, an array holds the text to search for and to use as the replacement. The array defines the words you're replacing within your content and loops to make all the replacements. In our example, isn't is replaced with is not, we'll is replaced with will not, and so on. Of course, this example only covers a small subset of the contractions. You will have to modify the example to fit your specific contraction compulsions.
![]() The observant developer will notice that there is much more than just a simple replacement going on in the loop. We also use the str_replace function, which replaces all occurrences of the search string with the replacement string.
The observant developer will notice that there is much more than just a simple replacement going on in the loop. We also use the str_replace function, which replaces all occurrences of the search string with the replacement string.
The first replacement ($search = str_replace(“'”,”’”,$search);) is needed because WordPress changes single quotes to a fancy version represented by “’”. This searches for the instances of the single quote, and then $content = str_replace(“'”,”’”,$content); replaces the single quote in the content. This allows the replacements array to have normal-looking searches with regular single quotes.
The third search and replace statement ($content = str_replace(ucfirst($search),ucfirst($replace),$content);) replaces content matches that have an uppercase first letter with a replacement that also has an uppercase first letter.
The last search and replace statement: ($content = str_ireplace($search,$replace,$content);) does a non–case-sensitive search to replace all remaining matches with the lowercase version of the replacement.
To test your contraction replacement plugin, follow these steps:
- Log in to your Dashboard.
- Visit the Add New Post page (Posts
 Add New).
The Add New Post page loads in your Dashboard where you can write and publish a new post (see Book IV, Chapter 1).
- Type a title for your post in the Title text field.
- Type this line of text in the post editor: Isn't it grand that we'll soon be sailing on the ocean blue? You'll see. We'll have a great time. I can't wait.
Notice the contractions Isn't, we'll, You'll, We'll and can't. Figure 5-5 shows our Add New Post page with this phrase added.
- Publish your post by clicking the Publish button.
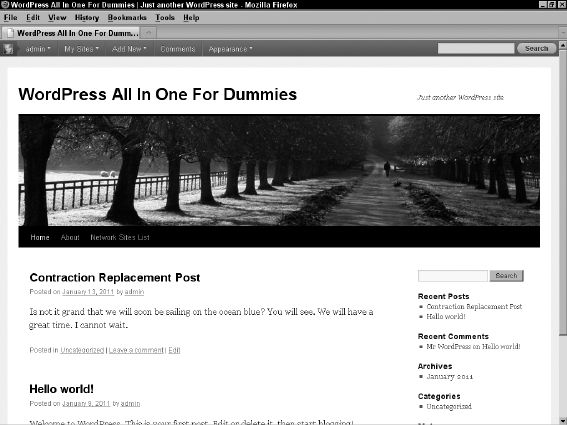
Figure 5-6 displays the post on our Web site with the contractions replaced with the appropriate words, as defined in our plugin function.
Figure 5-5: The Add New Post page with the contractions in place.
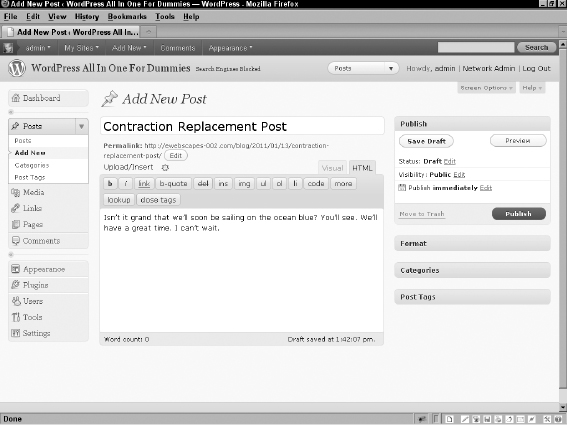
Figure 5-6: The published posts with contractions replaced.