
Setting Default User Permissions
When you enable the network, new site and new user registrations are turned off, by default. However, the Network Admin can add new sites and users from the Network Admin Dashboard. To let users sign up for your network, complete the following steps:
- Click the Network Admin link at the top of the Dashboard and then click the Settings menu link.
The Settings page loads in your browser window.
- In the Registration Settings section, select the User Accounts May Be Registered option (as shown in Figure 4-1).
This allows users to register on your network, assigns them to the main site as a Subscriber, but doesn't allow them to create a new site of their own.
- Click the Save Changes button at the bottom of the page.
 By selecting the option: Both sites and user accounts can be registered on the Network Admin Settings page, you allow users not only to register a new account, but also give them the option to create a new site on your network.
Figure 4-1: User registration options.

User registration
When signing up, users are directed to the main site of the installation and then added to one of the child sites. This site may be their site (if they choose to have a site when registering) or an existing site. If it's any existing site other than the main site, the user must be manually added to that site by the Network Admin, or the user who owns the site (if you have enabled the option under the Network Admin Settings to allow site admins to add new users to their sites).
The registration page (see Figure 4-2) is located at http://yourdomain.com/wp-signup.php. This sign-up page bypasses the WordPress registration page described in Book III, Chapter 4.
Figure 4-2: The network sign-up page.
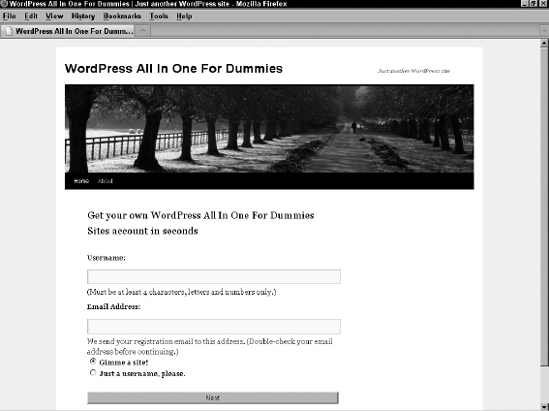
After filling out the form, the user will receive an e-mail with a link to activate her account. When she does so, she can immediately log in and manage her details; she is directed to her primary site, which is the main site or Dashboard site if she has no site to administer.
Users can also be added to existing sites in the network. The Network Admin can always assign users to specific sites on a per-case basis. When Network Admins set up a network, the Allow Site Administrators to Add New Users to Their Site via the “Users à Add New” Page setting (shown in Figure 4-3) allows them to add other users in the network to their sites. Although the Add New Users setting is turned off by default, you can enable it by selecting the box on the Settings page in the Network Admin Dashboard.
Controlling access to sites
The Network Admin has a list of all the sites on the network; by default, other users cannot find other sites in the network. Unless you, the Network Admin, add such ability via plugins, a user cannot navigate from one child site to the next. The only list provided to a user is the Dashboard![]() My Sites menu shown in Figure 4-4.
My Sites menu shown in Figure 4-4.
Figure 4-3: Allowing users to add other users to their site.

Figure 4-4: The My Sites page shows sites the user administrates.

The My Sites page lists only sites the user is the administrator of, not sites on which the user has a lesser role. Additionally, the My Sites menu has a link for the user to create more sites (if the NetworkAdmin has allowed it via the Network Admin![]() Settings menu).
Settings menu).
By default, users can create no sites or an unlimited number of sites. You can limit the number of sites a user can create by installing the Limit Blogs per User plugin.
Follow these steps to limit the amount of sites your users can create:
- Click the Network Admin link located at the top right of your Dashboard.
- Click Plugins
 Add New.
This loads the Install Plugins page in your Network Admin Dashboard.
- In the Search field, add the name of the plugin: Limit Blogs per User.
Be sure that you have ‘term’ selected in the drop-down menu to WordPress Knows to Search by Terms (Not by Author or Tag).
- Click the Search Plugins button.
This reloads the Install Plugins page with a return list of plugins that match the terms you entered in the search field in Step 3 — locate and click the Install Now link for the Limit Blogs per User plugin by Brajesh Singh.
- Click the Network Activate link on the Installing Plugin page.
This action activates the Limit Blogs per User plugin on your network.
- Choose Network AdminSettings.
Scroll to the bottom of the Settings page to the Limit Blog Registrations per User heading (shown in Figure 4-5) and enter the number of sites that you want to limit your network users to (the value of 1 allows users to create no more than 1 site, and so on — additionally a value of 0, or leaving the field empty, will allow users to create an unlimited number of sites in your network).
Importing users
You may have an existing pool of users you want to add to the network; for example, if you had a Web site before your network existed where you collected registrations or sign-ups (even newsletter programs give you a downloadable list of users you can use to import into your network). The Bulk Import Users plugin, available at http://wpmututorials.com/plugins/bulk-import-users, can be used with some plugins mentioned later in this chapter to assign users to various sites in the network. Figure 4-6 shows the Bulk Import Members page with instructions for importing a list of users. Currently, there is no default method of importing users into WordPress without the use of plugins.
Figure 4-5: The Limit Blog Registrations per User option.
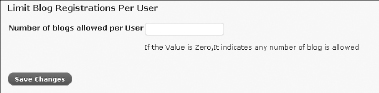
Figure 4-6: The Bulk Import Users plugin.
