
Signing Up and Installing Google Analytics on Your WordPress Site
Because we've pretty much made the decision for you to use Google Analytics, in the following sections, we walk you through the necessary steps to sign up for Google Analytics, install it on your blog, and add the WordPress plugin to your site.
Signing up for Google Analytics
In order to sign up for Google Analytics, follow these steps:
- Go to: www.google.com/analytics and click the Sign Up Now button, which is located on the right side of the page, below the Access Analytics button.
A page where you can sign up for a Google account or sign in via an existing Google account appears. If you don't have a Google account, follow the link to sign up for one.
- Sign in via your Google account by entering your Google e-mail address and password in the text boxes and then clicking Sign In.
The first of a series of walk-through pages appears.
- Click the Sign Up button.
- On the General Information page that appears (see Figure 3-4), enter the URL of your Web site and the name you want to call your account (this really doesn't matter; you can call it your Web site's name) in the appropriate text boxes, and select the country and time zone you're in from the drop-down lists.
- After you fill out this information, click the Continue button.
Figure 3-4: Entering your first URL in Google Analytics.

- On the Contact Information page that appears (see Figure 3-5), enter your first name and last name in the text boxes, and select the country or territory you reside in from the drop-down list.
- After you complete this information, click the Continue button.
The page that appears displays the Google Terms of Service Agreement, which you have to accept.
- Select the check box to accept the Google Terms of Service Agreement.
- Click the Edit Settings link below the terms of service.
After the terms of service, a new page appears where you can select how much of your analytics data is shared with Google. Read through this information and make an informed decision about how much of your data you want to make available. If you use Google Adwords (used for advertising on the Google search and content network), you may want to give permission to allow access to Google products but not third parties because you should be cautious about who has general data about your site after that data is entered in.
- Click the Create New Account button.
On the page that appears, Google Analytics provides you with your Google tracking code.
Figure 3-5: The Contact Information page.

- Copy this code (see Figure 3-6) by selecting it and pressing Ctrl+C.
Paste the Google tracking code into your WordPress blog in the following section. When you've added the tracking code on your site, click the Save and Finish button.
Figure 3-6: Get your Google Analytics code.

Installing the tracking code
After you set up your Google Analytics account and obtain the code to install in your WordPress site, you're ready for the installation. You can install Google Analytics pretty simply by following these steps:
- Go to your WordPress Dashboard and log in.
If you have a theme framework, such as Genesis or Thesis, you can paste the code in the theme's Options page, or if you're using one of the many Google for WordPress plugins, you can paste the code in the Plugin Options page. However, we recommend that you paste the code directly into your footer (the footer.php template file within your theme) because this location works for pretty much all WordPress-designed sites.
- Click the Appearance menu in the Dashboard, and select Editor below the appearance menu header.
The Edit Themes page loads in your browser window.
- From the Templates menu on the right side of the Edit Themes page, click Footer. This shows you the coding for the footer in the text box on the left side.
- Paste the Google Tracking code in the Footer Template file.
Paste the code that you copied by pressing Ctrl+V. Be sure to paste the code before the close body tag (</body>).
- Click Update File.
Figure 3-7 shows an example footer code.
 You have to put this code before the close body tag, not after. If you put it after the close body tag, the code doesn't function.
Figure 3-7: An example footer code.

Verifying that you installed the code properly
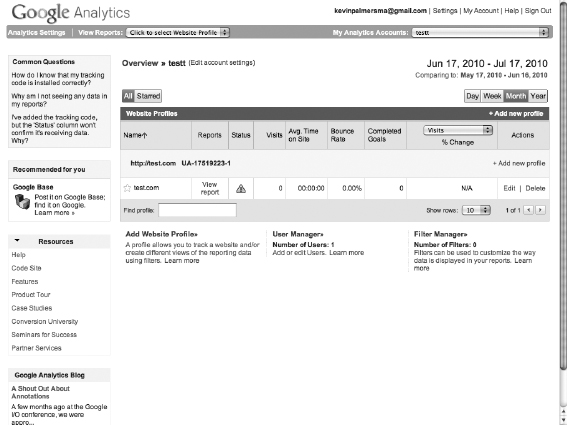
After you install your code, check whether you installed it correctly. When you log back in to Google Analytics, your Dashboard appears (see Figure 3-8). A green check box in the Status column means that you're good to go. A stopwatch icon in that column means that the tracking code has been detected and is waiting for data to report. A yellow triangle (like the one in Figure 3-8) means that Google hasn't picked up the tracking code yet. Verification can take anywhere from minutes to hours, so if it isn't working correctly right away, don't panic. If you don't see the stopwatch icon within 24 hours, try to reinstall the code.
Figure 3-8: Tracking code not working.
Installing and configuring the Analytics plugin
After you install Google Analytics on your WordPress site and make sure that the tracking code is working properly, you can install the plugin so that you can get a basic version of your stats right on your WordPress Dashboard. Just follow these steps:
- Log in to your WordPress account.
Your WordPress Dashboard appears.
- From the Plugins menu, select Add New.
A search box appears so you can search for the plugin.
- In the Search text box, type google analytics dashboard and click the Install Now button.
This takes you to the plugin installation screen.
- Activate the plugin by clicking the Activate plugin button on the Plugin Installation menu.
- On the WordPress Dashboard, select Google Analytics Dashboard in the Settings section.
The screen that pops up asks you to provide your log in information for Google Analytics.
- Enter your information and click Save Options to log in.
A configuration page appears (see Figure 3-9).
- From the Available Accounts drop-down list, select the analytics account from which you want to pull your stats.
- (Optional) Select the check boxes to remove your password and authentication information from Google.
You select these check boxes if you want to deactivate the plugin. If you only select to forget password or forget authentication, you will have to log back in to the menu like in Step 6.
- Specify the level (or role, such as Administrator, Contributor, and so on) of WordPress users who can see the stats by selecting an option from the Dashboard Level drop-down list. This is good for blogs that have multiple authors.
- Label your goals within analytics by entering the titles of your goals in the text boxes.
Goal labels can help people who are tracking specific metrics, such as sales, sign-ups, or other actions, to see if people are converting.
- Click Save Changes.
The plugin appears on your Dashboard.
- Drag and drop the plugin to the position you prefer.
Figure 3-10 shows a WordPress Dashboard with the Google Analytics plugin.
Figure 3-9: The Google Analytics configuration page.

Figure 3-10: Google Analytics on your WordPress Dashboard.

Using the data from the plugin
After you install Google Analytics on your WordPress Dashboard, you can examine the data it provides. Your Dashboard displays two basic groups of stats:
- A general overview: The stats here include the amount of visits, pageviews, pageviews per visit, bounce rate, average time on site, and the percent of new visits. This information gives you a good overview of the base stats of your blog.
- An extended stats section: Stats here include the most popular post over the last 30 days, the top searches that found your site, and the top referrers. These stats show you the most popular content on your site, the ways people are finding your site, and the sources of your traffic. If you want get even more detailed information, go to the Posts section on WordPress (see Figure 3-11), where you can find per-page stats for each of your posts and pages. Each breakdown has a chart, number of pageviews, number of exits, and the number of unique pageviews.
By examining the two data sets, you can get a handle on the traffic that's coming to your blog. We recommend paying attention to the following questions:
- What posts are popular?
- Do the popular posts have a unique theme or type?
- Do long posts or short posts help increase traffic?
- Do videos, lists, or any other type of specific posts give you more traffic than the rest?
The answers to these questions can help you draw various conclusions and adapt your publishing schedule, content type, and writing style to optimize the popularity of your blog.
Figure 3-11: A per-post breakdown, using Google Analytics for WordPress.
