
Discovering the Configuration File
Every WordPress installation contains a configuration file that holds essential data for your Web site to work. The file, wp-config.php, is located in your WordPress installation directory (see Chapter 4 of this minibook). Simply put, your Web site doesn't work if this file is missing or if the data found within the file is incorrect.
More than likely, you haven't even looked at your wp-config.php file yet because when you download the WordPress software, the file is actually wp-config-sample.php. When you install WordPress, the file is renamed wp-config.php and is populated by WordPress with the following information, some of which you may remember from when you installed WordPress, and some that we explain later in this chapter:
- Database name
- Database username
- Database password
- Database host
- WordPress language: English is the default.
- WordPress database table prefix: wp_
- Secret keys
- Absolute path to the WordPress files on your Web server
All this information must be present in the wp-config.php file for your installation to work correctly. If WordPress already works on your site, most likely, your wp-config.php file is correct and functioning beautifully. (See Chapter 4 in this minibook for how to install WordPress.)
Securing the configuration file
As you can probably already guess, hackers find the valuable information stored in the wp-config.php file attractive. If someone with nefarious intent were to get your database username and password, he could log in and undo everything that you've built! Therefore, take whatever steps you can to secure that file so that no one, but you, has access to it. One quick and easy way to do that is to disallow any bots (automated software applications that run on the Internet) access to it and to change the file permissions. To do so, follow these steps:
- Log in to your Web server via FTP, and then locate and open the .htaccess file to edit it.
See Chapter 2 of this minibook for information on File Transfer Protocol (FTP).
Most FTP programs allow you to open and edit a file on the server by right-clicking the filename and choosing Edit. This opens the file in the default text editor on your computer (either Notepad for Windows or TextMate for Mac).
- Add the Deny from all code to the top of the .htaccess file.
This secures the file from being seen by any bots or search engines on the Web:
<Files wp-config.php>
Order Allow,Deny
Deny from all
</Files>
- Save the new .htaccess file and upload it to your Web server.
Your wp-config.php file is hidden from any outside bots or search engines.
- Change file permission (chmod) on wp-config.php to 640.
See Chapter 2 of this minibook for information on file permissions and how to change permissions (chmod) via FTP.
Changing the file permission to 640 ensures that the file can be written (or changed/edited) only by the owner of the file, not by the public; or worse yet, by any automated bots or script programs run by hackers.
Exploring main configuration settings
After the wp-config.php file is nice and secure, you need to know what's stored within it so you can reference it and understand how WordPress hooks into, or communicates with, the database you configured and set up in Chapter 4 of this minibook. Open the wp-config.php file by using your default text editor and have a look inside. The next sections take you through, in detail, the information stored within.
Database information
The database information section of the wp-config.php file contains the database credentials that are required for WordPress to connect to your database. During installation, the WordPress installation script populates this data after you input the database name, username, password, and host in the installation form (see Book II, Chapter 4). The following lines of code show you what this section of the file looks like in its default form:
// ** MySQL settings - You can get this info from your Web host ** //

/** The name of the database for WordPress */
define('DB_NAME', 'database_name_here'),

/** MySQL database username */
define('DB_USER', 'username_here'),

/** MySQL database password */
define('DB_PASSWORD', 'password_here'),

/** MySQL hostname */
define('DB_HOST', 'localhost'),
Secret keys (salts)
Secret keys enhance WordPress security through user authentication with the placement of a cookie in the user's Web browser. They are also referred to as salts, a word commonly used in cryptography to represent random keys, such as in a password. Secret keys in your wp-config.php file make your site harder for outside sources to gain access to because they add random keys to the user password.
These keys aren't populated during the WordPress installation, so after the installation is complete, you need to visit the wp-config.php file to set the keys so that your WordPress installation has unique keys that are different from any other installation — making it more secure because the keys are specific only to your site. By default, the code in the file looks like this:
/**#@+
 * Authentication Unique Keys and Salts.
 *
 * Change these to different unique phrases!
 * You can generate these with the {@link https://api.wordpress.org/secret-key/1.1/
    salt/ WordPress.org secret-key service}. You can change these at any point in
    time to invalidate all existing cookies. This will force all users to have to
    log in again.
*
* @since 2.6.0
*/
define('AUTH_KEY', 'put your unique phrase here'),
define('SECURE_AUTH_KEY', 'put your unique phrase here'),
define('LOGGED_IN_KEY', 'put your unique phrase here'),
define('NONCE_KEY', 'put your unique phrase here'),
define('AUTH_SALT', 'put your unique phrase here'),
define('SECURE_AUTH_SALT', 'put your unique phrase here'),
define('LOGGED_IN_SALT', 'put your unique phrase here'),
define('NONCE_SALT', 'put your unique phrase here'),
Follow the directions in the file and visit the WordPress secret-key service Web page (https://api.wordpress.org/secret-key/1.1/salt; be sure to refresh this page a few times to make sure that you get unique keys) to obtain the keys that you need to replace the existing defaults (represented in the wp-config.php file by the lines that start with define. Copy the keys from the Web page and then replace the eight lines of default (blank) keys in your wp-config.php file. After you do that, this section of the file looks like this (except with your own, unique secret keys):
/**#@+
 * Authentication Unique Keys and Salts.
 *
 * Change these to different unique phrases!
 * You can generate these with the {@link https://api.wordpress.org/secret-key/1.1/
    salt/ WordPress.org secret-key service}. You can change these at any point in
    time to invalidate all existing cookies. This will force all users to have to
    log in again.
*
* @since 2.6.0
*/
define('AUTH_KEY','OkjsE|hTe1A#+yK*;zWOh_~we{X}(uX=TUXtV`WC9Owz_eA@c_
    LKH-Le;qKDPcn'),

define('SECURE_AUTH_KEY','mGt;>cS&Gn,weoFIoJts[.+8bm$Qk|+|a|]>u<TLQRJBH2_
    eb>$TDk{ru&:|$5b'),

define('LOGGED_IN_KEY','N13G3G^n8w%B4Nge)|V6TyI!S^Td!u|6_]}8kVSDB]p|@fTu=%>)
    M<s>%|t<qJb'),

define('NONCE_KEY','pOj/Uj?&+AJVO9SnRhr<e8:dO+A8>XgSO5SuUYpvkjy@%O:Hi
    < Z->|!~YIA+Yq'),

define('AUTH_SALT','8c%^y1/Kts3(I|N9/:`DM(j+qx.rKQh+I##E~e!Oq7|
    @p5j^D1:Yic+GQtlX>d'),

define('SECURE_AUTH_SALT','!$Fi=K0jfK([;1x~EzN,QQOja_y5a|oxl_On~7AIT&8<dE:)
    M|DGc?Cb:sQiTor'),

define('LOGGED_IN_SALT','N&j*A6khkJb}DhN>)+||e2}(:^Oo+mw!~DV0V;3W:75C|KCrHK[)
    7th_w:3%Fqe'),

define('NONCE_SALT','xscOi.7I=%1;=-{mWjN=+gN03].RjLR6|ZpvbZt@
    bqK{p$2p;M.%,&i#9U8SLZ'),
![]() You can change the secret keys any time by editing the wp-config.php file and replacing the keys with new ones. Doing so doesn't affect the functioning of your Web site, but it does require that users log in to your site again, if they were already logged in, because changing the keys changes user authentication and retires the cookies that had already been placed in their browsers.
You can change the secret keys any time by editing the wp-config.php file and replacing the keys with new ones. Doing so doesn't affect the functioning of your Web site, but it does require that users log in to your site again, if they were already logged in, because changing the keys changes user authentication and retires the cookies that had already been placed in their browsers.
Default language
English is the default language for every WordPress installation; however, you can use any of the language translations currently available for WordPress by changing the WPLANG parameter in the wp-config.php file. By default, the WPLANG parameter looks like this:
/**
* WordPress Localized Language, defaults to English.
*
* Change this to localize WordPress. A corresponding MO file for the chosen
    language must be installed to wp-content/languages. For example, install
    de.mo to wp-content/languages and set WPLANG to 'de' to enable German
    language support.
*/
define ('WPLANG', ''),
We don't have the room to list the all the available languages, but you can find the specifics at the WordPress Codex page (http://codex.wordpress.org/WordPress_in_Your_Language), which lists all the languages you have access to, including the language code. If you want WordPress translated into French, for example, look up the language code on the Codex page. You can see that the code is fr_FR. To use French rather than English, you change the WPLANG parameter to:
define ('WPLANG', 'fr_FR'),
Then save the file and upload it to your server. Your WordPress Dashboard (see Book III) displays in the French language, rather than the default English.
Database table prefix
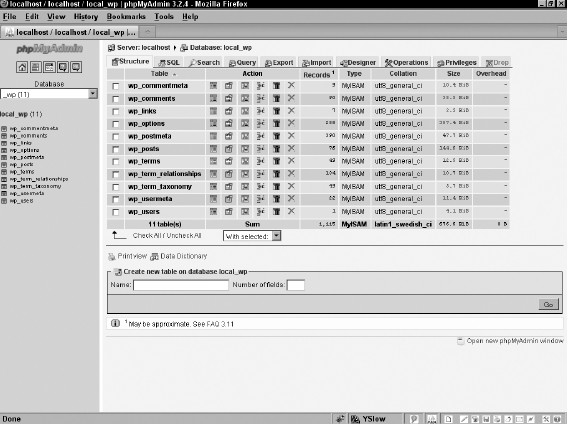
By default, when installing WordPress, you're asked for the database table prefix and given the wp_ default prefix. This is how the tables in the database are defined and called by the different WordPress functions in the code. Figure 5-1 shows Lisa's WordPress database displayed in phpMyAdmin (a database administration interface), which displays all the tables in Lisa's WordPress installation with the wp_ prefix.
Here's how the database table prefix definition looks in the wp-config.php file:
/**
* WordPress Database Table prefix.
* You can have multiple installations in one database if you give each a unique
    prefix. Only numbers, letters, and underscores please!

*/
$table_prefix = 'wp_';
Figure 5-1: phpMyAdmin displaying WordPress database tables.
During the installation process, you can change the default wp_ prefix to anything you want. In fact, most security experts recommend that you change the database prefix because WordPress is a big target for hacking (malicious scripts, spam, and so on). Web bots and spiders can be set to look for the usual WordPress default settings and attempt to exploit them. The wp_ database table prefix is one of those obvious default settings, so to safeguard your installation, change the prefix to anything you choose. However, keep in mind that if you change the prefix, you need to change it to something very difficult for a script or an automated program to guess. Treat the prefix like a password and make it a random string of letters and numbers — something like sd30df43xxi54_. Just be sure that it's unique and difficult to guess.
![]() If you didn't change the table prefix during installation, you can go back and do it later if you want to. You will need to edit the $table_prefix line in the wp-config.php file. Also, you'll need to alter the table names in your database by accessing the database administration interface provided by your Web hosting provider (like phpMyAdmin, for example) and by renaming the tables to replace the wp_ prefix with the one you defined in the wp-config.php.
If you didn't change the table prefix during installation, you can go back and do it later if you want to. You will need to edit the $table_prefix line in the wp-config.php file. Also, you'll need to alter the table names in your database by accessing the database administration interface provided by your Web hosting provider (like phpMyAdmin, for example) and by renaming the tables to replace the wp_ prefix with the one you defined in the wp-config.php.
![]() The underscore after the table prefix isn't required but is recommended practice to make the database tables easier to read and sort. Refer to Figure 5-1 and you see that the tables are named like this: wp_commentmeta, wp_comments, and so on. Placing the underscore after the prefix makes for easier reading and a more organized looking database. Reading a database can be confusing enough, so make it easy on yourself and use the underscore if you choose to change the database table prefix.
The underscore after the table prefix isn't required but is recommended practice to make the database tables easier to read and sort. Refer to Figure 5-1 and you see that the tables are named like this: wp_commentmeta, wp_comments, and so on. Placing the underscore after the prefix makes for easier reading and a more organized looking database. Reading a database can be confusing enough, so make it easy on yourself and use the underscore if you choose to change the database table prefix.
Absolute WordPress path
The configuration file defines the absolute path, or the full directory path on your web server, to the WordPress files on your Web server. This is called once when WordPress is executed and tells the Web server where, within your directory, it needs to look for the core files to successfully run WordPress on your site. The code that defines the absolute path in the wp-config.php file looks like this:
/** Absolute path to the WordPress directory. */
if ( !defined('ABSPATH') )
define('ABSPATH', dirname(__FILE__) . '/'),

/** Sets up WordPress vars and included files. */
require_once(ABSPATH . 'wp-settings.php'),
Moving the /wp-content directory
Another directory in your WordPress installation that's attractive to hackers is the /wp-content folder. Hackers sometimes attack this directory because it holds all your theme and plugin files. If a hacker can exploit any of the code found within those files, she can gain control of your Web site, or at the very least, mess it up a lot.
You can move the /wp-content directory to a location on your Web server outside the WordPress installation directory, making it a lot harder, if not impossible, for outside hackers to locate. To move the folder, create a new folder on your Web server outside the WordPress installation directory and then, using your FTP program, drag and drop the /wp-content folder to the new one you just created. In most popular FTP programs, you can right-click with your mouse and choose New Folder, which allows you to create a new folder and give it a name.
When you move the /wp-content folder, you need to define the new location in the wp-config.php file so that WordPress knows where to find those necessary files. You can define the new path to the /wp-content folder by adding these lines of code to the wp-config.php file (replacing newfolder with the name of the folder you just created):
define ('WP_CONTENT_DIR', $_SERVER['DOCUMENT_ROOT'].' /newfolder/wp-content'),
define ('WP_CONTENT_URL', 'http://yourdomain.com/newfolder/wp-content'),
Tweaking the configuration file for optimization
Adding a few bits of code to your wp-config.php file can change some of WordPress's default behaviors and improve the speed at which your site loads. In this section, I describe a few of the most popular configuration tweaks.
Post revisions, autosave, and trash handling
WordPress autosaves revisions of your posts and pages, and you can send posts and pages to the trash can, instead of completely deleting them. You visit the trash can and permanently delete your posts or pages. This extra step is a safeguard in case of mistakes. (We give you the details about this in Book IV.)
In terms of the post revisions, by default, WordPress saves unlimited revisions and sometimes, depending on how often you edit and reedit posts and pages, the saved revision list can get pretty long. You can limit the number of revisions that WordPress will save by adding the following line to the wp-config.php file:
define ('WP_POST_REVISIONS', 3); // limit number of revisions to 3
You can also completely disable the default revision feature by adding this line to the wp-config.php file, on its own line:
define ('WP_POST_REVISIONS', false); // disable post revisions
WordPress creates these revisions through the Autosave feature. By default, WordPress automatically saves a post revision every minute. If you take a long time to write a post, you could rack up dozens of post revisions, which are stored in the database and take up room. You can change the autosave interval by adding this code to the wp-config.php file on its own line (this code changes the autosave interval to 160 seconds, specifically — you can choose any time interval you want):
define ('AUTOSAVE_INTERVAL', 160); // in seconds
The Trash feature in WordPress gives you a safeguard against permanently deleting posts by mistake. In Book IV, you find that you can send a post or a page to the trash and that this action doesn't permanently delete it; instead, WordPress stores it in a virtual trash can. (Windows users can think of it as the Recycle Bin.) You can visit the trash can any time and permanently delete the post or page, or you can leave it there and WordPress automatically empties the trash can every 30 days. If you want to adjust this time interval, you can add the first line of code to force WordPress to empty the trash weekly, or the second line to disable the trash feature, completely, as follows (on its own line):
define('EMPTY_TRASH_DAYS', 7); // empty trash weekly
define('EMPTY_TRASH_DAYS', 0); // disable trash
Site and WordPress installation Web address
As we discuss in Book VI, one of the most common template tags for use in a theme is the bloginfo(); tag, which has several parameters you can use to call different bits of information about your site (like the site name and description, for example). You then can call in different theme template files and graphics (or images) into your theme. For example, the URL of your Web site can be defined in your template files with the following template tag:
<?php bloginfo('url'), ?> // Site URL
![]() In Book VI, we cover template tags and parameters in detail.
In Book VI, we cover template tags and parameters in detail.
That template tag tells WordPress to communicate with the site database, locate the site URL, and return it back to the template or plugin file that's making that database call. You can greatly reduce the number of database calls (thereby, speeding up your site) by defining the site URL in the wp-config.php file by inserting the following two lines on their own lines (replacing yourdomain.com with your actual domain name, of course):
define ('WP_HOME', 'http://yourdomain.com'), // site address
define ('WP_SITEURL', 'http://yourdomain.com'), // wordpress address
With these two lines in place in the wp-config.php file, whenever WordPress comes across a template tag that requests your site URL, it won't need to reach out to your database to discover what that URL is because it's defined in the file structure within the wp-config.php file. This reduces the number of calls to the database, which, in turn, reduces the resources your site uses on the Web server to display your Web site to your visitors.
Template and stylesheet path
Just as with the site URL from the preceding section, many themes and the WordPress core code look for your WordPress theme template and stylesheet directory through the following WordPress template tags:
<?php bloginfo('template_directory'), ?> // template directory
<?php bloginfo('stylesheet_directory'), ?> // stylesheet directory
Once again, you can significantly reduce the number of calls to the database for the template and stylesheet directories by directly defining them in your wp-config.php file. To do so, add these two lines of code (replace absolute/path/ with your own server path and replace /themefolder with the name of the theme folder you use currently) on their own separate lines:
define('TEMPLATEPATH', '/absolute/path/to/wp-content/themes/themefolder'),
define('STYLESHEETPATH, '/absolute/path/to/wp-content/themes/themefolder'),
As with the site URL in the preceding section, having these two lines of code in your wp-config.php file defines the file path within the file structure in the wp-config.php file, so that WordPress doesn't need to make an additional call to the database to discover what the absolute and stylesheet paths are.
Increasing PHP memory limits
Most Web hosting providers limit the amount of memory any one PHP script or program file can use on the Web server at any given time. PHP is at the core of WordPress (see Book II, Chapter 3), and by default, WordPress attempts to set the PHP memory limit to 32MB. However, if you see PHP memory limit errors on your Web site, such as
PHP Fatal error: Allowed memory size of 33554432 bytes exhausted
     (tried to allocate 6233929 bytes) ...
The PHP memory limit needs to be increased to run the PHP script or file. That memory limit error tells you that the PHP script was attempting to allocate 64MB of memory; however, the allowed memory size set by the server is limited to 32MB, which is the reason for the error.
To help resolve the PHP memory limit errors, within the wp-config.php, define the maximum amount of memory that PHP can use by writing one of these three lines of code, depending on how much memory you allow PHP to use on your site, and adding it to the wp-config.php file on its own line:
define ('WP_MEMORY_LIMIT', '64m'), // increase limit to 64M
define ('WP_MEMORY_LIMIT', '96M'), // increase limit to 96M
define ('WP_MEMORY_LIMIT', '128M'), // increase limit to 128M
 Some hosting providers disable the ability to increase PHP memory limits on your Web hosting account, so depending on your hosting environment, your attempts to increase the memory limit may not work. If you discover this is the case for your particular hosting account, you can contact your host and ask him to increase the PHP memory limit for your account or switch to a different hosting provider.