
Exploring Different Listening Tools
You can find tons of different types of monitoring or listening tools that oversee the social-media space. If you work for a large company, you can use large, paid tools such as Radian 6 (www.radian6.com), Sysomos (www.sysomos.com), Alterian (www.alterian.com), Lithium (www.lithium.com), or others. Pricing for these tools runs from a few hundred dollars to the tens of thousands per month. Most individuals and small businesses can't make that investment. If you're one of the smaller guys, you can create your own monitoring service right in WordPress by importing free monitoring tools into your Dashboard to create a social-media listening hub.
Some monitoring tools pick up blog coverage, Twitter remarks, and message board comments. Others pick up content created around video and pictures. Try out these different monitoring services and determine which give you the best results and which make you feel the most comfortable. Then choose the best tools to create a good monitoring mix. One solution probably can't cover everything, so experiment with different combinations of tools.
![]() Most, but not all, of these tools use Boolean search methods, so you need to understand how to narrow down your searches. If you want to combine terms, put an AND between two items (for example, cake AND pie). If you use OR, you can broaden your search — for example, to track common misspelling (MacDonalds OR McDonalds). Finally, if you want to exclude terms, you can use the NOT operator to exclude items from your search. Use NOT if you want to exclude a company or a blog with the same name that writes about a different topic (for example, Afghan NOT blanket, if you are blogging about Afghanistan).
Most, but not all, of these tools use Boolean search methods, so you need to understand how to narrow down your searches. If you want to combine terms, put an AND between two items (for example, cake AND pie). If you use OR, you can broaden your search — for example, to track common misspelling (MacDonalds OR McDonalds). Finally, if you want to exclude terms, you can use the NOT operator to exclude items from your search. Use NOT if you want to exclude a company or a blog with the same name that writes about a different topic (for example, Afghan NOT blanket, if you are blogging about Afghanistan).
Although some of the monitoring tools in the following sections don't apply to every type of Web site, we would include these tools in most monitoring setups.
Monitoring with Google Alerts
Most social-media experts widely consider Google Alerts (www.google.com/alerts) a must-use monitoring source for anyone dabbling in social media. Google Alerts allows the user to set up monitoring on news sites, blogs, pictures, videos, and groups. You can toggle the amount of results you see from 20 to 50; and you can choose how often they come in, either in real time, daily, or weekly. You can have Google deliver your alerts to your e-mail or via RSS.
Google Alerts isn't perfect, but it doesn't have many drawbacks. Some of the specialized searches (such as Boardreader, which targets message boards) pick up more around their areas of expertise than Google Alerts does, but in general, and compared to other tools, Google Alerts covers the widest range of content.
You can easily set up Google Alerts by following these steps:
- Navigate to www.google.com/alerts in your Web browser.
A page loads, welcoming you to the Google Alerts Web site.
- In the Search Terms text box, type in the keyword or phrase that you want to monitor.
If you enter a phrase in which the words have to go together in that particular order, put the phrase in quotes.
- From the Type drop-down list, select the type of monitoring that you want to use.
The options send you different kinds of alerts:
- Everything: All types of Internet content available
- News: Only news sources
- Blogs: Blog sources
- Discussions: Discussion sources, such as social media
We suggest that you select Everything so that you receive alerts in all areas of Internet content available on the Web. This gives you wider coverage in regards to your tool.
- Select the frequency of updates in the How Often drop-down list.
Because you'll receive the updates via RSS and not e-mail (which you set up in Step 6), you want the highest frequency possible. So, select As-It-Happens.
- From the Volume drop-down list, select the amount of items you want to appear in each update.
If you selected As-It-Happens in Step 4, you receive items in real time, so you don't need to specify the amount of items.
- Select your delivery type in the Deliver To drop-down list.
To make the delivery source an RSS feed, as opposed to an e-mail, select Feed.
- Click the Create Alert button.
Your Google Alert Management screen, where you can get the RSS feeds for all your Google Alerts, appears.
- To get the URL of the RSS feed, right-click the Feed hyperlink next to the orange RSS icon and select Copy Link Location from the pop-up menu that appears.
- Paste the copied link location into a document in which you list all the feeds that you plan to aggregate later.
- Repeat Steps 2 through 9 for all the terms you want to monitor.
![]() Before you start importing the feed into your WordPress Dashboard, you might want to receive the update via e-mail for a few days to test out the quality of the results you're getting. Starting with e-mails allows you to fine-tune the keywords you use and gives you the ability to test out and narrow down what you want to monitor. Doing this saves you the time of parsing all your RSS feeds, blending them all together, and then having to go back and edit everything because they are set up wrong. Using the e-mail as a test is a massive timesaver.
Before you start importing the feed into your WordPress Dashboard, you might want to receive the update via e-mail for a few days to test out the quality of the results you're getting. Starting with e-mails allows you to fine-tune the keywords you use and gives you the ability to test out and narrow down what you want to monitor. Doing this saves you the time of parsing all your RSS feeds, blending them all together, and then having to go back and edit everything because they are set up wrong. Using the e-mail as a test is a massive timesaver.
Tracking conversations with Social Mention
Social Mention (http://socialmention.com) allows users to track and measure what social-media users are saying about any topic. It measures over 100 social-media Web sites, including Twitter, Facebook, FriendFeed, YouTube, Digg, and others.
Social Mention also tracks the sentiment of posts. Sentiment scores refer to how the post was written — whether the post has a negative, neutral, or positive tone. Social Mention is the only free tool right now that features sentiment scoring.
You can set up monitoring on Social Mention by following these steps:
- Navigate to http://socialmention.com in your Web browser.
The Social Mention Web site loads in your browser window.
- In the text box on the main page, enter the search term you want to monitor and select where you want to monitor it from the drop-down list.
Don't click the Create an Alert link, which allows you to set up an e-mail alert.
The options available in the drop-down list include
- All
- Blogs
- Microblogs
- Networks
- Bookmarks
- Comments
- Events
- Images
- News
- Videos
- Audio
- Questions
- Click the Search button.
A new screen appears, displaying the RSS feed for your search results on the right side of the page.
- Right-click the RSS Feed link next to the orange RSS icon and select Copy Link Location from the pop-up menu that appears.
- Paste the link location into a document in which you list all the feeds that you plan to aggregate later.
Social Mention is a little different than the other free tools because it has sentiment analysis built into its page. Although this information doesn't get pulled in via RSS feed, you still may want to occasionally look at it because it displays the sentiment around your site. Sentiment score rates content around your site by grading it positive, negative, and neutral. Although automated sentiment score is often imprecise, this gives you a good general idea of how your site is perceived. On the left side of Social Mention's search results, a few statistics around the search term you entered into the site search appear:
- Strength: The likelihood that users are talking about your term in social media; the higher number, the better for this measure.
- Sentiment: The ratio of positive mentions versus negative mentions of the search term.
- Passion: The measurement of people who mention your search term and those who do so repeatedly. A higher number means that people who mention that search term do it more than once on a regular basis.
- Reach: Based on the unique influence of authors who are generating content around your search term.
Below each statistical section, more detailed stats appear, which show how often users talk about your search term in social media and how many people are mentioning it. First, your Average Time Per Mention displays how often users talk about that phrase. Next, the Last Mention shows when your keyword was last mentioned in social media. Finally, the Number of Unique Authors who have talked about your search term appears, as well as the Number of Retweets.
Social Mention also shows the sentiment scores related to the search term you entered — the total positive mentions, neutral mentions, and negative mentions. If you scroll down the page, you can see bar graphs for the top keywords used, the top users covering this area, the top hashtags used on Twitter, and the sites that appear most frequently in your search.
 Be careful about relying too heavily on automated sentiment analysis in both free and paid tools. The technology doesn't exist right now to automatically measure sentiment with high accuracy; use this analysis as a general picture, rather than an accurate description.
Listening to blogs with BlogPulse
BlogPulse (www.blogpulse.com) is an automated blog-monitoring service created by Nielsen. This tool doesn't get as much coverage as Technorati (see the following section) or other tools in this chapter, but it often catches blogs that other services don't.
Remember, this niche-monitoring tool monitors blogs only. It can't give you results from message boards or other social-media sites. You can compare the results you get from BlogPulse directly with the results you get from Technorati and make a choice between the two tools.
You can set up monitoring on BlogPulse by following these steps:
- Navigate to http://blogpulse.com.
The BlogPulse Web site loads in your browser window.
- Type your search term in the Search Blogosphere text box.
This text box appears in the upper-right corner of the page.
- Click the Go button.
After BlogPulse does the search, it takes you to a results page.
- Right-click the RSS Feed link next to the orange RSS icon and choose Copy Link Location from the pop-up menu that appears.
On the results page, where it says Search Results, an orange XML icon appears. They use the XML export rather than pure RSS but both types of data sources will work for what we are doing.
- Paste this link location into a document in which you list all the feeds that you plan to aggregate later.
- Repeat Steps 2 through 5 to add as many BlogPulse monitoring terms as you want.
Checking rank with Technorati
Technorati (http://technorati.com) seems like the old dog when you talk about all these different monitoring services because it's been around for so long! It was one of the first sites to monitor and rank the blogosphere. Although the site may have lost some of its luster to other products that are available, such as BlogPulse or even Google Alerts, at least try it out because Technorati was considered the top blog-data source for a long time. Users have encountered many problems when using the site, however, including its slow performance and occasional poor results.
But a lot of Technorati users swear by their results, so try it and compare it to other resources.
You can set up monitoring on Technorati by following these steps:
- Navigate to http://technorati.com.
The Technorati Web site loads in your browser window.
- Type the search term that you want to monitor in the Search Posts text box at the top of the screen, and then click the magnifying glass. When you click on the magnifying glass, your search results will appear.
- Click the RSS icon in the menu bar of your browser, and then copy and paste the URL of your feed to your list.
Technorati recently introduced a partnership with IngBoo to do RSS services, which, to be honest, is a pain. It requires yet another step in trying to gather all this information together because you have to register for IngBoo's services as well. However, it is a service you may find useful.
Connecting conversations with BackType
BackType (www.backtype.com) is a real-time, conversational search engine, meaning that it tracks conversations in social media in real time. It indexes and connects millions of conversations from blogs, social networks, and other social media so that you can find out what people are saying about the topics that interest you. BackType started out monitoring blog comments and has continually expanded the width and scope of what it covers.
The strength of BackType is in its blog comments targeting, so try out the search function to see what it returns. BackType may not be a must-add tool because it is limited in scope, but if people online are talking about and referencing your brand or blog often in blog comments, you may find it a worthy source.
At the time of this writing, BackType is monitoring only tracks based on a specific URL as opposed to search terms, and has shut down its search engine until it's integrated into a larger platform. For example, if you wanted to monitor Google you would have to choose Google.com and not the search term Google. We include it because its new platform can potentially eclipse some of the other players in this space, so it's worth your time to check out.
Searching communities with Boardreader
Boardreader (http://boardreader.com) is a community search tool that does an excellent job when it comes to message boards and smaller communities. Although the other tools we talk about in the previous sections cover blogs, microblogging, and other common social-media platforms, Boardreader focuses on groups and message boards, which often get overlooked when it comes to social-media searches. Boardreader also has a fairly in-depth repository of historical social-media data with some sites going back for up to ten years.
We classify Boardreader as a must-add tool because its niche focuses on groups and message boards, where conversations have been happening much longer than just Facebook and Twitter. Many other monitoring tools often overlook these areas when talking about monitoring the Web, but you can find so many vibrant communities that are worth being a part of, in addition to monitoring what is being said about your blog or company.
To set up your Boardreader tracking, follow these steps:
- Navigate to http://boardreader.com.
The Boardreader Web site loads in your browser window.
- In the text box, type the search term that you want to monitor, and then click the Search button. The results appear when the screen refreshes.
- Click the Show Tools link below the Search text box.
The RSS Feed link appears.
- Right-click the RSS Feed link next to the orange RSS icon and choose Copy Link Location from the pop-up menu that appears.
- Paste this link location into a document in which you list all the feeds that you plan to aggregate later.
- Repeat Steps 1 through 5 to search for and monitor as many different search terms as you want.
Staying on top of conversations with Twitter Search
Twitter Search (http://search.twitter.com) provides the most accurate way to stay on top of the conversations happening on Twitter that use the keywords you want to monitor. Twitter Search is limited to only the Twitter platform. Although Twitter is clearly the most popular microblogging platform, competitors still exist. You may prefer to use a tool that monitors multiple microblogging Web sites, such as Twingly (discussed in the following section).
You can use the Twitter Search service to monitor conversations on Twitter by following these steps:
- Navigate to http://search.twitter.com.
The Twitter Search Web site loads in your browser window.
- In the text box, type the search term that you want to monitor, and then click the Search button.
The screen that appears displays the results of your search.
- Click Feed for This Query on the upper-right side of the page.
The RSS export page appears.
- Copy and paste the URL in the Web address bar of your browser to whatever list you are generating for terms.
- Repeat Steps 1 through 4 for all the terms that you want to monitor.
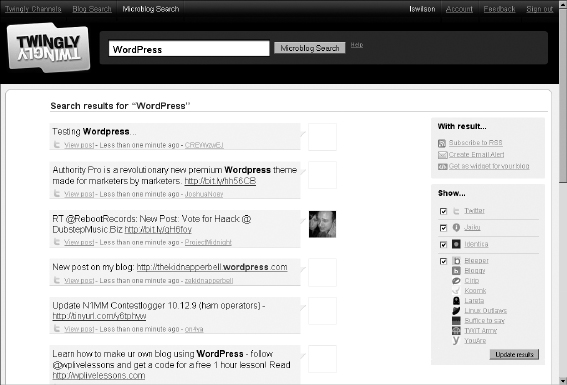
Microblog searching with Twingly
Twingly Microblog Search (www.twingly.com/microblogsearch) deals with real-time search microblogging and traditional blog search. Their microblog service also monitors conversations on other microblogging sites besides Twitter, such as Jaiku, Indentica, Bleeper, Bloggy, Crip, Koornk, Lareta, Linux Outlaws, Suffice to Say, TWIT Army, and YouAre.
Compare the results you get from Twingly with Twitter Search (see the preceding section), just to make sure that Twingly is picking up everything on Twitter. If it isn't, you can use Twitter Search and configure Twingly to pick up only the other microblogging sites. (See Figure 2-1.)
Figure 2-1: Choosing micro-blogging services to monitor.
To monitor conversations by using Twingly, follow these steps:
- Navigate to www.twingly.com/microblogsearch.
The Twingly Microblog Search page opens in your browser window.
- In the text box, type the search term that you want to monitor, and then click the Microblog Search button. All the relevant search results appear.
- On the right side of the screen, select the microblogging tools (refer to Figure 2-1) that you want to monitor, and then click Update Results.
This includes only the services that you want to monitor.
- On the right sidebar, right-click the Subscribe to RSS link next to the orange RSS icon and choose Copy Link Location from the pop-up menu that appears.
- Paste this link location into a document in which you list all the feeds that you plan to aggregate later.
- Repeat Steps 1 through 5 for all the terms you want to monitor.