
Enhancing Your Web Site with Widgets
WordPress widgets are very helpful tools built in to the WordPress.com application. They allow you to arrange the display of content in your blog sidebar, such as your blogroll(s), recent posts, and monthly and category archive lists. With widgets, arrange and display the content in the sidebar of your blog without having to know a single bit of PHP or HTML.
In this case, Widget areas are the regions in your theme that allow you to insert and arrange content (such as a list of your recent blog posts or links to your favorite sites) or custom menus, by dragging and dropping (and editing) available widgets (shown on the WordPress Dashboard's Widget page) into those corresponding areas.
Many widgets offered by WordPress (and those added sometimes by WordPress themes and plugins) provide drag-and-drop installation of more advanced functions normally available only if you wrote code directly into your theme files.
Choose Widgets on the Appearance menu in the Dashboard. The Widgets page displays the available widgets. This feature is a big draw because it lets you control what features you use and where you place them without having to know a lick of code.
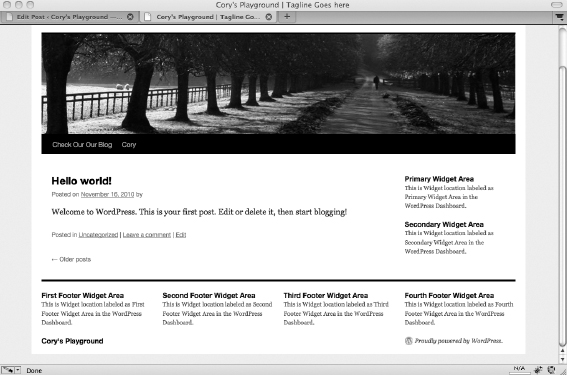
To explore the Twenty Ten theme's widget-ready areas, choose Appearance![]() Widgets on the WordPress Dashboard. The Widgets page displays Primary Widget Area, Secondary Widget Area, First Footer Widget Area, Second Footer Widget Area, Third Footer Widget Area, and Fourth Footer Widget Area, as shown in Figure 1-15. The corresponding widget areas that can be edited in the Twenty Ten theme through the WordPress Dashboard are shown in Figure 1-15.
Widgets on the WordPress Dashboard. The Widgets page displays Primary Widget Area, Secondary Widget Area, First Footer Widget Area, Second Footer Widget Area, Third Footer Widget Area, and Fourth Footer Widget Area, as shown in Figure 1-15. The corresponding widget areas that can be edited in the Twenty Ten theme through the WordPress Dashboard are shown in Figure 1-15.
Figure 1-15: This page displays available widgets and widget-ready areas.
Adding widgets to your sidebar or footer
To add widgets to your sidebar and footer, you drag and drop widgets from the Available Widgets section to the desired widget area. For example, to add a Search box to the right sidebar of the default layout, drag the Search widget from the Available Widgets section to the Primary Widget Area, as shown in Figure 1-16.
Figure 1-16: Adding a widget to the Primary Widget Area.

The Widgets page lists all the widgets that are available for your WordPress site. On the right side of the Widgets page are the sidebar and footer areas designated in your theme. You drag your selected widget from the Available Widgets section into your chosen widget area on the right.
To add a new widget to your sidebar, follow these steps:
- Find the widget you want to use.
The widgets are listed in the Available Widgets section. For the purpose of these steps, choose the Recent Posts widget (see Figure 1-17).
- Drag and drop the widget into the Primary Widget Area section on the right side of the page.
The widget is now located in the Primary Widget Area section, and the content of the widget now appears on your site in the sidebar.
Figure 1-17: Editing the Recent Posts widget.

- Click the arrow to the right of the widget title.
Options for the widget appear. Each widget has different options that you can configure. The Recent Posts widget, for example, lets you configure the title, as well as the number of recent posts you want to display (refer to Figure 1-17). The default is set to 5; the maximum allowed is 15.
- Select your options and click the Save button.
The options you've set are saved. Click the Close link.
- Arrange your widgets in the order you want them to appear in on your site by clicking a widget and dragging it above or below another widget.
Repeat this step until your widgets are arranged the way you want them.
![]() To remove a widget from your sidebar, click the arrow to the right of the widget title and then click the Delete link. WordPress removes the widget from the right side of the page and places it back in the Available Widgets list. If you want to remove a widget, but want WordPress to remember the settings that you configured for it, instead of clicking the Delete link, simply drag the widget into the Inactive Widget areas on the right side of the Widgets page, at the bottom of the page. This stores the widget and all the settings for future use.
To remove a widget from your sidebar, click the arrow to the right of the widget title and then click the Delete link. WordPress removes the widget from the right side of the page and places it back in the Available Widgets list. If you want to remove a widget, but want WordPress to remember the settings that you configured for it, instead of clicking the Delete link, simply drag the widget into the Inactive Widget areas on the right side of the Widgets page, at the bottom of the page. This stores the widget and all the settings for future use.
After you select and configure your widgets, click the Visit Site button at the top of your WordPress Dashboard (to the right of your site name), and your blog's sidebar matches the content (and order of the content) of the Widgets page sidebar. How cool is that? You can go back to the Widgets page and rearrange the items, as well as add and remove items, to your heart's content.
![]() The number of options available for editing a widget depends on the widget. Some have a number of editable options; others simply let you write a title for the widget area. As shown in Fig. 1-17, the Recent Posts widget has two options: one for editing the title of the widget and one to determine how many recent posts to display.
The number of options available for editing a widget depends on the widget. Some have a number of editable options; others simply let you write a title for the widget area. As shown in Fig. 1-17, the Recent Posts widget has two options: one for editing the title of the widget and one to determine how many recent posts to display.
Using the Text widget
The Text widget is one of the most highly used and useful WordPress widgets because it allows you to add text and even HTML code into widget areas without editing the theme's template files. Therefore, you can designate several types of information on your site by including your desired text within it.
Here are some examples of how the Text widget can be used and why it's such an important and popular feature:
- Add an e-mail newsletter subscription form. Add a form that allows your site visitors to sign up for your e-mail newsletter. Because this often involves HTML, the Text widget is especially helpful.
- Display business hours of operation. Display the days and hours of your business operation where everyone can easily see them.
- Post your updates from social networks. Many social-networking sites like Twitter and Facebook offer embed codes to display your updates on those sites directly on your Web site. They often include JavaScript, HTML, and CSS, which you can easily embed with the Text widget.
- Announce special events and notices. If your organization has a special sale, announcement about a new staff member, or important notice about inclement weather closings, you can use the Text widget to post this information to your site in just a few seconds.
 The WordPress Text widget doesn't allow you to include PHP code of any kind. Because of the nature of this widget, it doesn't execute PHP code, such as special WordPress template tags or functions (like the ones you find in Book VI, Chapter 3). There is, however, a great plugin called the Advanced Text Widget that does allow you to insert PHP code within it. You can download the Advanced Text Widget from the WordPress Plugin Directory at http://wordpress.org/extend/plugins/advanced-text-widget. (More information about using and installing WordPress plugins is found in Book VII.)
To add the Text widget, follow these steps:
- On the WordPress Dashboard, choose Appearance
 Widgets.
 - Scroll to the Available Widgets section.
- Drag and drop the Text widget to the desired widget area.
The Text Widget opens.
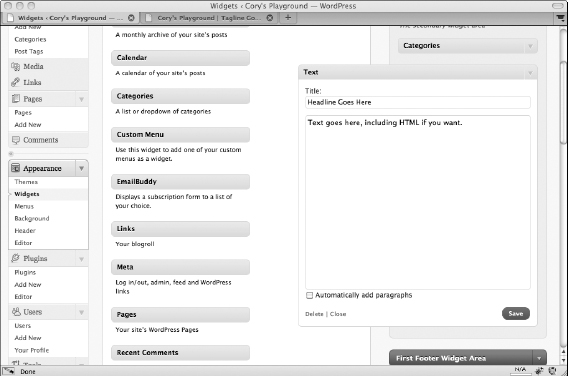
- Add a widget headline in the Title field and any desired text in the text area, as shown in Figure 1-18.
- After you finish, click Save and then click the Close link.
Using the RSS widget
The RSS widget allows you to pull headlines from almost any RSS feed, including recent headlines from your other WordPress blogs or sites. You can also use it to pull in headlines from news sites or other sources that offer RSS feeds. This is commonly referred to as aggregation, which means that you're gathering information from a syndicated RSS feed source to display on your site.
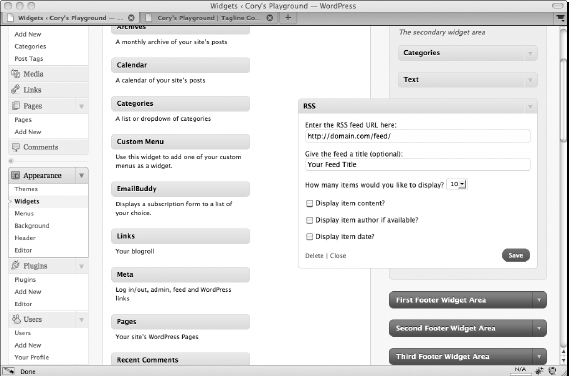
After you drag and drop the RSS widget to the appropriate widget area, the widget opens and you can enter the RSS Feed URL you want to display. Additionally, you can easily tweak other settings, as shown in Figure 1-19, to add information into the widget area for your reader.
Follow these steps to add the RSS widget to your blog:
- Add the RSS widget to your sidebar on the Widgets page.
Follow the steps in the “Adding widgets to your sidebar or footer” section, earlier in this chapter, to add the widget.
- Click the arrow to the right of the RSS widget's name.
The options you can configure for the RSS widget appear.
- In the Enter the RSS URL Here text box, type the RSS URL of the blog you want to add.
You can usually find the RSS Feed URL of a blog listed in the sidebar.
- Type the title of the RSS widget.
This title is what will appear in your blog above the links from this blog. If Lisa wanted to add the RSS feed from her personal blog, for example, she would type Lisa Sabin-Wilson's blog.
- Select the number of items to display.
The drop-down menu gives you a choice of 1-20. Select the number of items from the RSS feed that you want to display on your site.
- (Optional) Select the Display the Item Content check box.
Selecting this check box tells WordPress that you also want to display the content of the feed (usually, the content of the blog post from the feed URL). If you want to display only the title, leave the check box unselected.
- (Optional) Select the Display Item Author, If Available check box.
Select this option if you want to display the author's name with the item's title.
- (Optional) Select the Display Item Date check box.
Select this option if you want to display the date the item was published with the item's title.
- Click the Save Changes button.
WordPress saves all the options and reloads the Widgets page with your RSS widget intact.