
Refining Your Post Options
After you write the post, you can choose a few extra options before you publish it for the entire world to see. These settings apply to the post you're currently working on — not to any future or past posts. You can find these options below and to the right of the Post text box (see Figure 1-4). Click the title of each option — the settings for that specific option expand.
![]() You can reposition the different post option modules on the Add New Post page to fit the way you use this page.
You can reposition the different post option modules on the Add New Post page to fit the way you use this page.
Figure 1-4: Several options are available for your blog post.
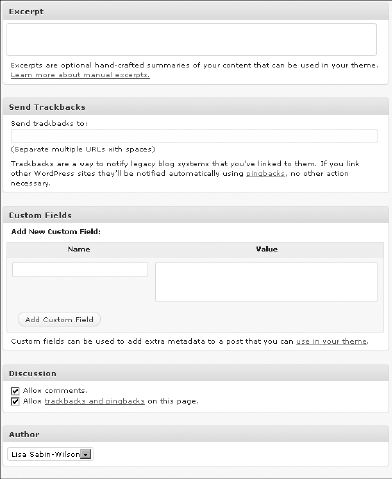
Here are the options that appear below the Post text box:
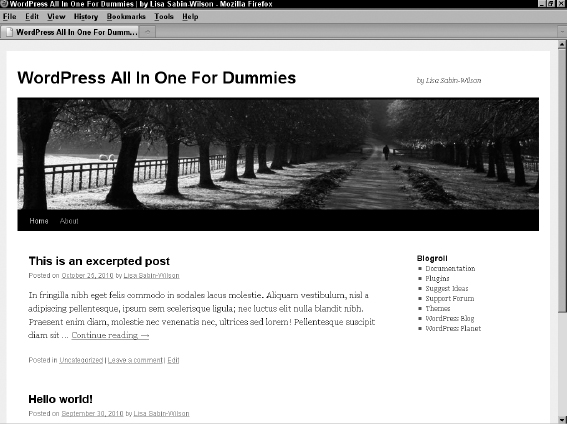
- Excerpt: Excerpts are short summaries of your posts. Many bloggers use snippets to show teasers of their blog posts, thereby encouraging the reader to click the Read More links to read the posts in their entirety. Type your short summary in the Excerpt box. Excerpts can be any length, in terms of words; however, the point is to keep it short and sweet, and tease your readers into clicking the Read More link. Figure 1-5 shows a blog post published to Lisa's site; however, it displays only an excerpt of the post on the front page — requiring the reader to click the Continue Reading link to view the post in its entirety.
- Send Trackbacks: If you want to send a trackback to another blog, enter the blog's trackback URL in the Send Trackbacks To text box. You can send trackbacks to more than one blog; just be sure to separate trackback URLs with a space between each. For more on trackbacks, refer to Book III, Chapter 5.
- Custom Fields: Custom fields add extra data to your posts, and you can fully configure them. You can read more about the Custom Fields feature in WordPress in Book IV, Chapter 6.
- Discussion: Decide whether to let readers submit comments through the comment system by selecting the Allow Comments on this Post check box. By default, the box is checked; uncheck it to disallow comments on this post.
- Author: If you're running a multi-author blog, you can select the name of the author who wrote this post. By default, your own author name appears selected in the Author drop-down menu.
Here are the options that appear to the right of the Post text box:
- Publish: Publishing and privacy options for your post, which we cover in more detail in the following section of this chapter.
- Categories: You can file your posts in different categories to organize them by subject. (See more about organizing your posts by category in Book III, Chapter 7.) Select the check box to the left of the category you want to use. You can toggle between listing all categories or seeing just the categories that you use the most by clicking the All Categories or Most Used links, respectively.
 Don't see the category you need? Click Add New Category, and you can add a category right there on the Add New Post page that appears.
 - Post Tags: Type your desired tags in the Add New Tag text box. Be sure to separate each tag with a comma so that WordPress knows where each tag begins and ends. Cats, Kittens, Feline represents three different tags, for example, but without the commas, WordPress would consider those three words to be one tag. See Book III, Chapter 7 for more information on tags and how to use them.
- Featured Image: Some WordPress themes are configured to use an image (photo) to represent each post that you have on your blog. The image can appear on the home/front page, blog page, archives, or anywhere within the content display on your Web site. If you're using a theme that has this option, you can easily define the post thumbnail by clicking Set Featured Image below the Featured Image module on the Add New Post page. More information about using Featured Images can be found in Book VI, Chapter 6.
 When you finish setting the options for your post, don't navigate away from this page; you haven't yet fully saved your options. The following section on publishing your post covers all the options you need for saving your post settings!
Publishing your post
After you give your new post a title; write the content of your new blog post; maybe add an image or other type of media file to your blog post (see Book IV, Chapter 4); and configure the tags, categories, and other options, now the question is: Publish? Or not to publish (yet)?
WordPress gives you three options for saving or publishing your post when you're done writing it. The Publish module is located on the right side of the Add New (or Edit) Post page. Just click the title of the Publish module to expand the settings you need. Figure 1-6 shows the available options in the Publish module.
Figure 1-6: The publish status for your blog posts.
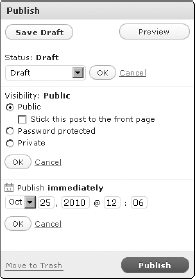
The Publish module has several options:
- Save Draft: Click this button to save your post as a draft. The Add New Post page reloads with all your post contents and options saved; you can continue editing it now, tomorrow, the next day, or next year — the post is saved as a draft until you decide to publish it or delete it. To access your draft posts, click the Posts link on the Posts menu.
- Preview: Click the Preview button to view your post in a new window, as it would appear on your live blog if you'd published it. Previewing the post doesn't publish it to your site yet. It gives you the opportunity to view it on your site and check it for any formatting or content changes you want to make.
- Status: Click the Edit link to open the settings for this option. A drop-down list appears, from which you can select Draft or Pending Review:
- • Draft: Save the post in draft form but don't publish it to your blog.
- • Pending Review: The post shows up in your list of drafts next to a Pending Review header. This option lets the administrator of the blog know that contributors have entered posts that are waiting for administrator review and approval (helpful for blogs that have multiple authors). Generally, only contributors use the Pending Review option.
Click the OK button to save your Status setting.
- Public: Select this option to make the post viewable to everyone who visits your site.
- Stick This Post to the Front Page: Select this check box to have WordPress publish the post to your blog and keep it at the very top of all blog posts until you change this setting for the post.
This option is otherwise known as a sticky post. Typically, posts are displayed in chronological order on your blog, displaying the most recent post on top. If you make a post sticky, it remains at the very top, no matter how many other posts you make after it. When you want to unstick the post, deselect the Stick This Post to the Front Page check box.
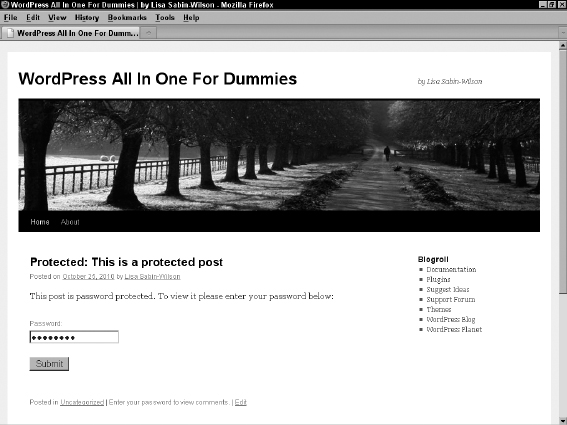
- Password Protected: By assigning a password to a post, you can publish a post to your blog that only you can see. You can also share the post password with a friend, who can see the content of the post after he or she enters the password. But why would anyone want to password-protect a post? Imagine that you just ate dinner at your mother-in-law's house and she made the worst pot roast you've ever eaten. You can write all about it! Protect it with a password and give the password to your trusted friends so that they can read all about it without offending your mother-in-law. Figure 1-7 shows a published post that's private; visitors see that a post exists, but they need to enter a password in the text box and then click Submit in order to view it.
Figure 1-7: A password-protected post.
- Private: Publish this post to your blog so that only you can see it — no one else will be able to see it, ever. You may want to protect personal and private posts that you write only to yourself (if you're keeping a personal diary, for example).
- Publish Immediately: Click the Edit link to make the publish date options appear, where you can set the timestamp for your post. If you want the post to have the current time and date, ignore this setting altogether.
If you want to future-publish this post, you can set the time and date for anytime in the future. This feature has come in handy for Lisa many times. For example, when you have a vacation planned and you don't want your blog to go without updates while you're gone, you can write a few posts and set the date for a time in the future. Those posts are published to her blog while you're somewhere tropical, diving with the fishes.
- Publish: This button wastes no time! It bypasses all the previous draft, pending review, and sticky settings, and publishes the post directly to your blog immediately.
After you select an option from the Publish drop-down list, click the Update button. The Write Post page saves your publishing-status option.
![]() If you click Publish and for some reason don't see the post appear on the front page of your blog, you probably left the Status drop-down list set to Unpublished. Your new post appears in the draft posts, which you can find by clicking Edit in the Posts drop-down list.
If you click Publish and for some reason don't see the post appear on the front page of your blog, you probably left the Status drop-down list set to Unpublished. Your new post appears in the draft posts, which you can find by clicking Edit in the Posts drop-down list.
Being your own editor
While we write this book, we have editors looking over our shoulders, making recommendations, correcting typos and grammatical errors, and helping us by telling us when we get too long winded. You, on the other hand, are not so lucky! You're your own editor and have full control of what you write, when you write it, and how you write it. You can always go back and edit previous posts to correct typos, grammatical errors, and other mistakes by following these steps:
- Find the post that you want to edit by clicking Posts in the Posts drop-down list.
The Posts page opens and lists the 20 most recent posts you've made to your blog.
To filter that listing of posts by date, select a date from the Show All Dates drop-down list at the top of the Posts page. For example, if you select February 2011, the Posts page reloads, displaying only those posts that were published in the month of February in 2011.You can also filter the post listing by category. Select your desired category from the View All Categories drop-down list.
- When you find the post you need, click its title.
Alternatively, you can click the Edit link that appears below the post title.
The Edit Post window opens. In this window, you can edit the post and/or any of its options.
If you need to edit only the post options, click the Quick Edit link. A drop-down Quick Edit menu appears, displaying the post options that you can configure, such as the title, status, password, categories, tags, comments, and timestamp. Click the Save button to save your changes. - Edit your post; then click the Update Post button.
The Edit Post window refreshes with all your changes saved.