Widget Settings
In a world of graphical user interfaces, WordPress fits right in with its system of widgets that allow users to add content and information to their Web sites without having to touch a single line of code in their WordPress templates. Book VI, Chapter 1 discusses the use of widgets, in-depth, whereas Book VI, Chapter 3 discusses how to add widget areas to your WordPress theme template files. Plugin developers can create widgets that work with their plugin so you can add the plugin information on your site anywhere you have a widget (sidebar) area.
![]() Depending on your particular theme, adding a new widget to your WordPress site removes the default widgets your theme has set up for you.
Depending on your particular theme, adding a new widget to your WordPress site removes the default widgets your theme has set up for you.
Each plugin's widgets have greatly differing options for their display and functionality. The following list examines several WordPress plugins that create their own widgets for you to use:
- WP e-Commerce (http://wordpress.org/extend/plugins/wp-e-commerce): Adds a full-featured shopping cart solution to your WordPress Web site. One feature this plugin provides is the ability to use several widgets included with this plugin, such as:
- Product Categories: Displays a list of product categories on your site
- Product Specials: Displays information on product specials on your site
- Shopping Cart: Displays shopping cart information on your site, such as products added to the shopping cart, a running tally of product prices and quantities, and so on
- Latest Products: Displays a list of the latest products on your site
- Price Range: displays a range of prices for products on your site.
- Product Donations: lists products that are flagged as donated products on your site.
- Product Tags: Displays a tag cloud of tags assigned to products on your site
After you install (search for the WP e-Commerce plugins in Plugins
 Add New inyour Dashboard) and activate the plugin (see Book VI, Chapter 1) on your WordPress site, click the Widgets link under the Appearance menu in your WordPress Dashboard. Figure 3-7 displays a few of the new widgets added to your WordPress Dashboard after the WP e-Commerce plugin has been installed and activated.
The information that the widgets display on your site is dependent upon the product information that you already set up within the WP e-Commerce plugin options. Because this is an e-Commerce plugin, it enables you to add products to sell on your site, so the widgets enable you to display specific information about those products. Check out more information about the WP e-Commerce plugin on their official Web site at: http://www.instinct.co.nz/e-commerce.
Figure 3-7: The WP e-Commerce plugin.

It is possible to change the displayed title of each of the three widgets, along with various other options, through editing the widget options — see Book VI, Chapter 1 for more information about editing widget options. For instance, the Shopping Cart widget allows you to set it to appear to the user only when there are products in the cart. The Product Categories widget allows you to designate different groups to display, or to show the groups as thumbnail images.
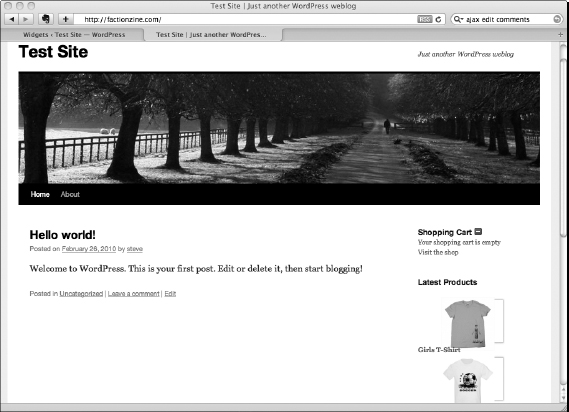
Configure each widget to your preference, click the Save button for each widget, and then navigate to your Web site's home page. You now have a dynamically generated sidebar widget for your site's store, as shown in Figure 3-8.
- SMS Text Message (http://wordpress.org/extend/plugins/sms-text-message): This plugin allows your visitors to subscribe to and receive updates via text message on their phone.
To set up this plugin, follow these steps:
- 1. Search for SMS Text Message in Plugins
 Add New in your Dashboard.
Install and activate the SMS Text Message plugin (see Book VII, Chapter 1 for information on installing and activating plugins).
Figure 3-8: The WP e-Commerce plugin's widget display.

- 2. Visit the Widgets page by going to Appearance
 Widgets in your Dashboard.
 - 3. Drag the SMS Text Message widget to the right widget area.
Unlike WP e-Commerce, the SMS Text Message widget doesn't have options in Appearance
 Widgets. Figure 3-9 shows the SMS Text Message widget placed in the Primary Widget Area on the Widgets page.
 - 4. Choose SMS Text Message
 Options on the WordPress Dashboard menu on the left.
The SMS Text Message Options page appears, shown in Figure 3-10, with four options you can configure.
Figure 3-9: The SMS Text Message widget.

Figure 3-10: The SMS Text Message Options page.

- 5. Set your widget header and footer. Make sure to change the From e-mail address to your Web site's address, so that replies from subscribers go directly to you.
Optionally, you can also modify the maximum number of characters allowed for each text message.
- 6. Save your settings, navigate to your Web site's home page, and click the refresh button.
You now have an SMS subscription widget on your blog, as shown in Figure 3-11.
- 1. Search for SMS Text Message in Plugins
- Subscribe2: Similar to SMS Text Message, the Subscribe2 plugin provides an e-mail subscription management system.
To set up this plugin, follow these steps:
- 1. Search for Subscribe2 in Plugins
 Add New in your Dashboard.
Install and activate the Subscribe2 plugin (see Chapter 2 of this minibook for information on installing and activating plugins).
- 2. Choose Settings
 Subscribe2 on the WordPress Dashboard menu.
 - 3. Under the Appearance subheading (see Figure 3-12), select the Enable Subscribe2 Widget check box.
- 4. Click Save at the bottom of the page.
Figure 3-11: The SMS Text Message plugin's widget display.

Figure 3-12: Enabling the Subscribe2 plugin's widget.

- 5. Choose Appearance
 Widgets and drag the Subscribe2 widget to the right widget area.
You can modify the widget title and add text before or after the content of the widget. In this options panel, you can even designate a CSS class for this widget's div for additional styling, as shown in Figure 3-13 in the Primary Widget Area.
Figure 3-13: Subscribe2 widget configuration.

- 6. Configure the settings as desired and then click Save.
When you navigate to your home page and refresh, your subscription widget appears how you configured it.
- 1. Search for Subscribe2 in Plugins
![]() Site admins see something different than readers see in the widget. This smart widget shows unsubscribed users a subscription form and shows subscribed users a link to their personal subscription settings.
Site admins see something different than readers see in the widget. This smart widget shows unsubscribed users a subscription form and shows subscribed users a link to their personal subscription settings.
