
Introducing Domain Mapping
Domain mapping means telling your Web server which domains you want WordPress to answer to, and which site you want shown to the visitor when they request that domain. This process is more than domain forwarding or masking because the URLs for your posts will have the full domain name in them. Instead of the child site being in secondsite.yourdomain.com format, it can be myotherdomain.com.
Domain mapping isn't possible in certain instances, however. If your WordPress install is in a subfolder and this folder is part of the URL, then any mapped domain will also contain this folder name. In that case, it would be better to move the install so that it isn't in a subfolder.
You also need to access your Web host's control panel (where you manage DNS records on your Web server) and the control panel for your domain name registrar, which is often a different company.
![]() The network install, by default, lets you choose between a subfolder setup and a subdomain setup. This step is still required before you can specify a domain for that site. We cover how to enable the network in Chapter 2 of this minibook. Please ensure that the network is set up and functioning properly before you attempt to map domains.
The network install, by default, lets you choose between a subfolder setup and a subdomain setup. This step is still required before you can specify a domain for that site. We cover how to enable the network in Chapter 2 of this minibook. Please ensure that the network is set up and functioning properly before you attempt to map domains.
Parking or pointing domains
You need to set up your Web server to accept any incoming requests for the domain you want to map and the location to send them to. On cPanel-based Web hosts, this is referred to as domain parking. We use cPanel here because it's quite popular and available on many Web hosts.
Follow these steps to park a domain on your Web hosting account via cPanel:
- Log in to your Web site's cPanel.
The address is provided by your Web host and usually available at http://yourdomain.com/cpanel.
- In the Domains section, click the Parked Domains icon, as shown in Figure 6-1.
The Parked domains page displays in your browser window that lists any domains you have parked, if you have previously parked any, and provides a form to enter a new domain.
Figure 6-1: The Parked Domains icon in cPanel.

- In the Create a New Parked Domain section, enter the domain name you want to map.
The domain is directed to the root folder of your Web site, which is where your WordPress install should be located. If it isn't, please follow the steps provided in the next section.
- Click Add Domain.
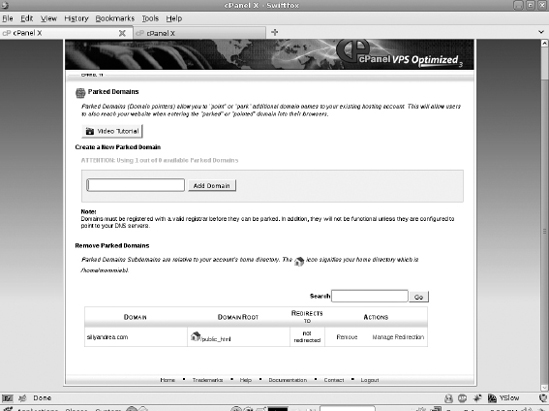
The screen refreshes and presents you with a page similar to Figure 6-2. The domain you added is shown in a list under Domains, which indicates successful parking of the domain you entered in Step 4.
Figure 6-2: The Parked Domains page showing a parked domain.
Other Web hosts may refer to domain parking as pointing or mirroring. You may need to ask your Web host support team which area you need to do this in. You're using a ServerAlias directive for the mapped domains, telling the Web server to send all requests for the mapped domain to the domain where WordPress is installed.
If the domain you're using for your WordPress network installation isn't the main domain of the Web site, but an add-on domain, you have to do a slightly different process to park the domain. Because you can't tell a parked domain to go anywhere other than the root folder, you need to choose the Addon Domains feature.
Follow these steps to create an Addon Domain in your Web hosting cPanel:
- Log in to your Web site's cPanel.
In the Domains section, click the Addon Domains icon, as shown in Figure 6-3. The Addon Domains page appears.
- Enter the new domain name you want to map in the New Domain Name field.
The other fields, Subdomain/FTP Username, and Document Root get auto-populated by your Web server; do not alter the information your Web server populates for the Subdomain/FTP Username, as this field is setting the username you will use to connect when you need to use FTP.
Figure 6-3: The Addon Domains icon in cPanel.

- In the Document Root field, enter the folder location of your WordPress network installation.
Figure 6-4 shows the Create an Add-on Domain information filled in.
- Click Add Domain to save your changes.
The Addon Domains page refreshes, and your new domain appears under the Addon Domains section.
Figure 6-4: Create an Add-on Domain in cPanel.

Domain name server records
To instruct the domain name registrar where to send the domain name to, you need to edit the domain nameserver (DNS) records. A common domain name registrar is GoDaddy, whose domain registration account interface we use in the following steps. To edit the name server records, follow these steps:
- Log in to your domain name registrar.
- Click the domain name management tools.
Figure 6-5 shows the information for the domain to map.
- Click the Set Nameservers link in the Nameservers section.
- Type the nameservers for your Web host where your WordPress install is located, and save your changes.
This tells servers around the world that your domain “lives” at this Web server location. Nameserver changes may take up to 24 hours to propagate across the Internet.
Figure 6-5: The domain name records of a mapped domain.
