
Adding a Blog to Your Web Site
If you want a blog on your site but don't want to display the blog on the front page, you can add one from the WordPress Dashboard. To create the blog for your site, first follow these steps:
- Click Add New link in the Pages drop-down list.
The page where you can write a new post to your WordPress blog opens.
- Type Blog in the Title text box.
The page slug is automatically set to /blog. (Read more about slugs in Book III, Chapter 3.)
- Leave the Page Content text box blank.
- Click the Publish button.
The page is saved to your database and published to your WordPress site.
Now, you have a blank page that redirects to http://yourdomain.com/blog. Next, you need to assign the page you just created as your blog page.
- Click Reading in the Settings drop-down list.
The Reading Settings page opens.
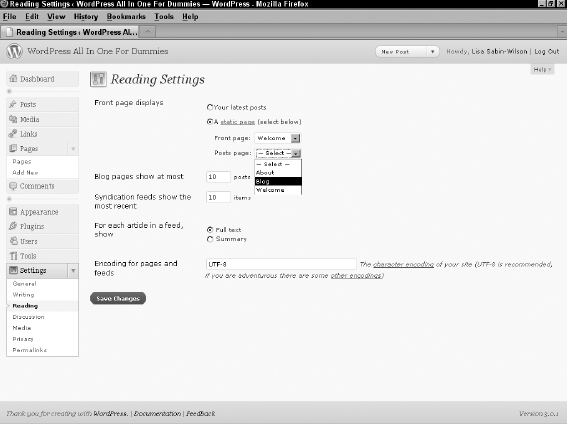
- From the Posts Page drop-down list, select the page that you created in the preceding step list.
The page is set as your blog page, as shown in Figure 2-6.
- In the Blog Pages Show at Most section, type the number of posts that you want to appear in the Posts text box.
If you enter 5, for example, the blog page shows the last five posts you made to your blog.
- Click the Save Changes button.
The options you just set are saved, and your blog is now at http://yourdomain.com/blog (where yourdomain.com is the actual domain name of your site).
When you navigate to http://yourdomain.com/blog, a listing of your blog posts appears.
Figure 2-6: Selecting the page to display for your blog posts.
![]() This method of using the /blog page slug works only if you're using custom permalinks with your WordPress installation. (See Book III, Chapter 3 if you want more information about permalinks.) If you're using the default permalinks, the URL for your blog page is different; it looks something like http://yourdomain.com/?p=4 (where 4 is the ID of the page you created for your blog).
This method of using the /blog page slug works only if you're using custom permalinks with your WordPress installation. (See Book III, Chapter 3 if you want more information about permalinks.) If you're using the default permalinks, the URL for your blog page is different; it looks something like http://yourdomain.com/?p=4 (where 4 is the ID of the page you created for your blog).