
Gathering and Displaying Network-wide Content
Depending on your needs, you may want to gather content from sites across your network to display on the front page of the main site (such as with the FoodPress example we provide at the beginning of this chapter). Although some plugins will do this for you, you can accomplish this by placing a few lines of code in your theme template file.
The main page of your network is controlled by the theme that is active in your regular Dashboard under Apperance![]() Themes. You can customize this theme with some code samples in the next section to suit your particular needs.
Themes. You can customize this theme with some code samples in the next section to suit your particular needs.
Adding Posts from Network Sites
One of the best ways to pull visitors into your site is to display a short list of headlines from posts made by other sites within your network. With a single WordPress site, this simply is handled by the Recent Posts widget. When running a network, however, there's no built-in way to pull a list of posts from across all the sites in your network. However, the Recent Global Posts widget plugin available from the folks at WPMU Premium Dev can do this for you quickly and efficiently, and includes a handy widget to make it easy for you to add recent posts from across your network of sites to your main Web site.
As we mention in an early part of this chapter, plugins from WPMU Dev Premium are not free, and you cannot access them from the official WordPress Plugins Directory. You first need to pay for and register a membership at their site: http://ewebscapes.com/wpmu-premium
After you have your membership, log in and download the Recent Global Posts Widget plugin here: http://premium.wpmudev.org/project/recent-global-posts-widget.
Listing network sites
To list all the sites in the network, use the Multi-Site Site List Shortcode plugin available for free from the WordPress Plugin Directory: http://wordpress.org/extend/plugins/multi-site-site-list-shortcode. You install this plugin just as you do any other plugin in WordPress; see Book VII, Chapters 1 and 2 for information on installing WordPress plugins.
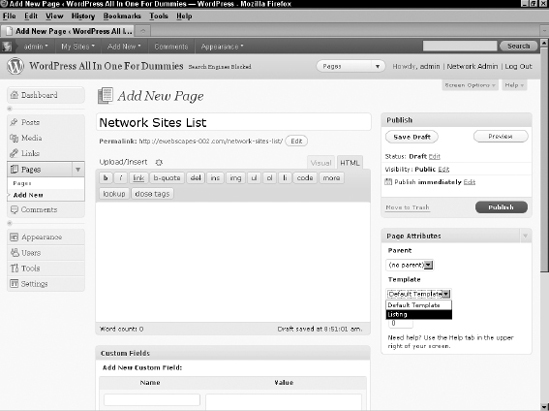
To use the information this plugin provides, you must include a shortcode that the plugin developer provides, within the body of a page, or a post, published to your main site. The most common and useful method is to create a page that includes the plugin shortcode. To list all network sites, follow these steps. In this example, I use the default Twenty Ten theme:
- Log in to the WordPress Dashboard on the main site.
- Choose Pages
 Add New.
 - Fill in a title for your page.
Something like: Network Sites List
- Add this short code in the body of your page:
[site-list]
- Publish the page.
When you visit the front end of your site, you will see a page with your new title in the menu. Clicking this shows the visitor the list of sites in the network, as shown in Figure 5-5.
Figure 5-5: A page showing the list of network sites.
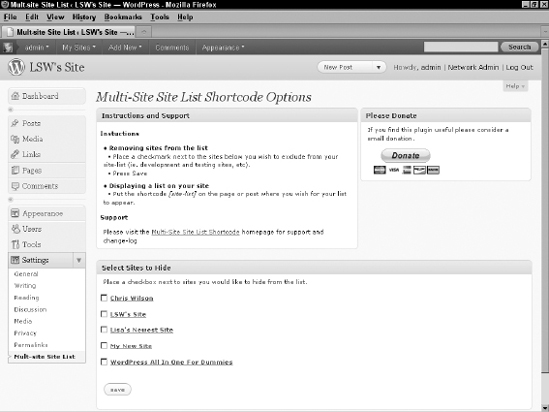
The Multi-Site Site List Shortcode plugin also gives you a settings page where you can select sites that you would like to hide from the listing of sites. You can find the Multi-Site Site List Shortcode Options page by clicking Settings![]() Multi-Site Site List within your regular Dashboard. The Multi-Site Site List Shortcode Options page is shown in Figure 5-6.
Multi-Site Site List within your regular Dashboard. The Multi-Site Site List Shortcode Options page is shown in Figure 5-6.
Displaying user comments
When running multiple sites, you may also want to display a list of the most recent comments from across the network. The Diamond Multsite widgets plugin (available at http://wordpress.org/extend/plugins/diamond-multisite-widgets) lets you do just that.
Install the plugin as outlined in Book VII, and click the Network Activate link. Visit the Appearance ![]() Widgets menu in the Dashboard area of your site to load the Widgets page, and you see that a new widget has been added called Diamond Recent Comments.
Widgets menu in the Dashboard area of your site to load the Widgets page, and you see that a new widget has been added called Diamond Recent Comments.
Figure 5-6: The Multi-Site Site List Shortcode Options page.
Drag this widget to the sidebar of your choosing and it will display a list of the most recent comments from every site on the entire network. The widget has configurable options; if you expand the Diamond Recent Comments widget, you see that there are several optional settings that allow you to configure:
- Widget Title: This is the title that is displayed on your site, above the widget information.
- Cache Expire Time: In seconds, it's the time frame in which the plugin will refresh the comments displayed with this widget.
- Comments Count: Enter the maximum number of comments you want to display.
- Exclude Blogs: Place a check mark next to the name of the site that you want to exclude comments from.
- Whitelist: Place a check mark next to the name of the site(s) that you want to always include comments from.
- Format String: Enter the format for how you want the comments to display on your site by typing in the strings of text shown directly beneath this option (see Figure 5-7).
Figure 5-7: The Diamond Recent Comments widget options.

- Avatar Size: Enter the size of the comment author's avatar for display on your site.
- Default Avatar URL: Enter the Web address to the graphic/image file you want to display as the default avatar (for comment authors who do not have one).
- Default “Read More” link text: Enter the text that you want the Read More link to display (by default, the widget displays the words “Read More” as the direct link to the comment).
- DateTime Format: Enter the date and time format that you prefer.
Be sure to click the Save button within the widget to save all the settings you created here.
Sitewide tags and categories
The Sitewide Tags plugin pulls information from every new post on each site and reproduces it on a site that the plugin creates in your network called the Tags Blog site, which is a site in your network that aggregates the posts from every site. You may also set Tags Blog as the main site in your network so that all new posts appear on the front page.
The plugin pulls and reposts almost all content from a post on another network site, including the title, content, tags, categories, and author information. At this time, however, it doesn't pull the post thumbnail or the comments.
By default, this plugin is set to create a new site called Tags Blog and saves up to 5,000 posts before it, automatically, removes older ones. Each post it aggregates retains its original permalink (the full URL to the post), and all post meta (the post's original author, the date and time it was published, and any categories and tags assigned to the post).
All the aggregated posts from across the network are saved and published to one site; the Tags Blog are then are displayed as if theses posts were posted to a single site. Each new post is saved to the Tags Blog site when it's created. Users or visitors can then search the Tags Blog site and see tags from across the network, search all aggregated posts across the network, see posts by all network authors — the possibilities for network-wide aggregation and display are quite useful.
Because the original permalink of the post is retained, search engines will not read these aggregated posts as duplicate content, and thereby any page rankings or SEO juice is retained by each site.
You can find the plugin at http://wordpress.org/extend/plugins/wordpress-mu-sitewide-tags or you may also install it by using the built-in plugin installer.
After you install the plugin, activate it on the network by moving it to the mu-plugins folder (the mu-plugins folder is discussed later in this chapter). When moved to this folder on the server, the plugin will be automatically activated and start working.
After you activate the plugin, you need to enable it. Visit the Settings page in your Network Dashboard (Network Admin![]() Settings) and scroll to the bottom of the page. Figure 5-8 shows the Global Tags option, where you enable the Tags Blog on your network by selecting the Enabled check box in the Global Tags section.
Settings) and scroll to the bottom of the page. Figure 5-8 shows the Global Tags option, where you enable the Tags Blog on your network by selecting the Enabled check box in the Global Tags section.
Figure 5-8: Check box to enable Tags Blog.

After you click the Save Changes button on the Settings page, scroll back down to the bottom of the page and you see the Global Tags section has changed and provides you with new options (see Figure 5-9), including
- Tags Blog: Enabled: This creates a site named tags and aggregates all posts to this site.
- Blogname: The name you want to assign to the Tags Blog. Using this option will cause the Tags Blog to be created.
- Post to Main Blog: Select this option to have WordPress push posts from all network sites to the main site in the network. With this option selected, the Tabs Blog is not created and the plugin uses your main site to aggregate the network content to, instead.
- Max Posts: Set to 5,000 by default. Beyond that, the plugin will delete older posts from the Tags Blog site, automatically.
- Include Pages: Check to enable, this will also include any pages users create on their network sites, and push them to the assigned tags blog.
- Privacy: Whether the Tags Blog site can be indexed by search engines.
- Non-public blogs: When enabled, this will aggregate posts from sites that have changed their privacy setting under Settings Privacy to non-public.
- Post meta: If you are using a plugin or a theme on some or all of the network sites that creates custom files, you may enter those field names here so those values will also be pulled to the tags blog.
Figure 5-9: Global tags options.
