
Exploring Plugin Interaction with WordPress
WordPress plugins use an Application Programming Interface (API) provided within WordPress to make plugin development easier. The API provides hooks, which are means of calling pieces of functionality built into the WordPress core application. For example, in the core of WordPress is functionality for publishing a post. If a plugin wants to execute that functionality, it uses an action hook to call and execute the publish post functionality.
The two types of hooks in the API are
- Action hooks: WordPress launches these hooks at specific points during execution of PHP code or as specific events occur.
- Filter hooks: WordPress launches these hooks to modify text before it's added to the database or sent to the browser screen.
![]() A complete list of action hooks available for plugin development can be found in the WordPress documentation at http://codex.wordpress.org/Plugin_API/Action_Reference. A complete list of filter hooks can be found at http://codex.wordpress.org/Plugin_API/Filter_Reference.
A complete list of action hooks available for plugin development can be found in the WordPress documentation at http://codex.wordpress.org/Plugin_API/Action_Reference. A complete list of filter hooks can be found at http://codex.wordpress.org/Plugin_API/Filter_Reference.
Understanding action hooks
To explore a simple action hook within the API, we analyze the Hello Dolly plugin by Matt Mullenweg. When activated, the Hello Dolly plugin randomly displays a lyric from the song “Hello Dolly!” by Louis Armstrong in the upper right of every page in the WordPress Dashboard.
The following code in the Hello Dolly plugin calls the action hook admin_head.
add_action('admin_head', 'dolly_css'),
The action hook admin_head runs in the HTML <head> section of the WordPress Dashboard. The function in the plugin that is hooked into admin_head is dolly_css. This function is defined in the plugin as shown:
function dolly_css() {
   $x = ( is_rtl() ) ? 'left' : 'right';
   echo "
   <style type='text/css'>
   #dolly {
      position: absolute;
      top: 4.5em;
      margin: 0;
      padding: 0;
      $x: 215px;
      font-size: 11px;
   }
   </style>
   ";
}
The function dolly_css simply echoes the HTML code between the <style></style> tags to the browser. This is one method of delivering style code to the browser. Another would be to put the style code in a plugin-specific stylesheet and call the stylesheet so that the stylesheet loads in the header of the Web site when it is loaded in a browser window. Figure 4-5 shows the <style> code added to the <head> section of the WordPress Dashboard.
Figure 4-5: Source code of the Dashboard showing Hello Dolly's style code.

This is a very basic example of how a plugin uses the hooks provided by the WordPress plugin API to access certain core functionality within WordPress. Without this hook, you must write a function that duplicates a process that WordPress is already performing.
Understanding filter hooks
To demonstrate the use of a filter hook, we stay with the Hello Dolly theme. This time, look at the Fancy Dolly plugin (http://wordpress.org/extend/plugins/fancy-plugin). The developer has taken the Hello Dolly plugin and expanded its functionality to add a sidebar widget where you can enter text for random display rather than the lyrics to “Hello Dolly!.”
The following code calls the widget_title filter hook:
apply_filters('widget_title', $instance['title'] );
The apply_filter is calling the widget_title filter hook. As you might imagine, this outputs the title of the widget to the browser. Figure 4-6 shows the widget title for the Hello Dolly widget on the front end of a Web site.
Figure 4-6: A widget title displayed on a Web site.

The function that is hooking into the widget_title filter hook is $instance[‘title’], which is defined in the Fancy Dolly plugin as a form:
function form( $instance ) {
   /* Set up some default widget settings. */
    $defaults = array( 'title' => 'We love you Dolly', 'dtext' => 'Hello, Dolly
   Well, hello, Dolly
   It's so nice to have you back where you belong
   You're lookin' swell, Dolly'),
      $instance = wp_parse_args( (array) $instance, $defaults ); ?>
<p>
<label for="<?php echo $this->get_field_id( 'title' ); ?>">Title:</label>
<input id="<?php echo $this->get_field_id( 'title' ); ?>" name="<?php echo $this-
    >get_field_name( 'title' ); ?>" value="<?php echo $instance['title']; ?>"
    style="width:100%;" />
</p>
<p>
<label for="<?php echo $this->get_field_id( 'dtext' ); ?>">Text (each row will be
    displayed randomly, use Notepad to copy and paste):</label>
<textarea rows="16" cols="80" id="<?php echo $this->get_field_id( 'dtext' ); ?>"
    name="<?php echo $this->get_field_name( 'dtext' ); ?>" value="<?php echo
    $instance['dtext']; ?>"><?php echo $instance['dtext']; ?></textarea>
</p>
<?php
   }
The form has some default text already inserted, but it provides two fields — title and dtext — in which you can enter your own text. The plugin then randomly displays your text in the widget area of your Web site. Figure 4-7 shows the widget form where you can replace the default text with your own.
Figure 4-7: The Fancy Dolly widget displaying the input form.
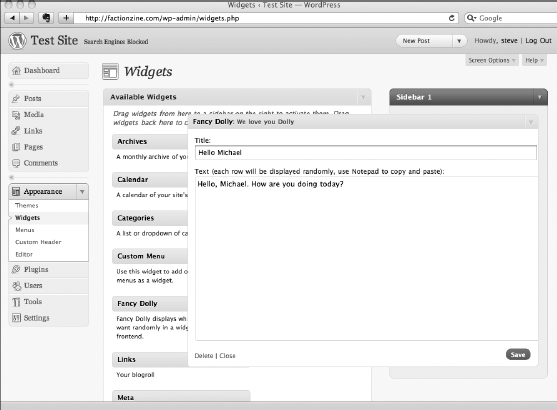
Figure 4-8 shows the text displaying in the widget area of the Web site.
Figure 4-8: The Fancy Dolly widget displaying text on a Web site.
