
Adding Theme Support for Built-In Features
The WordPress core offers a number of great tools that can be easily added to a theme to give the theme more customization options. WordPress provides you with several built-in features that give you the ability to enhance your site and theme. This section covers five of the most popular features, including:
- Custom navigation menus
- Custom post types
- Custom taxonomies
- Post formats
- Featured images
Each of these features are part of the WordPress core; however, they aren't activated by default. When we say that you're “adding theme support,” what we mean is that you are activating a built-in feature in your theme. Therefore, when you're travelling around the WordPress community, whether it's in a support forum or at a WordCamp event, and you hear someone say the theme supports a certain feature, you can smile because you know exactly what he is talking about.
Activating support for these features in the theme you are using involves a few steps:
- Core Function: Add support for the feature in your theme by including the core function in your theme's Theme Functions template file (functions.php).
- Template Function: Add the necessary function tags in your theme template(s) to display the features on your Web site.
- Templates: In some cases, you can create feature-specific templates to create enhancements to your site.
The following sections take you through each feature. You add the core function to your theme, add the function tags to your templates and, if indicated, create a feature-specific template in your theme that will handle the added features.
Adding support for custom menus
We think the WordPress menu-building feature is a great tool that WordPress offers to theme developers. Before the addition of this tool, theme developers implemented their own menu solution, creating a huge number of themes with navigation customization requiring coding and a small set of themes with very different ways of handling navigation. Creating complex, multi-level menus on your WordPress site takes just a few steps, as outlined in this section.
A navigation menu is a listing of links that displays on your site. These links can be links to pages, posts, or categories within your site, or they can be links to other sites. Either way, you can define navigation menus on your site with the built-in Custom Menus feature in WordPress.
It's to your advantage to provide at least one navigation menu on your site so that readers can see everything your site has to offer. Providing visitors with a link — or several links — keeps with the point-and-click spirit of the Web.
The Twenty Ten theme already supports menus. Looking at Twenty Ten's functions.php file, you can see that the following lines of code handle registering the theme's menu:
// This theme uses wp_nav_menu() in one location.
register_nav_menus( array(
 'primary' => __( 'Primary Navigation', 'twentyten' ),
) );
This registers a single navigation area with a theme location name of primary and a human-readable name of Primary Navigation. With the Twenty Ten theme active, choose Appearance![]() Menus.
Menus.
Core menu function and template tags
The Custom Menu feature is already built in to the default Twenty Ten WordPress theme, so you don't have to worry about preparing your theme for it. However, if you're using a different theme, adding this functionality is easy:
- Choose Appearance
 Editor and then click the Theme Functions template file ( functions.php ).
The Theme Functions template opens in the text editor on the left side of the Edit Themes page.
- Type the following function on a new line in the Theme Functions template file:
// ADD MENU SUPPORT
add_theme_support( 'nav-menus' );
- Click the Update File button to save the changes to the template.
This template tag tells WordPress that your theme can use the Custom Menu feature, and a Menus link now displays on the Appearance menu in the Dashboard.
- Open the Header template ( header.php ).
Click the Header link on the Edit Themes page to open the Header template in the text editor on the left side of the Edit Themes page.
- Add the following template tag by typing it on a new line in the Header template ( header.php ):
<?php wp_nav_menu(); ?>
This template tag is needed so the menu you build by using the Custom Menu feature will display at the top of your Web site. Table 6-2 gives the details on the different parameters you can use with the wp_nav_menu(); template tag to further customize the display to suit your needs.
- Click the Update File button at the bottom of the page to save the changes you made to the Header template.
Table 6-2 Common Tag Parameters for wp_nav_menu();


Figure 6-2 shows the default Twenty Ten theme with a navigation menu (Home, About, and Blog) beneath the theme's header graphic.
A menu called Main was created in the WordPress Dashboard. (See Chapter 1 in this minibook to create menus in the WordPress Dashboard.) The template tag used in the theme to display the menu looks like this:
<?php wp_nav_menu('Main'), ?>
The HTML markup for the menu is generated as an unordered list, by default, and looks like this:
<ul id="menu-main" class="menu">
<li id="menu-item-53" class="menu-item menu-item-type-custom menu-item-object-
    custom menu-item-53"><a href="/">Home</a></li>
<li id="menu-item-51" class="menu-item menu-item-type-post_type menu-item-object-
    page menu-item-51"><a href="http://localhost/wpdemo/blog/">Blog</a></li>
<li id="menu-item-52" class="menu-item menu-item-type-post_type menu-item-object-
    page menu-item-52"><a href="http://localhost/wpdemo/about/">About</a></li>
</ul>
Figure 6-2: The Twenty Ten theme displayed on Lisa's site with a navigation menu below the header.

Notice, in the HTML markup, the <ul id=“menu-main” class=“menu”> line defines the CSS ID and class.
The ID reflects the name that you give your menu. Because the menu is named Main, the CSS ID is menu-main. If the menu was named Foo, the ID would be menu-foo. By assigning menu names in the CSS and HTML markup, WordPress allows you to utilize CSS to create different styles and formats for your different menus.
When developing themes for either yourself or others to use, make sure that the CSS you define for the menus can do things like account for subpages by creating drop-down menus. There are several different ways to accomplish this; Listing 6-1 gives you just one example — a block of CSS that you can use to create a nice style for your menu. (This CSS example assumes that you have a menu named “Main”; therefore, the HTML and CSS markups use menu-main).
Listing 6-1: Sample CSS for Drop-down Menu Navigation
#menu-main {
....width: 960px;
....font-family: Georgia, Times New Roman, Trebuchet MS;
....font-size: 16px;
....color: #FFFFFF;
....margin: 0 auto 0;
....clear: both;
....overflow: hidden;
....}

#menu-main ul {
....width: 100%;
....float: left;
....list-style: none;
....margin: 0;
....padding: 0;
....}

#menu-main li {
....float: left;
....list-style: none;
....}

#menu-main li a {
....color: #FFFFFF;
....display: block;
....font-size: 16px;
....margin: 0;
....padding: 12px 15px 12px 15px;
....text-decoration: none;
....position: relative;
....}

#menu-main li a:hover, #menu-main li a:active, #menu-main .current_page_item a,
    #menu-main .current-cat a, #menu-main .current-menu-item {
....color: #CCCCCC;
....}

#menu-main li li a, #menu-main li li a:link, #menu-main li li a:visited {
....background: #555555;
....color: #FFFFFF;
....width: 138px;
....font-size: 12px;
....margin: 0;
....padding: 5px 10px 5px 10px;
....border-left: 1px solid #FFFFFF;
....border-right: 1px solid #FFFFFF;
....border-bottom: 1px solid #FFFFFF;
....position: relative;
....}

#menu-main li li a:hover, #menu-main li li a:active {
....background: #333333;
....color: #FFFFFF;
....}

#menu-main li ul {
....z-index: 9999;
....position: absolute;
....left: −999em;
....height: auto;
....width: 160px;
....}
#menu-main li ul a {
....width: 140px;
....}

#menu-main li ul ul {
....margin: −31px 0 0 159px;
....}

#menu-main li:hover ul ul, #menu-main li:hover ul ul ul, #menu-main li.sfHover ul
    ul, #menu-main li.sfHover ul ul ul {
....left: −999em;
....}

#menu-main li:hover ul, #menu-main li li:hover ul, #menu-main li li li:hover
    ul, #menu-main li.sfHover ul, #menu-main li li.sfHover ul, #menu-main li li
    li.sfHover ul {
....left: auto;
....}

#menu-main li:hover, #menu-main li.sfHover {
....position: static;
....}
![]() The CSS you use to customize the display of your menus will differ; the example in the preceding section is just that, an example. After you get the hang of using CSS, you can try different methods, colors, and styling to create a custom look of your own. (Additional information about Basic HTML and CSS is found in Chapter 4 of this minibook).
The CSS you use to customize the display of your menus will differ; the example in the preceding section is just that, an example. After you get the hang of using CSS, you can try different methods, colors, and styling to create a custom look of your own. (Additional information about Basic HTML and CSS is found in Chapter 4 of this minibook).
Displaying custom menus using widgets
You don't have to use the wp_nav_menu(); template tag to display the menus on your site because WordPress also provides a Custom Menu widget that you can add to your theme, allowing you to use widgets, instead of template tags, to display the navigation menus on your site. This is especially helpful if you've created multiple menus for use in and around your site in various places. Have a look into Chapter 4 in this minibook for more information on using WordPress widgets.
Your first step is to register a special widget area for your theme to handle the Custom Menu widget display. To do this, open your theme's function.php file and add the following lines of code:
// ADD MENU WIDGET
if ( function_exists('register_sidebars') )
....register_sidebar(array('name'=>'Menu',));
These few lines of code create a new Menu widget area on the Widgets page in your Dashboard. You can drag the Custom Menu widget into the Menu widget to indicate that you want to display a custom menu in that area. Figure 6-3 shows the Menu widget area with the Custom Menu widget added.
Figure 6-3: Widgets page displaying a new Menu widget area with the Custom Menu widget added.

To add the widget area to your theme, open the Theme Editor (Appearance![]() Editor), open the header.php file, and add these lines of code in the area in which you want to display the Menu widget:
Editor), open the header.php file, and add these lines of code in the area in which you want to display the Menu widget:
<ul>
<?php if ( !function_exists('dynamic_sidebar') || !dynamic_sidebar('Menu') ) : ?>
<?php endif; ?>
</ul>
These lines of code tell WordPress that you want information contained in the Menu widget area to display on your site.
Adding support for custom post types
Custom post types and custom taxonomies have expanded the CMS capabilities of WordPress and are likely to become a big part of plugin and theme features as more developers become familiar with their use. Custom post types allow developers to create new content types separate from posts and pages, such as movie reviews or recipes. Custom taxonomies allow developers to create new types of content grouping separate from categories and tags, such as genres for movie reviews or seasons for recipes.
Posts and pages are nice generic containers of content. A page is timeless content that has a hierarchal structure — a page can have a parent (forming a nested, or hierarchal, structure of pages). A post is content that is listed in linear (not hierarchal) order based on when it was published and organized into categories and tags. What happens when you want a hybrid of these features? What if you want content that doesn't show up in the post listings, displays the posting date, and doesn't have either categories or tags? Custom post types are created to satisfy this desire to customize content types.
By default, WordPress already has different post types built in to the software, ready for you to use. The default post types include
- Blog posts
- Pages
- Menus
- Attachments
- Revisions
Custom post types give you the ability to create new and useful types of content on your Web site, including a smart and easier way to publish those content types to your site.
The possibilities for the use of custom post types are endless. To kick-start your imagination, here are some of the more popular and useful ideas that others have implemented on sites:
- Photo gallery
- Podcast or video
- Book reviews
- Coupons and special offers
- Events calendar
Core custom post type function
To create and use custom post types on your site, you need to be sure that your WordPress theme contains the correct code and functions. The following steps create a very basic and generic custom post type called Generic Content. Follow these steps to create the same basic custom post type:
- Open the Theme Functions template file ( functions.php ).
Choose Appearance
Editor to open the Theme Editor page. Then click the Theme Functions template link to open the functions.php file in the text editor. - Add the custom post types code to the bottom of the Theme Functions template file.
Scroll to the bottom of the functions.php file and include the following code to add a Generic Content custom post type to your site:
// ADD CUSTOM POST TYPE add_action( 'init', 'create_post_type' ); function create_post_type() { register_post_type( 'generic-content', array( 'labels' => array( 'name' => __( 'Generic Content' ), 'singular_name' => __( 'Generic Content' ) ), 'public' => true ) ); } - Click the Update File button to save the changes made to the functions.php file.
![]() The register_post_type function can accept several arguments and parameters, which are detailed in Table 6-3. You can use a variety and combination of different arguments and parameters to create a specific post type. You can find more information on Custom Post Types and using the register_post_types function in the WordPress Codex at http://codex.wordpress.org/Function_Reference/register_post_type.
The register_post_type function can accept several arguments and parameters, which are detailed in Table 6-3. You can use a variety and combination of different arguments and parameters to create a specific post type. You can find more information on Custom Post Types and using the register_post_types function in the WordPress Codex at http://codex.wordpress.org/Function_Reference/register_post_type.
![]() If you really don't feel up to writing this code in the Theme Functions template file, there is a nifty plugin developed for WordPress called Custom Post Types UI, written by Brad Williams of WebDevStudios (http://webdevstudios.com). This plugin provides you with an interface in your WordPress Dashboard that simplifies the creation of custom post types on your site and completely bypasses the need to create the code in the Theme Functions template file (functions.php). You can find the plugin at http://wordpress.org/extend/plugins/custom-post-type-ui.
If you really don't feel up to writing this code in the Theme Functions template file, there is a nifty plugin developed for WordPress called Custom Post Types UI, written by Brad Williams of WebDevStudios (http://webdevstudios.com). This plugin provides you with an interface in your WordPress Dashboard that simplifies the creation of custom post types on your site and completely bypasses the need to create the code in the Theme Functions template file (functions.php). You can find the plugin at http://wordpress.org/extend/plugins/custom-post-type-ui.
After you complete the steps to add the generic content post type to your site, the Generic Content post type appears on the left navigation menu in the Dashboard, as shown in Figure 6-4.
Figure 6-4: A new custom post type menu appears on the Dashboard.

You add and publish new content using the new custom post type the same way youdo when you write and publish blog posts. The published content isn't added to the chronological listing of blog posts; it's treated as separate content, just like static pages.
Generic Content is part of the permalink structure, and the permalink looks similar to http://yourdomain.com/generic-content/new-article.
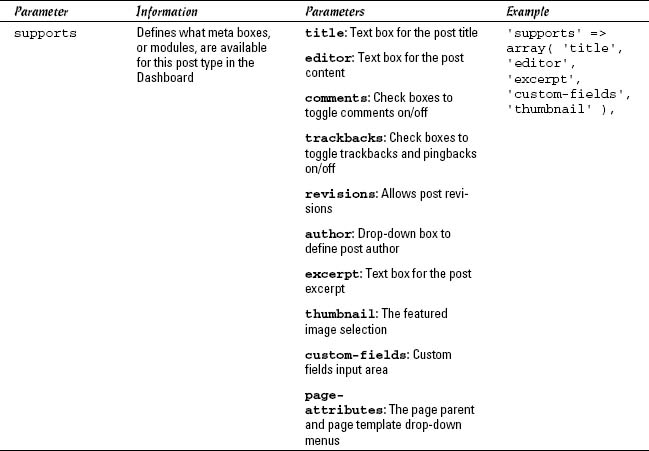
Table 6-3 Arguments and Parameters for register_post_types();


Listing 6-2 gives you a real-world example that Lisa used on a site she developed called No Rules Theatre, which you can see at http://norulestheatre.org. This site uses a custom post type called Shows to create custom content for the shows that the theatre produces each season. Reference the parameters and information provided in Table 4-2 while reading the lines of code in Listing 6-2 to see how the custom post types for the No Rules Theatre site were created and applied.
Listing 6-2: Real World Custom Post Type Example from norulestheatre.org
// ADD CUSTOM POST TYPE: SHOWS
add_action( 'init', 'create_my_post_types' );
function create_my_post_types() {
....register_post_type( 'shows',
....array(
....'labels' => array(
....'name' => __( 'Shows' ),
....'singular_name' => __( 'Show' ),
....'add_new' => __( 'Add New Show' ),
....'add_new_item' => __( 'Add New Show' ),
....'edit' => __( 'Edit' ),
....'edit_item' => __( 'Edit Show' ),
....'new_item' => __( 'New Show' ),
....'view' => __( 'View Show' ),
....'view_item' => __( 'View Show' ),
....'search_items' => __( 'Search Shows' ),
....'not_found' => __( 'No shows found' ),
....'not_found_in_trash' => __( 'No shows found in Trash' ),
....'parent' => __( 'Parent Show' ),
....),

....'public' => true,
....'show_ui' => true,
....'publicly_queryable' => true,
....'exclude_from_search' => false,
....'menu_position' => 10,
....'menu_icon' => get_stylesheet_directory_uri() . '/img/nrt-shows.png',
....'hierarchical' => true,
....'query_var' => true,
....'rewrite' => array( 'slug' => 'shows', 'with_front' => false ),
....'taxonomies' => array( 'post_tag', 'category'),
....'can_export' => true,
....'supports' => array(
....'post-thumbnails',
....'excerpts',
....'comments',
....'revisions',
....'title',
....'editor',
....'page-attributes',
....'custom-fields')
....)
....);
}
![]() In the previous section we discuss Custom Menus, and in Chapter 1 of this minibook, we show you how to add custom menus in the Dashboard. Chapter 1 states the three modules WordPress gives you to add menus from are Custom Links, Pages, and Categories. On the Custom Menu page in the WordPress Dashboard, click the Screen Options tab at the top right of that page; the check box next to Post Types enables your custom post types in the Menus you create.
In the previous section we discuss Custom Menus, and in Chapter 1 of this minibook, we show you how to add custom menus in the Dashboard. Chapter 1 states the three modules WordPress gives you to add menus from are Custom Links, Pages, and Categories. On the Custom Menu page in the WordPress Dashboard, click the Screen Options tab at the top right of that page; the check box next to Post Types enables your custom post types in the Menus you create.
Custom post type templates
By default, custom post types utilize the single.php template in your theme. That is unless you create a specific template for your custom post type if you find the regular WordPress single.php template too limiting for your post type.
The preceding section has the code to build a simple Generic Content custom post. After that is added, a Generic Content menu appears in the WordPress Dashboard. Choose Generic Content![]() Add New and publish a new post to add some content for testing. In this example, a new Generic Content type with a title of Test and a slug of test is added. Because the Generic Content type doesn't have a specific template, it uses the single.php template, and resulting posts look no different from a standard one.
Add New and publish a new post to add some content for testing. In this example, a new Generic Content type with a title of Test and a slug of test is added. Because the Generic Content type doesn't have a specific template, it uses the single.php template, and resulting posts look no different from a standard one.
![]() If you get a Not Found page when you try to go to a new custom post type entry, reset your permalink settings. Choose Settings
If you get a Not Found page when you try to go to a new custom post type entry, reset your permalink settings. Choose Settings![]() Permalinks on the WordPress Dashboard and then click Save Changes. This forces WordPress to reset the permalinks, which adds the new custom post type link formats in the process.
Permalinks on the WordPress Dashboard and then click Save Changes. This forces WordPress to reset the permalinks, which adds the new custom post type link formats in the process.
To build a template specific for the Generic Content post type, add a new template named single-posttype.php where posttype is the first argument passed to the register_post_type function from the preceding section. For this example, the single template file specific to Sample Post Type is single-generic-content.php. Any modifications made to this template file will only appear for instances of the Generic Content post type.
Tying this together with the section on template parts from earlier in this chapter, a basic structure for single-generic-content.php for the Twenty Ten theme is
<?php get_header(); ?>
<div id='container'>
    <div id='content' role='main'>
        <?php get_template_part('loop', 'generic-content'), ?>
    </div><!-- #content -->
</div><!-- #container -->
<?php get_sidebar(); ?>
<?php get_footer(); ?>
By using the template part, creating a file called loop-generic-content.php allows for easy customization of The Loop for the Generic Content post type entry.