Working with Custom Post Types
A new feature in WordPress (new as of version 3.0) is a feature called custom post types. This feature allows you, the site owner, to create different content types for your WordPress site that give you more creative control over how different types of content are entered, published, and displayed on your WordPress Web site.
![]() Personally, we wish WordPress had called this feature custom content types so that people didn't incorrectly think that custom post types pertain to posts only. Custom post types aren't really the posts that you know as blog posts. Custom post types are a different way of managing content on your blog, by defining what type of content it is, how it is displayed on your site, and how it operates — but they're not necessarily posts.
Personally, we wish WordPress had called this feature custom content types so that people didn't incorrectly think that custom post types pertain to posts only. Custom post types aren't really the posts that you know as blog posts. Custom post types are a different way of managing content on your blog, by defining what type of content it is, how it is displayed on your site, and how it operates — but they're not necessarily posts.
By default, WordPress already has different post types built into the software, ready for you to use. These default post types include
- Blog posts
- Pages
- Navigation menus (see Book VI)
- Attachments
- Revisions
Custom post types give you the ability to create new and useful types of content on your Web site, including a smart and easy way to publish those content types to your site.
You really have endless possibilities for how to use custom post types, but here are a few ideas that can kick-start your imagination (they're some of the most popular and useful ideas that others have implemented on their sites):
In order to create and use custom post types on your site, you need to be sure that your WordPress theme contains the correct code and functions. In the following steps, we create a very basic custom post type called Generic Content. Follow these steps to create the Generic Content basic custom post type:
- Click Editor in the Appearances drop-down list to open the Theme Editor page.
- Click the Theme Functions template link to open the functions.php file in the text editor on the left side of the page.
- Add the custom post types code to the bottom of the Theme Functions template file.
Scroll down to the bottom of the functions.php file and include the following code to add a Generic Content custom post type to your site:
add_action( 'init', 'create_my_post_types' ); function create_my_post_types() { register_post_type( 'generic_content', array( 'label' => __( 'Generic Content' ), 'singular_label' => __( 'Generic Content' ), 'description' => __( 'This is a description of the Generic Content type' ), 'public' => true, ) } - Click the Update File button to save the changes made to the functions.php file.
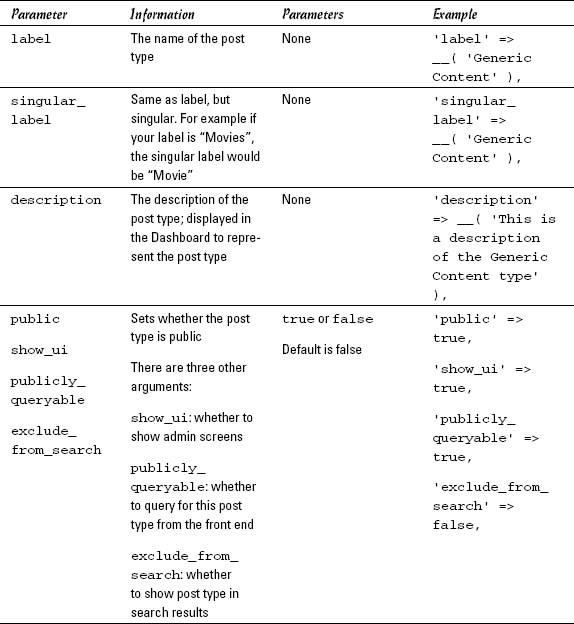
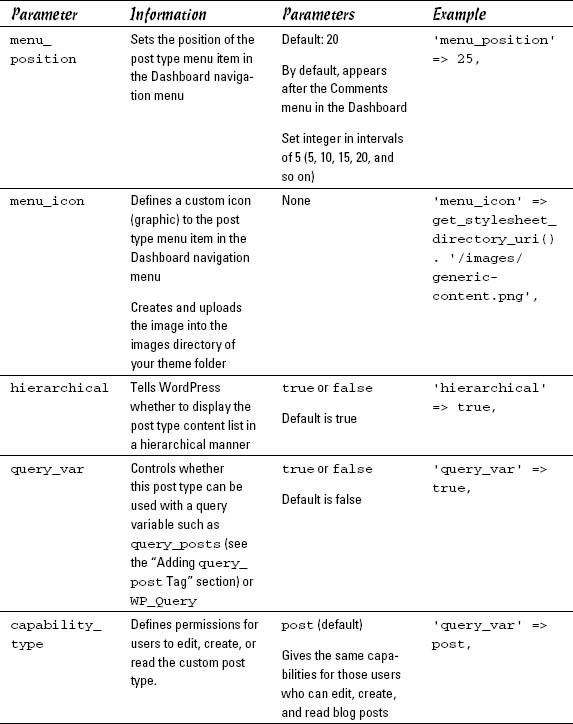
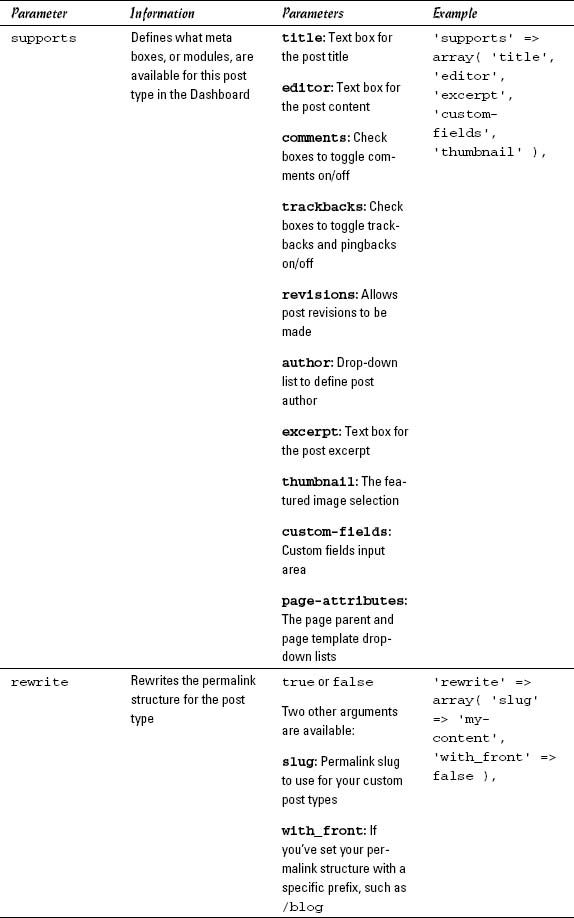
![]() The function register_post_type can accept several different arguments and parameters, which are detailed in Table 6-2. You can use a variety and combination of different arguments and parameters to create a specific post type. You can find more information on custom post types and using the register_post_types function in the official WordPress Codex at http://codex.wordpress.org/Function_Reference/register_post_type.
The function register_post_type can accept several different arguments and parameters, which are detailed in Table 6-2. You can use a variety and combination of different arguments and parameters to create a specific post type. You can find more information on custom post types and using the register_post_types function in the official WordPress Codex at http://codex.wordpress.org/Function_Reference/register_post_type.
After you complete the preceding steps to add the Generic Content custom post type to your site, a new post type labeled Generic appears in the left navigation menu of the Dashboard.
You can add and publish new content by using the new custom post type, just like when you write and publish blog posts (see Book IV, Chapter 1). The published content isn't added to the chronological listing of blog posts, but rather, it's treated like separate content from your blog (just like static pages).
View the permalink for it, and you see that it adopts the post type name Generic Content and uses it as part of the permalink structure, creating a permalink that looks like http://yourdomain.com/generic-content/new-article.
Table 6-2 Arguments and Parameters for register_post_types();

Two very helpful plugins for building custom post types pretty quickly in WordPress are
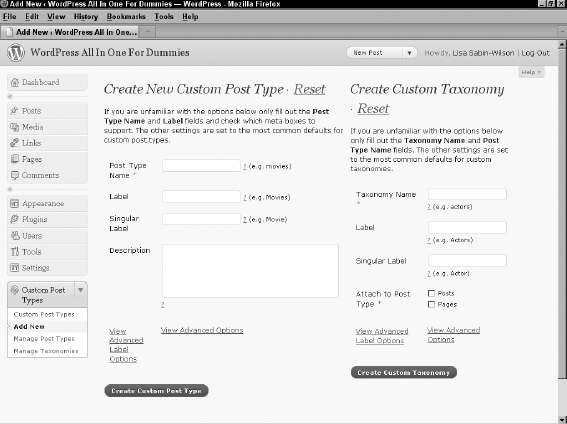
- Custom Post Types UI: Written by the folks at WebDevStudios (http://webdevstudios.com), this plugin gives you a clean interface within your WordPress Dashboard that can help you easily and quickly build custom post types on your Web site. It eliminates the need to add the code (discussed earlier in this section) to your functions.php file by giving you options and settings so that you can configure and build the custom post type that you want. Figure 6-6 shows the Custom Post Types UI options page in the Dashboard.
Figure 6-6: The Custom Post Types UI plugin options page.
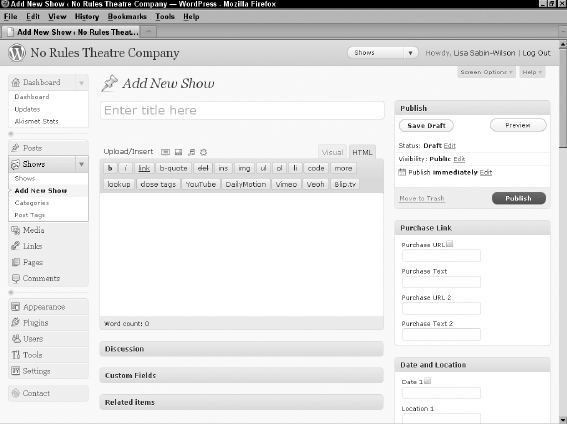
- Verve Meta Boxes: Available from Magento Developers in the WordPress Plugin Directory (http://wordpress.org/extend/plugins/verve-meta-boxes), this plugin provides an interface in your Dashboard that you can use to create meta boxes, or special custom fields (see Book IV, Chapter 5) for the custom post types that you build. As an example, Figure 6-7 shows some custom meta boxes built by using custom post types. This Web site features theater productions and the custom post types for those shows. On the right side of Figure 6-7, the Purchase Link boxes were created by using custom meta boxes and give the Web site owner a quick and easy field to fill out so that he or she can include information on where to purchase show tickets in every show post published.
Figure 6-7: Purchase Link Meta Boxes created for this Custom Post Type.