
Editing the Dashboard to Create a Listening Post
After you choose your data sources, clean up your feeds, and put them all in individual RSS feeds, you can finally bring them into WordPress and set up your social-media listening hub.
You can bring these RSS feeds into your Dashboard in two ways:
- Edit your WordPress install by hand. You can edit the trunk code (the core coding of WordPress), which WordPress provides in Trac at http://core.trac.wordpress.org/browser/trunk//wp-admin/includes/dashboard.php.
- Use a plugin. If you don't feel comfortable doing any type of editing to the code, you can just take the easy way out (or the most sane way) and use a plugin, which we recommend. Currently, I use the Dashboard Latest News plugin, which you can find in the plugin repository at http://wordpress.org/extend/plugins/dashboard-last-news.
Follow these steps to set up the Dashboard Last News plugin and configure it to create a social-listening Dashboard in WordPress:
- From the Plugins menu on the left side of your WordPress installation, choose Add New. This takes you to the form where you can search for new plugins.
- In the Search text box, type dashboard-last-news and click Search Plugins.
The search results page appears.
- Search for the Dashboard-Last-News plugin and click the Install now link, which installs the plugin on your site.
- After the installation is complete, activate the plugin by clicking Activate Plugin in the Installed Plugin menu that appears below the Plugin menu.
- Click the Last News link in the Settings menu in the Dashboard.
A new menu appears, which you can use to select how many Dashboard widgets you want for your RSS.
- Select the number of Last News Dashboard widgets you want (up to five) in the drop-down menu on the Dashboard Last News page, and then click Update.
- Click the Dashboard link in the menu on the left to go back to your Dashboard.
A Last News section that contains the widgets you created in step 6 appears in your Dashboard.
- To configure a widget, hover over the menu bar for that widget and, when the word Configure appears, click it.
The screen reloads, and you can now completely configure the widget.
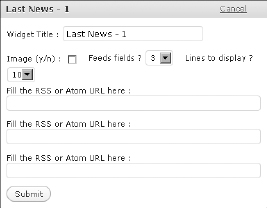
- Enter a name for the widget in the Widget Title text box.
You may want to name it according to the subject area it covers. The example dashboard has data coming in around Social Media and Design to go along with the terms we are monitoring.
- (Optional) Select the Image (Y/N) check box to add an image next to the individual search results in the widget.
You may not want to include images because most of the images that are automatically pulled are voting option buttons or other feed image buttons, which don't add anything by having. Also, images slow down the load time.
- Select a number from the Lines to Display drop-down list, which specifies how many online entries that the monitoring tools have found that you want to appear in the widget.
You can choose between 1 and 40.
- Paste the URL that you created in xFruits (as discussed in the preceding section) into the Fill the RSS or Atom URL Here text box and click Submit (see Figure 2-10).
- Repeat Steps 8 through 12 for the other widgets on your Dashboard by using your other xFruits-generated feeds.
Figure 2-10: Configuring the Last News widget.
After you have your feeds set up, you can configure the appearance of your WordPress Dashboard.
- Drag and drop the new widget boxes where you want them.
- (Optional) Expand the number of columns and remove current widgets by clicking the Screen Options link in the upper-right corner of the Dashboard, and then selecting or deselecting the check boxes for the widgets in the drop-down list that appears.