
Adding New Template Files
In Chapter 3 of this minibook, I introduce the concept of template files and give you an overview of the template files available to you. In Chapter 5, we explain the idea of overriding template files with child themes. The following sections explore some advanced uses of template files.
Although you rarely need to use all these techniques, being fluent in your options gives you flexibility to address specific needs quickly when they come up.
Creating named templates
WordPress recognizes three special areas of a theme: header, footer, and sidebar. The get_header, get_footer, and get_sidebar functions default to loading header.php, footer.php, and sidebar.php, respectively. Each of these functions also supports a name argument to allow you to load an alternate version of the file. For example, running get_header(‘main’) causes WordPress to load header-main.php.
You might wonder why you would use a name argument when you could just create a template file named whatever you like and load it directly. The reasons for using the get_header, get_footer, or get_sidebar functions with a name argument are
- Holding to a standard naming convention that other WordPress developers can easily understand
- Automatically providing support for child themes to override the parent theme's template file
- Offering a fallback that loads the unnamed template file if the named one doesn't exist
In short, use the name argument feature if you have multiple, specialized header, footer, or sidebar template files.
This named template feature can be used with the Theme Options discussed in the “Exploring Theme Options” section, later in this chapter, to allow users to easily switch between different header, footer, and sidebar styles. On the Theme Options page, you can give the user the ability to choose the specific header, footer, or sidebar template file he or she wants, giving them an easy way to change the layout or design of the site. A good example of content you could add to a different sidebar file can be found in the nearby Query posts for category content sidebar, which discusses displaying a list of recent posts and filing them in a specific category in the sidebar of your site.
Query posts for category content
WordPress makes it possible to pull in very specific types of content on your Web site through the query_posts(); template tag. You place this template tag before The Loop, and it lets you specify which category you want to pull information from. If you have a category called WordPress, and you want to display the last three posts from that category on your front page, in your blog sidebar, or somewhere else on your site, you can use this template tag.
The query_posts(); template tag has several parameters that let you display different types of content, such as posts in specific categories, content from specific pages/posts, or dates in your blog archives. The query_posts(); tag lets you pass many variables and parameters; it's not just limited to categories either, you can use it for pages, posts, tags and more. Visit the WordPress Codex at http://codex.wordpress.org/Template_Tags/query_posts and read about this tag's options.
To query the posts on your blog to pull out posts from just one specific category, you can use the following tag with the associated arguments for the available parameters. This example tells WordPress to query all posts that exist on your site and list the last five posts in the Books category:
<?php query_posts('showposts=5&category_
          name=books;); ?>
Simply place this code on a line above the start of The Loop; you can use it in a sidebar to display clickable titles of the last five posts in the Books category. (When clicked, the reader is taken to the individual post page to read the full post.)
<?php query_posts('showposts=5&category_
          name=books;); ?>
<?php if (have_posts()) : while (have_
          posts()) : the_post(); ?>
<strong><a href="<?php the_permalink()
          ?>" rel="bookmark" title="Permanent Link to
<?php the_title_attribute(); ?>"><?php
          the_title(); ?></a></strong>
<?php the_excerpt(); endwhile; endif; ?>
Creating and using template parts
Template parts are relatively new (they were added in version 3.0). A template part is very similar to the header, footer, and sidebar templates except that you aren't limited to just header, footer, and sidebar.
The get_header, get_footer, and get_sidebar functions allow for code that's duplicated in many of the template files to be placed in a single file and loaded by using a standard process. The purpose of template parts is to offer a new standardized function that can be used to load sections of code specific to an individual theme. Using the concept of template parts, sections of code that add a specialized section of header widgets or display a block of ads can be placed in individual files and easily loaded as a template part.
Template parts are loaded by using the get_template_part function. The get_template_part function accepts two arguments: slug and name. The slug argument is required and describes the generic type of template part to be loaded, such as loop. The name argument is optional and selects a specialized template part, such as post.
A call to get_template_part with just the slug argument will try to load a template file with a file name of slug.php. Thus, a call to get_template_part(‘loop’) will try to load loop.php, and a call to get_template_part(‘header-widgets’) will try to load header-widgets.php. See a pattern here? Slug refers to the name of the template file, minus the .php extension, because WordPress already assumes that it's a PHP file.
A call to get_template_part with both the slug and name arguments will try to load a template file with a filename of slug-name.php. If a template file with a filename of slug-name.php doesn't exist, then WordPress will try to load a template file with a filename of slug.php. Thus, a call to get_template_part(‘loop’, ‘post’) will first try to load loop-post.php followed by loop.php if loop-post.php doesn't exist; a call to get_template_part(‘header-widgets’, ‘post’) will first try to load header-widgets-post.php followed by header-widgets.php if header-widgets-post.php doesn't exist.
The Twenty Ten theme offers a good example of the template part feature in use. It uses a template part called loop to allow The Loop to be put into individual files.
![]() The Loop is the section of code found in most theme template files that uses a PHP while loop to loop through the set of post, page, and archive content (to name a few) and display it. The presence of The Loop in a template file is crucial for a theme to function properly. A section of Chapter 3 in this minibook examines The Loop.
The Loop is the section of code found in most theme template files that uses a PHP while loop to loop through the set of post, page, and archive content (to name a few) and display it. The presence of The Loop in a template file is crucial for a theme to function properly. A section of Chapter 3 in this minibook examines The Loop.
Twenty Ten's index.php template file shows a template part for The Loop in action:
<?php get_header(); ?>
    <div id="container_51_chapter-06">
        <div id="content_51_chapter-06" role="main">
            <?php get_template_part('loop', 'index'), ?>
        </div><!-- #content -->
    </div><!-- #container -->
    <?php get_sidebar(); ?>
    <?php get_footer(); ?>
Loading The Loop by using a template part, Twenty Ten cleans up the index.php code considerably when compared to other themes. This cleanup of the template file code is just the icing on the cake. The true benefits are the improvements to theme development.
Twenty Ten's index.php template file calls for a template part with a slug of loop and a name of index. Because Twenty Ten doesn't supply a loop-index.php file, loop.php is used. This allows a child theme (child themes are discussed at length in Chapter 5 of this minibook) to supply a loop-index.php file to customize just The Loop for index.php. A child theme can do this without having to supply a customized index.php file because of Twenty Ten's use of template parts and using both arguments of the get_template_part function.
With Twenty Ten's code for the header, Loop, sidebar, and footer placed into separate files, the template files become much easier to customize for specific uses. This can be seen by comparing the page.php to the onecolumn-page.php template files:
The page.php listing:
<?php get_header(); ?>
    <div id="container_51_chapter-06">
        <div id="content_51_chapter-06" role="main">
            <?php get_template_part('loop', 'page'), ?>
        </div><!-- #content -->
    </div><!-- #container -->
    <?php get_sidebar(); ?>
    <?php get_footer(); ?>
The onecolumn-page.php listing:
/* Template Name: One column, no sidebar */
    <?php get_header(); ?>
    <div id="container_51_chapter-06" class="one-column">
        <div id="content_51_chapter-06" role="main">
            <?php get_template_part('loop', 'page'), ?>
        </div><!-- #content -->
    </div><!-- #container -->
    <?php get_footer(); ?>
Other than the onecolumn-page.php having the Template Name comment at the top, allowing it to be used as a page template (discussed in the upcoming “Using page templates” section), the only difference is that page.php has the get_sidebar function call and onecolumn-page.php adds a one-column class to the container div. With just these modifications and a few styling rules added for the one-column class, the theme now has a page template that doesn't have a sidebar.
You might wonder how the preceding example shows the value of template parts if it is really about the get_sidebar function. Although the get_sidebar function is the feature of the previous example, the unsung hero is the get_template_part function.
Before template parts, the full Loop code would be duplicated in the page.php and onecolumn-page.php files. This means that a modification to the page.php file's Loop code would also require the same modification to the onecolumn-page.php file. Imagine if you had to make the same modification to five template files. Repeatedly making the same modifications quickly becomes tiring and each modification increases the chance of making mistakes. Using a template part means that the modification needs to be made only one time.
Looking at the page.php and onecolumn-page.php example, the get_template_part call allows for easily creating as many customized page templates as needed without having to duplicate The Loop code. Without the duplicate code, the code for The Loop can be easily modified in one place.
![]() When you start duplicating sections of code in numerous template files, place the code in a separate file and use the get_template_part function to load it where needed.
When you start duplicating sections of code in numerous template files, place the code in a separate file and use the get_template_part function to load it where needed.
Exploring content-specific standard templates
The template files discussed so far span a wide scope of site views specific to the view and not the content. For example, the category.php template file applies to all category archive views but not to a specific category, and the page.php template file applies to all page views but not to a specific page. However, you can create template files for specific content and not just the view.
Four content-specific template types are available: author, category, page, and tag. Each one allows you to refer to specific content by the term's ID (an individual author's ID, for instance) or by the slug.
![]() The slug discussed in this section differs from the slug argument of the get_template_part function described in the preceding section. For this section, slug refers to a post, page, or category slug (to name a few), such as a Press Releases category having a slug of press-releases or a post titled “Hello World” having a slug of hello-world.
The slug discussed in this section differs from the slug argument of the get_template_part function described in the preceding section. For this section, slug refers to a post, page, or category slug (to name a few), such as a Press Releases category having a slug of press-releases or a post titled “Hello World” having a slug of hello-world.
For example, imagine that you have an About Us page with an id of 138 and a slug of about-us. You can create a template for this specific page by creating a file named either page-138.php or page-about-us.php. In the same way, if you want to create a template specific to an awesome author named Cory with an id of 7 and a slug of cory, you can create a file named either author-7.php or author-cory.php.
Creating a template by using the slug can be extremely helpful for making templates for sites that you don't manage. If you want to share a theme that you created, you could create a category-featured.php template, and this template would automatically apply to any category view that has a slug of featured.
Using categories as the example, the file naming convention is as follows:
- A template with the filename category.php is a catchall (default) for the display for all categories (alternatively, a template with the filename of archives.php will display categories if a category.php does not exist).
- Add a dash and the category ID number to the end of the filename (shown in Table 6-1) to specify a template for an individual category.
- Alternatively, you can add a dash and the category slug to the end of the filename ( shown in Table 6-1) to define it as a template for that particular category. For example, if you have a category called Books, the category slug is books; the individual category template file would be named category-books.php.
- If you don't have a category.php, an archives.php, or category-#.php file, the category display pulls from the Main Index template (index.php).
Table 6-1 gives you some examples of file naming conventions for category templates.
Table 6-1 Category Template File Naming Conventions
| If the Category ID or Slug Is . . . | The Category Template Filename Is . . . |
| 1 | category-1.php |
| 2 | category-2.php |
| 3 | category-3.php |
| books | category-books.php |
| movies | category-movies.php |
| music | category-music.php |
![]() Because creating a template by using slugs is so useful (and because an ID is only relevant to a specific site), you might wonder why the id option exists. The short answer is that the id option existed before the slug option; however, it is still valuable in specific instances. You can use the id option for a content-specific template without worrying about the customization breaking when the slug changes. This is especially helpful if you set up the site for someone and can't trust that he or she will leave the slugs alone (such as changing a category with a slug of news to press-releases).
Because creating a template by using slugs is so useful (and because an ID is only relevant to a specific site), you might wonder why the id option exists. The short answer is that the id option existed before the slug option; however, it is still valuable in specific instances. You can use the id option for a content-specific template without worrying about the customization breaking when the slug changes. This is especially helpful if you set up the site for someone and can't trust that he or she will leave the slugs alone (such as changing a category with a slug of news to press-releases).
Using page templates
Although the page-slug.php feature is very helpful; sometimes, requiring the theme's user to use the name you choose for a specific feature is too difficult or unnecessary. Page templates allow you to create a stand-alone template (just like page.php or single.php) that the user can selectively use on any specific page he or she chooses. As opposed to the page-slug.php feature, a page template can be used on more than one page. The combined features of user selection and multiple uses make page templates a much more powerful theme tool than page-slug.php templates.
For more on page templates, refer to Chapters 1, 3, and 5 in this minibook.
To make a template a page template, simply add Template Name: Descriptive Name to a comment section at the top of the template file. For example, the following code is the beginning of the onecolumn-page.php page template file in the Twenty Ten theme:
<?php
/**
 * Template Name: One column, no sidebar
 *
 * A custom page template without sidebar.
 *
 * The "Template Name:" bit above allows this to be selectable
 * from a dropdown menu on the edit page screen.
 *
 * @package WordPress
 * @subpackage Twenty_Ten
 * @since Twenty Ten 1.0
 */
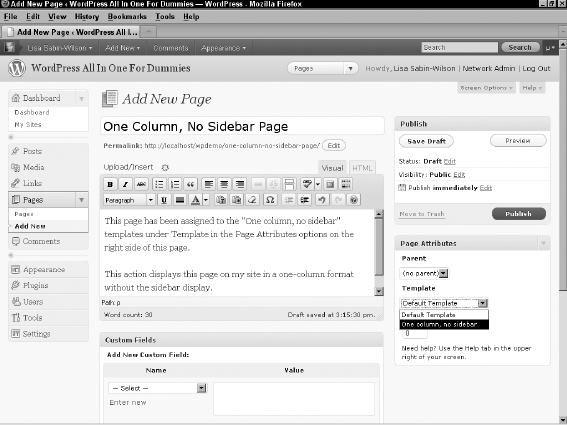
This registers the template file as a page template and adds One Column, No Sidebar to the Page Attributes module's Template drop-down, as shown in Figure 6-1. (Check out Book 4, Chapters 1 and 2 for information on publishing pages and using the Page Attributes options.) Using a template on a static page is a two-step process: Upload the template, and tell WordPress to use the template by tweaking the page's code.
Figure 6-1: Add New Page in the Dashboard Showing Page Attributes for Page Template Assignment.
By providing a robust set of page templates, you can offer users of your theme an easy-to-use set of options for formatting their pages. Although these options can be used only for pages, named header, footer, sidebar, and template parts can be used to offer users options on other site views.