
Exploring the Custom Fields Interface
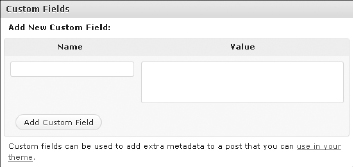
The Custom Fields module appears on both the Write Post and Write Page (See Book IV, Chapters 2 and 3) pages in the WordPress Dashboard, below the Post text box, as shown in Figure 5-1.
Figure 5-1: The Custom Fields module on the Write Post page in the Dashboard.
The Custom Fields module has two different text boxes:
- Name: Also known as the Key, you give this name to the Custom Field you're planning to use. The Name needs to be unique: It's used in the template tag that you can read about in the section “Adding Custom Fields to Your Template File,” later in this chapter. In Figure 5-2, you can see that Lisa's Custom Field has the name mood.
- Value: Assigned to the Custom Field name and displayed in your blog post on your site if you use the template tag that you can also read about in the section “Adding Custom Fields to Your Template File,” later in this chapter. In Figure 5-2, the Value assigned to the mood (the Custom Field name) is Happy.
Figure 5-2: Custom Fields that have Name and Value assigned.
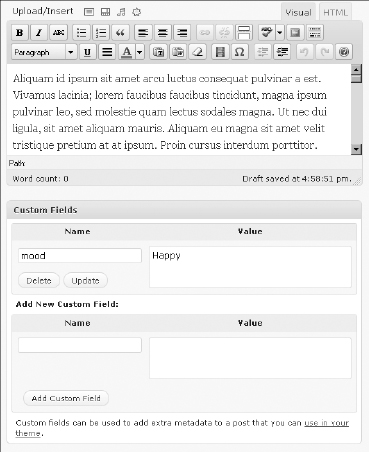
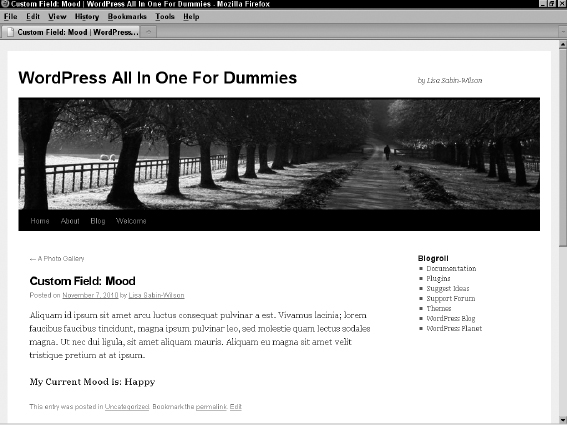
Simply fill out the Name and Value text boxes, and then click the Add Custom Field button to add the data to your post or page. Figure 5-2 shows a Custom Field that Lisa added to her post with the Name of mood and with the assigned Value Happy. In the section “Adding Custom Fields to Your Template File,” later in this chapter, we show you the template tag you need to add to your WordPress theme template in order to display this Custom Field, which appears in her post like this: My Current Mood is: Happy, shown in Figure 5-3, where the Custom Field appears at the end of Lisa's post.
Figure 5-3: A Custom Field output appears in Lisa's published post.
You can add multiple Custom Fields to one post. To do so, simply add the Name and the Value of the Custom Field in the appropriate text boxes on the Write Post page, and then click the Add Custom Field button in order to assign the data to your post. You will do this for each Custom Field you want to add to your post.
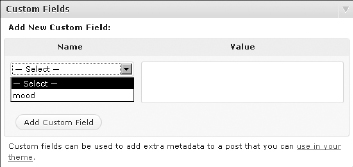
![]() After you add a particular Custom Field (such as the mood Custom Field Lisa added in Figure 5-2), you can always add it to future posts. So, you can make a post tomorrow and use the mood Custom Field but assign a different value to it. If tomorrow you assign the value Sad, your post displays My Current Mood is: Sad. You can easily use just that one Custom Field on subsequent posts. After you create a Custom Field (such as the mood Custom Field), you can access it in a drop-down list below the Name field, as shown in Figure 5-4 — so you can easily select it again and assign a new Value to it in the future.
After you add a particular Custom Field (such as the mood Custom Field Lisa added in Figure 5-2), you can always add it to future posts. So, you can make a post tomorrow and use the mood Custom Field but assign a different value to it. If tomorrow you assign the value Sad, your post displays My Current Mood is: Sad. You can easily use just that one Custom Field on subsequent posts. After you create a Custom Field (such as the mood Custom Field), you can access it in a drop-down list below the Name field, as shown in Figure 5-4 — so you can easily select it again and assign a new Value to it in the future.
![]() Custom Fields are considered extra data, separate from the post content itself, for your blog posts, and WordPress refers to them as metadata. The Custom Field Name and Value get stored in the database in the wp_postmetadata table, which keeps track of which Names and Values are assigned to each post. See Book II, Chapter 7 for more information about the WordPress database structure and organization of data.
Custom Fields are considered extra data, separate from the post content itself, for your blog posts, and WordPress refers to them as metadata. The Custom Field Name and Value get stored in the database in the wp_postmetadata table, which keeps track of which Names and Values are assigned to each post. See Book II, Chapter 7 for more information about the WordPress database structure and organization of data.
Figure 5-4: Custom Field Names are saved and displayed in a drop-down list for future use.
You can find a Custom Fields module on the Write Page screen in the Dashboard, as well; so, you can add Custom Fields to either your posts or pages, as needed.