
Exploring Theme Options
One of the key features of an advanced theme is a Theme Options page. A Theme Options page allows the theme user to supply information to the theme without having to modify the theme files. Although a single-use theme could have this information hard-coded into the theme, it's an inelegant solution. If the theme is used more than once or is managed by a non-developer, having an easy-to-change setting on the back end allows changes to be made quickly and easily.
Use a Theme Options page when the information is specific to the user and not the theme design. Web analytics code (such as visitor tracking JavaScript from Google Analytics or Woopra) is a good example of this user-specific information. Because hundreds of analytics providers exist, most analytics providers require the JavaScript code to be customized for the specific site. The theme could have a number of different header and footer files, providing easy-to-use theme options. Adding JavaScript code to the header and the footer rather than requiring theme file modifications can make using your theme much easier.
Advanced uses of a Theme Options page vary widely and include design editors, color pickers, font options, and settings to modify the theme layout (switch a sidebar from one side of the theme to another, for example). The options offered depend on the project and the design. Early in the design process, consider what a user may want to modify.
Understanding theme options basics
Before jumping into the code, you should understand some basic concepts of how theme options work.
Before WordPress version 2.8, adding options to your theme required the developer to code the entire process, including providing an input form to accept the options, storing the options in the database, and retrieving the options from the database to use them. Fortunately, things have gotten much better. Some work is still required, but adding options is much easier now.
To let the user access the theme options, an input form is required. This process requires the most work because the form still needs to be manually created and managed. The form will need to be added to the back end so the user can access it. Adding a new option to the Appearance menu allows the user to find the Theme Options page. Fortunately, WordPress offers an easy-to-use function called add_theme_page. To have WordPress manage as much as possible for you, the code will need to tell WordPress to store the data. The register_setting function can handle this.
Building a simple theme options page
Now that you know what pieces you need to build the Theme Options page, you can jump into the code. Open a plain-text editor and enter the code in Listing 6-4.
Listing 6-4: The Theme Options Page
<?php
function cm_theme_options_init(){                                   a2
 register_setting( 'cm_theme_options', 'theme_options' );           a3
}
add_action( 'admin_init', 'cm_theme_options_init' );                a5
function cm_theme_options_menu() {                                  a6
 add_theme_page( 'Theme Options', 'Theme Options', 'manage_options',
     'cm_theme_options', 'cm_theme_options_page' );                 a7
}
add_action( 'admin_menu', 'cm_theme_options_menu' );                a9
function cm_theme_options_page() {                                  a10
 ?>
 <div class="wrap">                                                 a12
<?php screen_icon(); ?>                                                   a13
 <h2>Theme Options</h2>                                                   a14
 <form method="post" action="options.php">                                a15
 <?php settings_fields( 'cm_theme_options' ); ?>                          a16
 <?php $options = get_option( 'theme_options' ); ?>                       a17
 <table class="form-table">                                               a18
 <tr valign="top">                                                        a19
<th scope="row">Checkbox</th>                                             a20
 <td><input name="theme_options[checkbox]" type="checkbox" value="1" <?php
    checked('1', $options['checkbox']); ?> /></td>                        a21
 </tr>
 <tr valign="top"><th scope="row">Text</th>                               a23
 <td><input type="text" name="theme_options[text]" value="<?php echo
    $options['text']; ?>" /></td>                                         a24
 </tr>
 <tr valign="top">                                                        a26
<th scope="row">Text Area</th>                                            a27
 <td><textarea name="theme_options[text_area]"><?php echo $options['text_area'];
     ?></textarea></td>                                                   a28
 </tr>
 </table>
 <p class="submit"><input type="submit" class="button-primary" value="<?php _e
   ( 'Save Changes' ); ?>" /></p>                                         a31
 </form>
 </div>
 <?php
}
?>
Here's a brief explanation of what the various lines do:
To load this file, you need to add a line of code to the theme's functions.php file. Edit the functions.php file, and add the following line at the bottom of the file:
require_once( 'theme-options.php' );
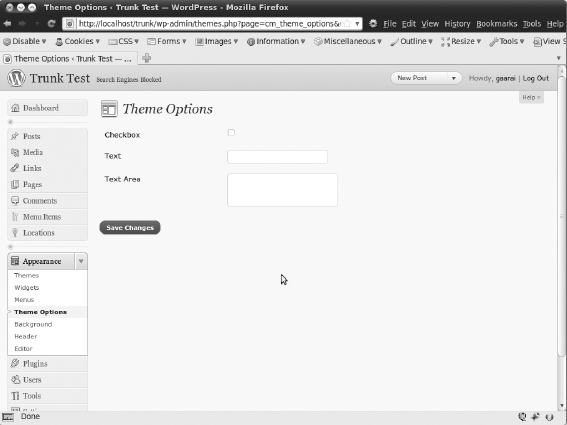
Choose Appearance![]() Theme Options. The Theme Options page appears, as shown in Figure 6-9.
Theme Options. The Theme Options page appears, as shown in Figure 6-9.
Figure 6-9: The new Theme Options page in the WordPress back end.
Using theme options in the theme
Compared to setting up a theme options page, using the stored options is very easy. To make it easier, add the following code — a quick function that makes using the options as simple as a single function call — to your theme's functions.php file:
<?php
function get_theme_option( $option_name ) {
    global $theme_options;
        if ( ! isset( $theme_options ) )
            $theme_options = get_option( 'theme_options' );
        if ( isset( $theme_options[$option_name] ) )
            return $theme_options[$option_name];
    return '';
}
?>
The get_theme_option function takes an option name as its only argument and returns that option's value. For example, to get the check box option value, simply call get_theme_option(‘checkbox’).
If your theme has a section that can be enabled and disabled by a theme option check box, a section of code such as the following works very well:
<?php if ( get_theme_option('checkbox') ) : ?>
    <!-- example code -->
<?php endif; ?>
Typically, text or text area options output user-provided content. By using a check to see whether an option has a value, your theme can offer a default set of text that can be overridden by text entered into a theme option:
<div class="footer-right">
    <?php if ( get_theme_option('text') ) : ?>
        <?php echo get_theme_option('text'), ?>
    <?php else : ?>
        <p>Sample Theme by Cory Miller</p>
    <?php endif; ?>
    <p>Powered by <a
href="http://wordpress.org">WordPress</a></p>
</div>