
Advanced Plugin Configuration
In this section, we explore two plugins that require slightly more advanced configuration: WP Super Cache and WordPress.com Stats. Both of these plugins have advanced configurations — that is, they aren't a “set it and forget it” type of plugin, as users do need to perform additional configuration in order for the plugin to work on their site.
WP Super Cache
We recommend this plugin for every WordPress site because it helps shorten the time it takes for your site visitors to pull up the site in their browsers by serving static HTML files rather than dynamically generating the WordPress pages they see each time.
![]() For the best performance results with this plugin, make sure that PHP Safe mode is disabled on your web server, and that the Apache modules mod_mime and mod_rewrite are installed. If you are unsure whether Safe mode is disabled, or if your server already has these Apache modules, check with your Web hosting provider. Additionally, you can ask your hosting provider to tweak the server configurations for these as well — unless you own the server or have a dedicated server configuration, it's likely that you do not have the necessary system administrator access to the Web server to make these configurations yourself.
For the best performance results with this plugin, make sure that PHP Safe mode is disabled on your web server, and that the Apache modules mod_mime and mod_rewrite are installed. If you are unsure whether Safe mode is disabled, or if your server already has these Apache modules, check with your Web hosting provider. Additionally, you can ask your hosting provider to tweak the server configurations for these as well — unless you own the server or have a dedicated server configuration, it's likely that you do not have the necessary system administrator access to the Web server to make these configurations yourself.
After installing and activating WP Super Cache (check Chapter 2 of this minibook for a refresher on installing and activating plugins), the plugin needs to be configured in order to enable caching on your site; Figure 3-2 shows the disabled status of WP Super Cache just below the Plugins title. Click the plugin admin page link to visit the WP Super Cache plugin settings page in your Dashboard.
Now comes the tricky part. After you click the Plugin Admin Page link to access the plugin settings page, WP Super Cache attempts to make certain changes to files on your web server. Depending on your server settings and file permissions, it may or may not be able to make these changes automatically. Some of these changes include
- Creating an advanced-cache.php file: If you get the message that looks like this:
Warning! /wp-content/advanced-cache.php does not exist or cannot be updated
the plugin tried to create a file called advanced-cache.php and was unable to. That's fine; you can make adjustments to the folder permissions on your web server so that the plugin can create the file:
- 1. Using your favorite FTP program, navigate to your blog's root directory (the directory that has wp-admin and wp-content).
- 2. Make the wp-content directory writable by changing the directory permissions to 777 (see Book II, Chapter 2 for information on changing file and folder permissions via FTP).
- 3. Back in your WordPress Dashboard, refresh the WP Super Cache Settings page.
The warning message should no longer appear.
 Make sure that you change the /wp-content folder permissions back to 755 so that the directory is not publically writable. You accomplish this via your FTP program, just as you did when you changed the permissions to 777 in the previous steps.
 - Configuring the wp-config.php file: You may get the message
Error: WP_CACHE is not enabled in your wp-config.php file
To remedy this problem, use your FTP software to edit the wp-config.php file you used when you set up your WordPress blog. Add the following line:
define('WP_CACHE', true);Save the file and upload it to the server, overwriting the old file. After you refresh your WP Super Cache Settings page again, you should no longer see the error message.
Figure 3-2: WP Super Cache needs to be configured to enable caching.
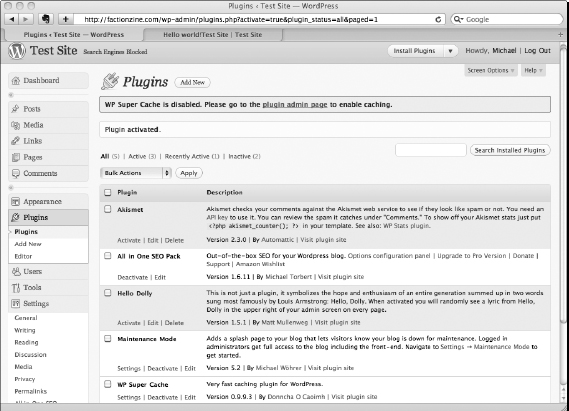
- Enabling caching: For basic use of WP Super Cache, select the Caching On radio button under the Caching heading on the WP Super Cache Settings page to enable caching on your site and then click the Update Status button. Caching is not enabled by default when you activate the plugin, so taking this step to enable caching is important to use this plugin.
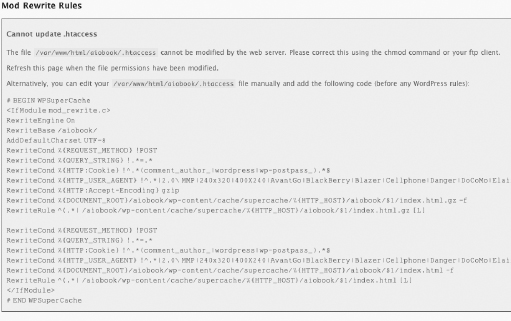
- Modifying the .htaccess file: You may get a message telling you that your .htaccess file needs to be updated, as shown in Figure 3-3.
To resolve this issue, either modify the permissions of your .htaccess file to writable (777) or manually copy and paste the code given on the WP Super Cache Settings page to the top of your original .htaccess file. After you paste the code and resave the .htaccess file, refresh the WP Super Cache Settings page and click the Update Mod_Rewrite Rules button. Be sure to go back to the Web server directory in your FTP program and reset the file permissions on your .htaccess file to its previous permissions (probably 755 or 644) to retain security on that file.
- Enabling Super Cache Compression: On the WP Super Cache Settings page, click the Advanced tab to load the advanced settings in your browser window. Click the box to the left of the Compress page so they're served more quickly to visitors to enable compression. By default, compression is disabled because some Web hosting providers have problems with compressed files — when you enable compressions, if you experience problems with the loading of your Web site, go back and disable compression and contact your Web hosting provider to find out if they can assist with the handling of compressed files on your Web server.
Figure 3-3: Cannot update .htaccess.
![]() For most blogs, configuring WP Super Cache with the basic settings is good enough. For some WordPress sites, however, other configurations are required, particularly those sites that receive a large amount of traffic and interaction from their visitors. Cache Preload is an option that you find under the Preload tab on the WP Super Cache Settings page — you can set WP Super Cache to preload mode, which creates a static file for every published post and page on your site to non-logged-in, or unknown, users. Cache Preload is an option that high-traffic sites should enable to increase the speed of the Web site.
For most blogs, configuring WP Super Cache with the basic settings is good enough. For some WordPress sites, however, other configurations are required, particularly those sites that receive a large amount of traffic and interaction from their visitors. Cache Preload is an option that you find under the Preload tab on the WP Super Cache Settings page — you can set WP Super Cache to preload mode, which creates a static file for every published post and page on your site to non-logged-in, or unknown, users. Cache Preload is an option that high-traffic sites should enable to increase the speed of the Web site.
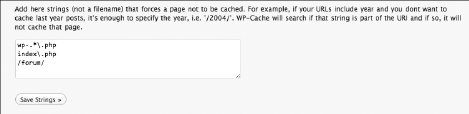
Another advanced feature is preventing the caching of particular pages. For instance, if you have a WordPress page with dynamically served content, such as a forum, you don't want your page to be cached; otherwise, visitors would see new forum posts only when the cache refreshes. For example, say you have a forum whose pages use an address that begins with mywebsite.com/forum/. In the Accepted Filenames & Rejected URIs section under the Advanced tab on the WP Super Cache Settings page, enter /forum/ in the text box and click the Save Strings button. Any time someone visits a page with the word forum in the URL — that is, any forum page — he or she sees the live dynamically served page rather than a cached one. This is shown in Figure 3-4.
WordPress.com Stats
This plugin provides fairly comprehensive statistics about your Web site traffic, such as the number of visits, where your visitors are coming from and what content they are viewing on your Web site, in a condensed format, which makes it easy to quickly review general visitors' data for different parts of your WordPress site.
To install and activate the plugin, follow these steps:
- In your WordPress Dashboard, choose Plugins
 Add New.
On the Install Plugins page, use the keywords WordPress.com Stats to search for and find the plugin, created by Automattic.
- Click the Install Now link to install the WordPress.com Stats plugin.
A confirmation window pops up asking if you really want to install the plugin. Click OK.
- Click the Activate Plugin link on the Installing Plugin page.
This activates the plugin on your site and takes you to the Plugins page in your Dashboard. Figure 3-5 shows the status of the WordPress.com Stats plugin activated within the list of plugins on the Plugins page in your Dashboard. Note the message at the top of the page saying that the WordPress.com Stats needs your attention.
Figure 3-5: WordPress.com Stats needs to be configured.
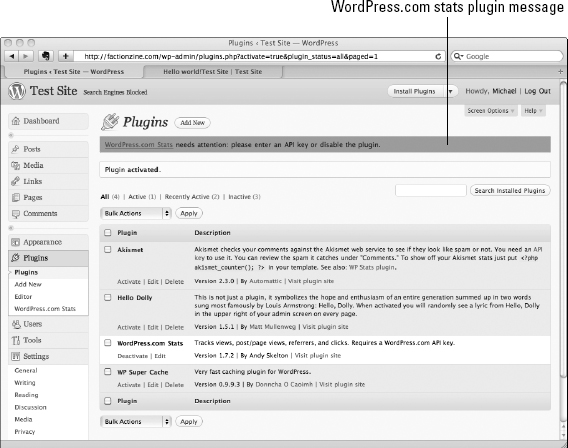
- Click the WordPress.com Stats link within the status message (refer to Figure 3-5).
This loads the WordPress.Com Stats page. (See Figure 3-6.)
- Enter your WordPress.com API key in the API key text box.
If you don't have an API key, you need to sign up for a WordPress.com account at http://wordpress.com. Create your account and then click the Edit My Profile link in the menu to visit your Profile page in the WordPress.com Dashboard. On the profile page, click the API Key and Other Personal Settings link, which loads the Personal Settings page. Copy your API key from the top of that page and paste it in the API key text box in your WordPress Dashboard and be sure to click the Save button.
Figure 3-6: The WordPress.com Stats plugin.

Congratulations! The WordPress.com Stats plugin is properly configured and will show you lots of great information about the visitorsto your WordPress blog or Web site.