
Using One Theme on Multiple Sites
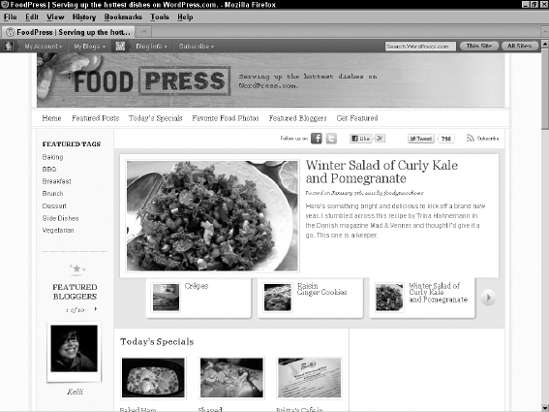
In certain situations (for example, when a Network Admin wants consistent branding/design across their entire network), each site in a network is used as a subsection of the main site. Some WordPress networks are set up as a magazine-style design on their main site and populate the content on their site with different posts from sites within their network, aggregating all the content to the main site in the network. You can see an example of this on a new blog on the WordPress.com network called FoodPress (http://foodpress.com), as shown in Figure 5-1.
FoodPress is a site run by Automattic, the company who owns WordPress.com, and their goal is to highlight posts from within the WordPress.com network that are about food and cooking. When you visit that site, you'll notice that all the post title links point to different blogs within their network. Although, WordPress.com allows the administrators of their network sites to use different designs, so the branding across sites is not consistent with the main FoodPress site — we use this example here of a magazine-style theme that aggregates content from within their network.
Figure 5-1: FoodPress, a magazine-style site in the WordPress.com network.
Although each site in the network operates separately from the main (Network Admin) site, some Network Admins want each site to look the same as the main site because it ties into the main site visually, through design and branding, and provides a consistent experience for visitors to any site within a network. You may have a custom theme specially made for the main site in your network, with added features to display network-wide content. It may make sense for you to create a theme that is used on all sites within your network (other than your main site) that is created from the same design, with the same color scheme and graphics to provide that consistent look; if consistency and network branding is your goal.
In Book VI, you read about how WordPress accesses themes stored on the Web server. When the network is enabled, these themes are shared among all sites, and available with the site administrator's Dashboard. If a change to a theme file is made, every site in the network using that theme experiences the change because only one copy of the theme is being served. When a theme is enabled, it appears in the administrator's Dashboard on the Manage Themes page (Dashboard![]() Appearance
Appearance![]() Themes). Users can choose to activate this theme so it displays on the front side of the site. The Network Admin must activate a theme for use across all sites in a network by clicking the Network Enable link under the Theme name in the Network Admin Dashboard (Network Admin
Themes). Users can choose to activate this theme so it displays on the front side of the site. The Network Admin must activate a theme for use across all sites in a network by clicking the Network Enable link under the Theme name in the Network Admin Dashboard (Network Admin![]() Themes).
Themes).
The main network site could have 20 different themes installed in the main WordPress installation; however, if the Network Admin has not enabled them for use across the entire network, then site administrators will not see network-disabled themes in their Dashboards and therefore, will not be able to use them on their site.
If a consistent network design is what you're after, you will run into a few troubles with the WordPress network because, by default, no matter what themes you have activated, the default WordPress Twenty Ten theme is the theme that gets activated whenever new sites are created within your network. It would be nice for WordPress to provide you with a global setting in the Network Admin Dashboard that would allow Network Admins to assign the default theme to every site that is created; however, that is currently not the case, unless you want to edit some code in the WordPress configuration file (which we do cover in a later section in this chapter).
There is, however, a wonderful plugin that adds a simple item in the Network Admin![]() Settings options called Default Theme. Simply, it gives Network Admins the option to assign a default theme to be the theme displayed on newly created sites.
Settings options called Default Theme. Simply, it gives Network Admins the option to assign a default theme to be the theme displayed on newly created sites.
The Default Theme plugin is not a free plugin, unfortunately; rather, it is available from the development group at WPMU Dev at http://ewebscapes.com/wpmu-premium. In order to access the plugin, you do need to purchase membership to their site — however, do not let that deter you.
![]() The WPMU Dev membership gives you access to hundreds of WordPress network-related plugins and themes for one annual membership — we recommend them highly and feel their membership is worth every penny spent. After you have your WPMU Dev membership; you can begin downloading any one of hundreds of plugins and themes for your WordPress network. You can purchase membership by visiting their site at http://ewebscapes.com/wpmu-premium.
The WPMU Dev membership gives you access to hundreds of WordPress network-related plugins and themes for one annual membership — we recommend them highly and feel their membership is worth every penny spent. After you have your WPMU Dev membership; you can begin downloading any one of hundreds of plugins and themes for your WordPress network. You can purchase membership by visiting their site at http://ewebscapes.com/wpmu-premium.
Enabling themes for individual sites
You may have a customized theme for one member site that you don't want other sites within the network to use, or have access to. Each site on the network is editable by Network Admins, who can do some basic tasks, such as enabling or disabling themes, or adding new themes to the network, without leaving their own Dashboard. If you want to have a theme available for use on only one site, and not available for other sites to choose, follow these steps:
- Click the Network Admin link in the upper-right corner of your Dashboard and then click the Sites menu link.
The Sites page appears, showing a list of all sites across the network, sorted by creation date, as shown in Figure 5-2.
- Hover your mouse cursor over the site you want to enable a theme for and then click the Edit link.
The Edit Site page displays in your Dashboard.
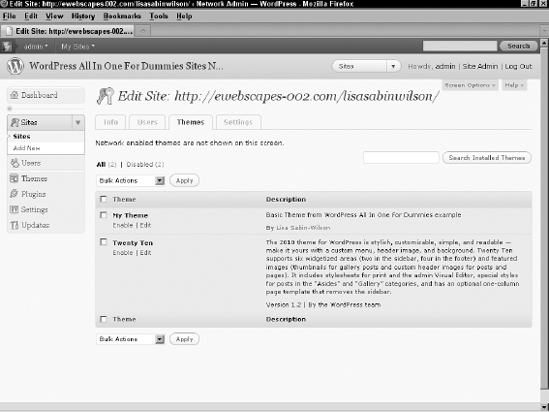
- Click the Themes tab on the Edit Sites page.
This changes the display on the Edit Sites page to show a list of themes that can be enabled for the site you are editing (see Figure 5-3).
- Click the Enable link for the theme you want to enable for the site you are editing.
The Edit Site page refreshes with the Theme tab still active and displays a message stating that the theme has been enabled.
- Your selected theme is now enabled on the site.
Repeat these steps for any sites that you want to enable a theme on.
Figure 5-2: A list of sites on the network.
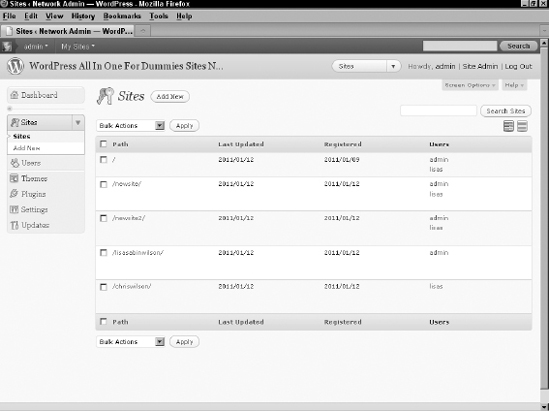
Figure 5-3: The Edit Site with the Themes tab active.
Installing themes for network use
Installing a theme for use on your network is the same process we outline in Book VI, Chapter 2, with an extra step: You have to enable each theme in the Network Admin Dashboard to activate it on the Appearance menu in the individual site administrators Dashboard for sites within your network to use. Here's how to enable a theme so all your site owners can use it on their sites:
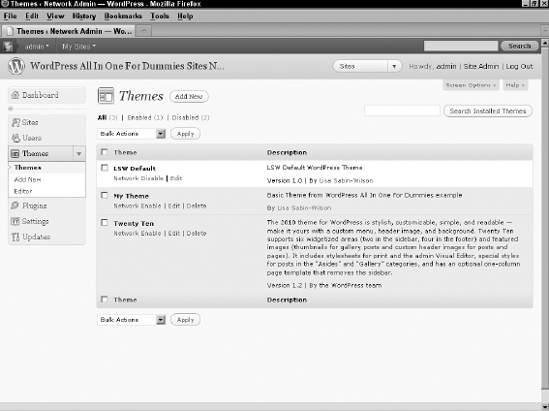
- Click the Network Admin link in the upper-right corner of your Dashboard and then click the Themes menu link.
The Themes page displays with a list of installed themes, as shown in Figure 5-4. Each theme installed in the /wp-content/themes folder is listed on this page.
- Click the Network Enable link.
Enabling a theme on the Themes page in the Network Admin causes it to appear in the list of available themes within each network site Dashboard (but does not change his active theme, it merely makes this theme available for his use).
Figure 5-4: A list of themes on the network.
- Repeat these steps to enable more themes on your network.
Anytime you install a new theme in your main WordPress installation does not mean that it's available for use network-wide. As the Network Admin, you always have to enable the theme first, before your site owners can use it.
Setting the default theme for sites
When a new site is created on the network, by default, it displays the Twenty Ten theme provided within WordPress. If you want to use a different theme as the default for all new sites created, you can accomplish this by adding a define statement in the wp-config.php file of your WordPress installation. (Check out Book II, Chapter 5 to familiarize yourself with the wp-config.php file you're working with in this section.)
Install your theme on the server, which we outline in Book VI, Chapters 1 and 2. You may also want to enable the theme network-wide, as outlined in the preceding section. This isn't a necessary step, but if you have other themes available, and if the active theme is disabled, a user who switches away from that theme will not be able to switch back to it.
Because the Twenty Ten WordPress theme is already the default, we use another popular WordPress theme called Hybrid (by Justin Tadlock: http://wordpress.org/extend/themes/hybrid) as the theme we want to set as the default theme for all sites within the network:
- Log in to your Web server via FTP, and then locate and open the .wp-config.php file to edit it.
Refer to Book II, Chapter 2 for a refresher on using FTP, and Book II, Chapter 4 to discover where you'll find the wp-config.php file on your Web server.
- Open the wp-config.php file in your favorite text editor.
It is a good idea to save a copy of your original wp-config.php file before editing it: Do this by downloading a copy to your local computer hard drive so you have a working copy of wp-config.php saved and safe, in case you make any mistakes or typos in the next few steps.
- Locate the following line of code in the wp-config.php file: define (‘WPLANG’, ‘’);
You will find this line toward the bottom of the file; scroll until you locate it. When you find it, place your mouse cursor at the end of that line and click, and then hit the Enter key on your keyboard. This adds a new, blank line directly underneath it.
- Type: define(‘WP_DEFAULT_THEME’, ‘hybrid’);
This one line of code tells WordPress to use the Hybrid theme as the default theme for all new sites within your network.
- Save the wp-config.php file and upload it to your Web server.
The hybrid in quotes refers to the theme's folder name on the Web server. The name within the quotes should be identical to the folder name where the theme files reside. All new sites created now display the Hybrid theme.