
Migrating Your Existing Blog to WordPress
So you have a blog on a different blogging system and want to move your blog to WordPress? This chapter helps you accomplish just that. WordPress makes it relatively easy to pack up your data and archives from one blog platform and move to a new WordPress blog.
WordPress lets you move your blog from such platforms as Blogspot, TypePad, and Movable Type. It also gives you a nifty way to migrate from any blogging platform via RSS feeds, as long as the platform you're importing from has an RSS feed available. Some platforms, such as MySpace, have some limitations on RSS feed availability, so be sure to check with your platform provider. In this chapter, you discover how to prepare your blog for migration and how to move from the specific platforms for which WordPress provides importer plugins.
![]() For each blogging platform, the WordPress.org platform provides you with a quick and easy way to install plugins that allows you to import and use your content right away. The importers are packaged in a plugin format because most people use an importer just once, and some people don't use the importer tools at all. The plugins are there for you to use if you need them. WordPress.com, on the other hand, has the importers built into the software. Note the differences for the version you are using.
For each blogging platform, the WordPress.org platform provides you with a quick and easy way to install plugins that allows you to import and use your content right away. The importers are packaged in a plugin format because most people use an importer just once, and some people don't use the importer tools at all. The plugins are there for you to use if you need them. WordPress.com, on the other hand, has the importers built into the software. Note the differences for the version you are using.
Movin' on up
Bloggers have a variety of reasons to migrate from one system to WordPress:
- Curiosity: There is a lot of buzz around the use of WordPress and the whole community of WordPress users. People are naturally curious to check out something that all the cool kids are doing.
- More control of your blog: This reason applies particularly to those who have a blog on Blogspot, TypePad, or any other hosted service. Hosted programs limit what you can do, create, and mess with. When it comes to plugins, add-ons, and theme creation, hosting a WordPress blog on your own Web server wins hands down. Additionally, you have complete control of your data, archives, and backup capability when you host your blog on your own server.
- Ease of use: Many people find the WordPress interface easier to use, more understandable, and a great deal more user-friendly than many of the other blogging platforms available today.
The hosted version of WordPress.com and the self-hosted version of WordPress.org allow you to migrate your blog to their platforms; however, WordPress.com does not provide as many options for import as WordPress.org does. The following is a list of blogging platforms that have built-in importers, or import plugins, for migration to WordPress:
- Blogger
- Movable Type
- TypePad
- Vox
- Posterous
- TextPattern
- RSS Feeds
- GreyMatter
- DotClear
- Blogware
- WordPress.com
![]() In the WordPress.org software (self-hosted), the importers are added to the installation as plugins. The importer plugins included in the preceding list are plugins packaged within the WordPress.org software or found by searching in the Plugins Directory at http://wordpress.org/extend/plugins/tags/importer. You can import content from several other platforms by installing other plugins from the WordPress Plugins Directory, but you may have to search a bit on Google to find them.
In the WordPress.org software (self-hosted), the importers are added to the installation as plugins. The importer plugins included in the preceding list are plugins packaged within the WordPress.org software or found by searching in the Plugins Directory at http://wordpress.org/extend/plugins/tags/importer. You can import content from several other platforms by installing other plugins from the WordPress Plugins Directory, but you may have to search a bit on Google to find them.
Preparing for the big move
Depending on the size of your blog (that is, how many posts and comments you have), the migration process can take anywhere from 5 to 30 minutes. As with any major change or update you make, no matter where your blog is hosted, the very first thing you need to do is create a backup of your blog. You should back up the following:
- Archives: Posts, comments, and trackbacks
- Template: Template files and image files
- Links: Any links, banners, badges, and elements you have in your current blog
- Images: Any images you use in your blog
Table 7-1 gives you a few tips on creating the export data for your blog in a few major blogging platforms. Note: This table assumes that you are logged in to your blog software.
Table 7-1 Backing Up Your Blog Data on Major Platforms
| Blogging Platform | Backup Information |
| Movable Type | Click the Import/Export button in the menu of your Movable Type Dashboard and then click the Export Entries From link. When the page stops loading, save it on your computer as a .txt file. |
| TypePad | Click the name of the blog you want to export and then click the Import/Export link in the Overview menu. Click the Export link at the bottom of the Import/Export page. When the page stops loading, save it on your computer as a .txt file. |
| Blogspot | Back up your template by copying the text of your template to a text editor, such as Notepad. Save it on your computer as a .txt file. |
| LiveJournal | Browse to http://livejournal.com/export.bml and enter your information; choose XML as the format. Save this file on your computer. |
| WordPress | Choose Tools |
| RSS feed | Point your browser to the URL of the RSS feed you want to import. Wait until it loads fully (you may need to set your feed to display all posts). View the source code of the page, copy and paste that source code into a .txt file, and save the file on your computer. |
![]() This import script allows for a maximum file size of 128MB. If you get an “out of memory” error, try dividing the import file into pieces and uploading them separately. The import script is smart enough to ignore duplicate entries, so if you need to run the script a few times to get it to take everything, you can do so without worrying about duplicating your content. (You could also attempt to, temporarily, increase your PHP memory limit by making a quick edit of the wp-config.php file; more information on this is found in Book II, Chapter 5 and Chapter 6.)
This import script allows for a maximum file size of 128MB. If you get an “out of memory” error, try dividing the import file into pieces and uploading them separately. The import script is smart enough to ignore duplicate entries, so if you need to run the script a few times to get it to take everything, you can do so without worrying about duplicating your content. (You could also attempt to, temporarily, increase your PHP memory limit by making a quick edit of the wp-config.php file; more information on this is found in Book II, Chapter 5 and Chapter 6.)
Converting templates
Every blogging program has a unique way of delivering content and data to your blog. Template tags vary from program to program; no two are the same, and each template file requires conversion if you want to use your template with your new WordPress blog. In such a case, you have two options:
- Convert the template yourself. To accomplish this task, you need to know WordPress template tags and HTML. If you have a template that you're using on another blogging platform and want to convert it for use with WordPress, you need to swap the original platform tags for WordPress tags. The information provided in Book VI gives you the rundown on working with themes, as well as basic WordPress template tags; you may find that information useful if you plan to attempt a template conversion yourself.
- Hire an experienced WordPress consultant to do the conversion for you. See Book I, Chapter 4 for a list of WordPress consultants.
To use your own template, make sure that you saved all the template files, the images, and the stylesheet from your previous blog setup. You need them to convert the template(s) for use in WordPress.
![]() Hundreds of free templates are available for use with WordPress, so it may be a lot easier to abandon the template you're currently working with and find a free WordPress template that you like. If you paid to have a custom design done for your blog, contact the designer of your theme, and hire him to perform the template conversion for you. Alternatively, you can hire several WordPress consultants to perform the conversion for you — including yours truly.
Hundreds of free templates are available for use with WordPress, so it may be a lot easier to abandon the template you're currently working with and find a free WordPress template that you like. If you paid to have a custom design done for your blog, contact the designer of your theme, and hire him to perform the template conversion for you. Alternatively, you can hire several WordPress consultants to perform the conversion for you — including yours truly.
Moving your blog to WordPress
You've packed all your stuff, and you have your new place prepared. Moving day has arrived!
This section takes you through the steps for moving your blog from one blog platform to WordPress. This section assumes that you already have the WordPress software installed and configured on your own domain.
Find the import function that you need by following these steps:
- On the Dashboard, choose Tools
 Import.
The Import page appears, listing blogging platforms, such as Blogger and Movable Type, from which you can import content. (See Figure 7-1.)
Figure 7-1: The Import feature of the (self-hosted) WordPress.org Dashboard.
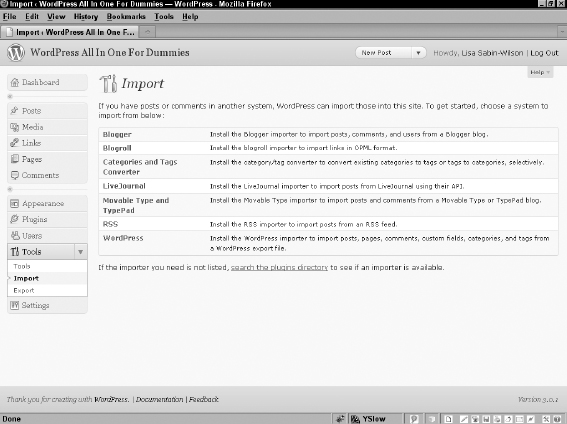
- Click the link for the blogging platform you're working with.
Click the Install Now button to install the importer plugin to begin using it.
The following sections provide some import directions for a few of the most popular blogging platforms (other than WordPress, that is). Each platform has its own content export methods, so be sure to check the documentation for the blogging platform that you are using.
Importing from Blogspot, er Blogger
I call it Blogspot; you call it Blogger — a rose by any other name would smell as sweet. The blogging application owned by Google is referenced either way. In the end, we're talking about the same application.
To begin the import process, first complete the steps in the “Moving your blog to WordPress” section, earlier in this chapter. Then follow these steps:
- Click the Blogger link on the Import page and install the plugin for importing from Blogger.
Click the Activate Plugin & Install Importer link and the Import Blogger page loads with instructions to import your file, as shown in Figure 7-2.
Figure 7-2: Import Blogger page in the WordPress Dashboard.
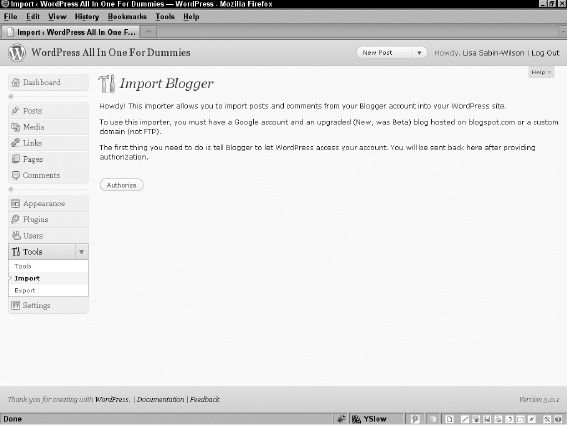
- Click the Authorize button to tell WordPress to access your account.
A page from Google opens with a message that says your WordPress blog is trying to access your Google account.
- Enter the e-mail address and password you use for Google; then click the Sign In button.
The Access Request page in your Google Account opens. When you have successfully logged in, you receive a message from Google stating that your blog at WordPress is requesting access to your Blogger account so that it can post entries on your behalf.
- Give your permission by clicking the Grant Access button on the Access Request page.
If you have many posts and comments in your Blogger blog, the import can take 30 minutes or more.
After the import script has performed its magic, you're redirected to your WordPress Dashboard, where the name of your Blogger blog is listed.
- To finish importing the data from Blogger, click the Import button (below the Magic Button header).
The text on the button changes to Importing . . . while the import takes place. When the import is complete, the text on the button changes to Set Authors (no wonder it's called the Magic Button!).
- Click the Set Authors button to assign the authors to the posts.
The Blogger username appears on the left side of the page; a drop-down menu on the right side of the page displays the WordPress login name.
- Assign authors by using the drop-down menu.
If you have just one author on each blog, the process is especially easy: Use the drop-down menu on the right to assign the WordPress login to your Blogger username. If you have multiple authors on both blogs, each Blogger username is listed on the left side with a drop-down menu to the right of each username. Select a WordPress login for each Blogger username to make the author assignments.
- Click Save Changes.
You're done!
Importing from LiveJournal
Both WordPress.com and WordPress.org offer an import script for LiveJournal users, and the process of importing from LiveJournal to WordPress is the same for each platform.
To export your blog content from LiveJournal, log in to your LiveJournal blog and then type this URL in your browser's address bar: www.livejournal.com/export.bml.
LiveJournal lets you export the XML files one month at a time, so if you have a blog with several months' worth of posts, be prepared to be at this process for a while. First, you have to export the entries one month at a time, and then you have to import them into WordPress — yep, you guessed it — one month at a time.
![]() To speed the process a little, you can save all the exported XML LiveJournal files in one text document by copying and pasting each month's XML file into one plain-text file (created in a text editor such as Notepad), thereby creating one long XML file with all the posts from your LiveJournal blog. Then you can save the file as an XML file to prepare it for import into your WordPress blog.
To speed the process a little, you can save all the exported XML LiveJournal files in one text document by copying and pasting each month's XML file into one plain-text file (created in a text editor such as Notepad), thereby creating one long XML file with all the posts from your LiveJournal blog. Then you can save the file as an XML file to prepare it for import into your WordPress blog.
After you export the XML file from LiveJournal, return to the Import page in your WordPress Dashboard, and follow these steps:
- Click the LiveJournal link and install the plugin for installing from LiveJournal.
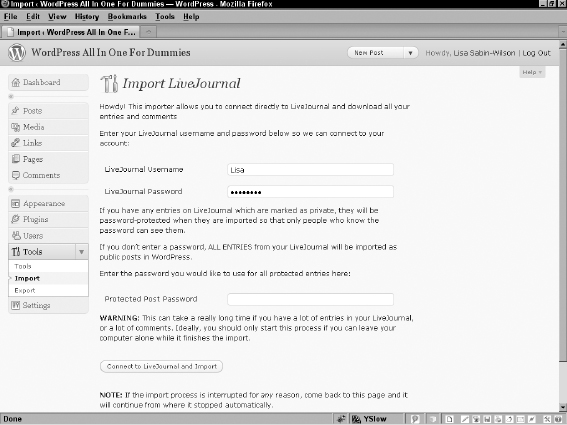
Click the Activate Plugin & Install Importer link and the Import LiveJournal page loads with instructions to import your file, as shown in Figure 7-3.
Figure 7-3: Import LiveJournal page on the WordPress Dashboard.
- Click the Browse button.
A window opens, listing files on your computer.
- Double-click the name of the XML file you saved earlier.
- Click the Upload and Import button.
When the import script finishes, it reloads the page with a confirmation message that the process is complete. Then WordPress runs the import script and brings over all your posts from your LiveJournal blog.
Importing from Movable Type and TypePad
Six Apart created both Movable Type and TypePad. These two blogging platforms run on essentially the same code base, so the import/export procedure is the same for both. Refer to Table 7-1, earlier in this chapter, for details on how to run the export process in both Movable Type and TypePad. This import script moves all your blog posts, comments, and trackbacks to your WordPress blog.
Go to the Import page on your WordPress Dashboard by following Steps 1 and 2 in the “Moving your blog to WordPress” section, earlier in this chapter. Then follow these steps:
- Click the Movable Type and Typepad link and install the plugin for importing from Movable Type and Typepad.
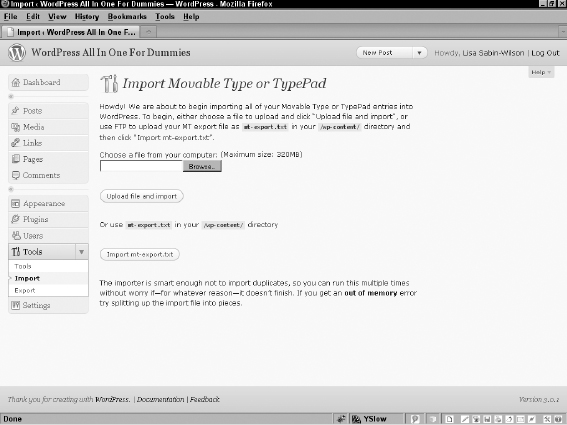
Click the Activate Plugin & Install Importer link and the Import Movable Type or TypePad page loads with instructions to import your file, as shown in Figure 7-4.
- Click the Browse button.
A window opens, listing your files.
- Double-click the name of the export file you saved from your Movable Type or TypePad blog.
- Click the Upload File and Import button.
Sit back and let the import script do its magic. When the script finishes, it reloads the page with a confirmation message that the process is complete.
Figure 7-4: Import Movable Type or TypePad page on the WordPress Dashboard.
When the import script finishes, you can assign users to the posts, matching the Movable Type or TypePad usernames with WordPress usernames. If you have just one author on each blog, this process is easy; you simply assign your WordPress login to the Movable Type or TypePad username by using the drop-down menu. If you have multiple authors on both blogs, match the Movable Type or TypePad usernames with the correct WordPress login names and then click Save Changes. You're done!
Importing from WordPress
With the WordPress import script, you can import one WordPress blog into another; this is true for both the hosted and self-hosted versions of WordPress. WordPress imports all your posts, comments, custom fields, and categories into your blog. Refer to Table 7-1, earlier in this chapter, to find out how to use the export feature to obtain your blog data.
When you complete the export, follow these steps:
- Click the WordPress link on the Import page and install the plugin to import from WordPress.
Click the Activate Plugin & Install Importer link and the Import WordPress page loads with instructions to import your file, as shown in Figure 7-5.
Figure 7-5: Import WordPress page on the WordPress Dashboard.

- Click the Browse button.
A window opens, listing the files on your computer.
- Double-click the export file you saved earlier from your WordPress blog.
- Click the Upload File and Import button.
The import script gets to work, and when it finishes, it reloads the page with a confirmation message that the process is complete.
Importing from an RSS feed
If all else fails, or if WordPress doesn't provide an import script that you need for your current blog platform, you can import your blog data via the RSS feed for the blog you want to import. With the RSS import method, you can import posts only; you can't use this method to import comments, trackbacks, categories, or users. WordPress.com currently doesn't let you import blog data via an RSS feed; this function works only with the self-hosted WordPress.org platform.
Refer to Table 7-1, earlier in this chapter, for the steps to create the file you need to import via RSS. Then follow these steps:
- On the Import page in the WordPress Dashboard, click the RSS link and install the plugin to import from an RSS feed.
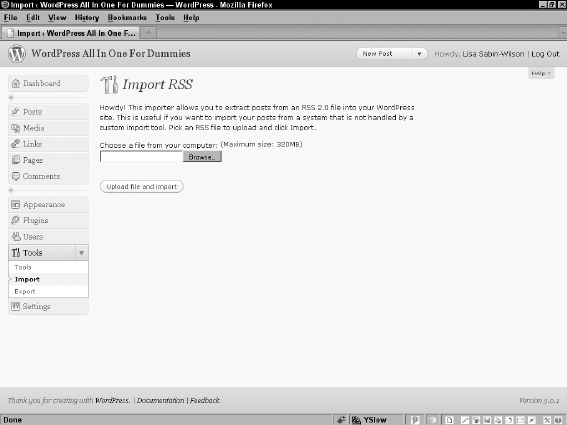
Click the Activate & Install link and the Import RSS page loads with instructions to import your RSS file, as shown in Figure 7-6.
- Click the Browse button on the Import RSS page.
A window opens, listing the files on your computer.
- Double-click the export file you saved earlier from your RSS feed.
- Click the Upload File and Import button.
The import script does its magic and then reloads the page with a confirmation message that the process is complete.
Figure 7-6: Import RSS page in the WordPress Dashboard.
Finding other import resources
The WordPress Codex has a long list of other available scripts, plugins, workarounds, and outright hacks for importing from other blog platforms. You can find that information at http://codex.wordpress.org/Importing_Content.
Note, however, that volunteers run the WordPress Codex. When you refer to the Codex, be aware that not everything listed in it is necessarily up-to-date or accurate, including import information (or any other information about running your WordPress blog).