
Navigating the Dashboard
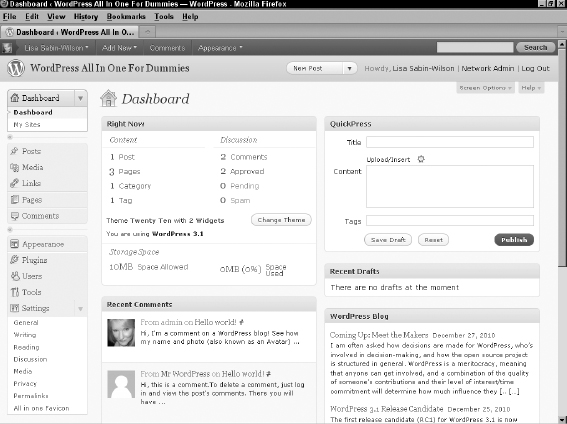
You can consider the Dashboard to be a control panel of sorts because it offers several quick links and areas that provide information about your blog, starting with the actual Dashboard page, as shown in Figure 1-1.
You can change how the WordPress Dashboard looks, at least in terms of the order the modules appear on it. You can expand (open) and collapse (close) the individual modules by clicking your mouse anywhere within thegray title bar of the module. This feature is really nice because you can use the Dashboard for just those modules that you use regularly. The concept is easy: Keep the modules you use all the time open and close the ones that you use only occasionally — you can open those modules only when you really need them. You save space and can customize your Dashboard to suit your needs.
Figure 1-1: The WordPress Dashboard page.
When you view your Dashboard for the very first time, all the modules in the Dashboard appear in the expanded (open) position by default (refer to Figure 1-1).
![]() The navigation menu in the WordPress Dashboard appears on the left side of your browser window. When you need to get back to the WordPress Dashboard, click the Dashboard link that appears at the top of the navigation menu of any of the pages within your WordPress Dashboard.
The navigation menu in the WordPress Dashboard appears on the left side of your browser window. When you need to get back to the WordPress Dashboard, click the Dashboard link that appears at the top of the navigation menu of any of the pages within your WordPress Dashboard.
In the following sections, we cover the Dashboard page as it appears when you log in to your WordPress Dashboard for the very first time; later we show you how to configure the appearance of your Dashboard so that it best suits how you use the available modules. Also, check out the nearby “Discovering the admin bar” sidebar that covers the menu located at the top of every page in your Dashboard and site.
Right Now
The Right Now module in the Dashboard shows what's going on in your blog right now — right this very second! Figure 1-2 shows the expanded Right Now module in a brand-spanking-new WordPress blog.
Discovering the admin bar
New to WordPress 3.1 is a navigation menu, the admin bar, which you see across the top of Figure 1-1. The admin bar appears at the top of every page on your site, by default, and across the top of every page of the Dashboard if you set it to do so in your profile settings (Chapter 3 of this minibook). The nice thing is that the only person who can see the admin bar is you because it displays only for the user who is logged in. The admin bar contains shortcuts that take you to the most frequently viewed areas of your WordPress Dashboard. Across the top, from left to right you find that your photo and name display with a drop-down menu when you hover on them. The drop-down menu provides you with quick links to three areas in your Dashboard: Edit Your Profile, Dashboard, and Log Out. The next link in the admin bar is called New; hover on that and you find links to Post and Page, which you click to go to either the Add New Post page or the Add New Page screen. The next link is Comments; click that and visit the Manage Comments page in your Dashboard. The last link is Appearance; hover on that link and the Widgets and Menus links appear. When you click one, you can visit either the Widgets page or the Custom Menu page in your Dashboard. Additionally, on the right side of the admin bar is a search form that you can use to search for items on your site by using keywords.
Again, the admin bar is seen only by you at the top of your site, no matter what page you're on, as long as you are logged in to your WordPress site.
Figure 1-2: The Right Now module in the Dashboard, expanded so that you can see the available features.
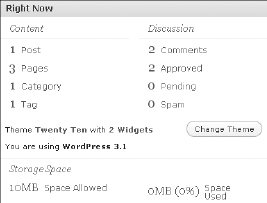
The Right Now module shows the following default information below the Content and Discussion headers:
- The number of posts you have: This number reflects the total number of posts you currently have in your WordPress blog; the blog in Figure 1-2 has one post. The number is blue, which means it's a clickable link. When you click the link, you go to the Edit Posts page, where you can edit the posts on your blog. We cover editing posts in Book IV, Chapter 1.
- The number of pages: The number of pages on your blog, which changes when you add or delete pages. (Pages, in this context, refer to the static pages you create in your blog.) Figure 1-2 shows that the blog has three pages.
Clicking this link takes you to the Edit Pages page, where you can view, edit, and delete your current pages. (Find the difference between WordPress posts and pages in Book IV, Chapter 2.)
- The number of categories: The number of categories on your blog, which changes when you add and delete categories. Figure 1-2 shows that this blog has one category.
Clicking this link takes you to the Categories page, where you can view, edit, and delete your current categories or add brand-new ones. (For details about the management and creation of categories, see Book III, Chapter 7.)
- The number of tags: The number of tags in your blog, which changes when you add and delete categories. Figure 1-2 shows that this blog has one tag.
Clicking this link takes you to the Tags page, where you can add new tags and view, edit, and delete your current tags. (You can find more information about tags in Book III, Chapter 7.)
- The number of comments: The number of comments on your blog. Figure 1-2 shows that this blog has two comments, two approved comments, 0 (zero) pending comments, and 0 (zero) comments marked as spam.
Clicking any of these four links takes you to the Edit Comments page, where you can manage the comments on your blog. We cover the management of comments in Book III, Chapter 5.
The last section of the Dashboard's Right Now module shows the following information:
- Which WordPress theme you're using: Figure 1-2 shows that the example blog is using the theme Twenty Ten. The theme name is a link that, when clicked, takes you to the Manage Themes page, where you can view and activate themes on your blog.
- How many widgets you've added to your blog: The number of WordPress widgets you're using in your blog. Figure 1-2 shows that this blog has two widgets. The number 2 is a link that, when clicked, takes you to the Widgets page, where you can change your widget options by editing them, moving them, or removing them. (Widgets are covered in detail in Book VI, Chapter 1.)
- Change Theme: Clicking this button takes you to the Manage Themes page, which lists currently active and all available themes for your WordPress blog. Your active theme (the theme that's visible on your active blog) appears at the top of the page, below the Current Theme header. All other available themes are listed below Available Themes. Click any theme on this page to use it on your blog.
- The version of WordPress you're using: The last statement in the Right Now section. Figure 1-2 shows that this blog is using WordPress version 3.1. This version announcement changes if you're using an earlier version of WordPress. When WordPress software is upgraded, this statement tells you that you're using an outdated version of WordPress and encourages you to upgrade to the latest version.
Recent Comments
The module below the Right Now module is the Recent Comments module, as shown in Figure 1-3. Within this module, you find
- The most recent comments published to your blog: WordPress displays a maximum of five comments in this area.
- The author of each comment: The name of the person who left the comment. This section also displays the author's picture (or avatar), if he or she has one.
- A link to the post the comment was left on: The post title appears to the right of the commenter's name. Click the link, and you go to that post in the Admin panel.
- An excerpt of the comment: A short snippet of the comment left on your blog.
- Comment management links: When you hover on the comment with your mouse cursor, five links appear below the comment. These links give you the opportunity to manage those comments right from your Dashboard: The first link is Unapprove, which appears only if you have comment moderation turned on. (Find out more about moderating comments in Book III, Chapter 5). The other four links are Edit, Reply, Spam, and Trash.
- View All button: This button invites you to see all the comments on your blog. Clicking the View All button takes you to the Edit Comments page, where you can view, edit, moderate, or delete any comments on your blog.
Figure 1-3: The Recent Comments module in the Dashboard.

You can find even more information on managing your comments in Book III, Chapter 5.
Incoming Links
The module below the Recent Comments module in the Dashboard is Incoming Links. It lists all the blog-savvy people who wrote a blog post that links to your blog. When your blog is brand new, you won't see any incoming links listed in this section. Don't despair, however; as time goes on, you'll see this listing of links fill up while more and more people discover you and your inspired writings!
In the meantime, the Incoming Links module shows, “This dashboard widget queries Google Blog Search so that when another blog links to your site it will show up here. It has found no incoming links ... yet. It's okay — there is no rush.” The phrase Google Blog Search is a link; when you click it, you go to the Google Blog Search directory, which is a search engine for blogs only.
Follow these steps to edit the Incoming Links module:
- Hover your mouse on the title of the Incoming Links module.
A new link labeled Configure appears directly to the right of the Incoming Links title.
- Click the Configure link.
The Incoming Links module expands and you see settings that you can configure (see Figure 1-4).
Figure 1-4: Changing the settings of the Incoming Links module by clicking the Configure link.
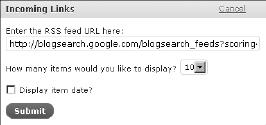
- Add a URL in the Enter the RSS Feed URL Here text box.
You can enter the URL of any RSS feed that you want to display incoming links to your site. Examples of feeds you can use include such sources as Technorati (http://technorati.com), Yahoo! Search (http://search.yahoo.com), or Social Mention (www.socialmention.com). You're not restricted to using the Google Blog Search engine (http://blogsearch.google.com) to provide your Incoming Links information.
- Select how many items you want to display from the drop-down list.
The default is 5, but you can display up to 20 items (incoming links).
- Check the Display Item Date box if you want each incoming link to display the date the link was created.
If you don't want the date display, leave that box blank.
- Click the Submit button to save all your preferences.
Clicking Submit resets the Incoming Links module with your new settings saved.
Plugins
We get into the management and use of WordPress plugins in detail in Book VII; however, for the purposes of this section, we discuss the functions of the Plugins module in the Dashboard.
The Plugins module includes three titles of WordPress plugins that are linked to its individual plugin page within the WordPress Plugin Directory. The Plugins module pulls information via RSS feed from the official WordPress Plugin Directory at http://wordpress.org/extend/plugins. This module displays a plugin from three different plugin categories in the official WordPress Plugin Directory: Most Popular, Newest Plugins, and Recently Updated, as shown in Figure 1-5.
Figure 1-5: The Plugins module in the Dashboard
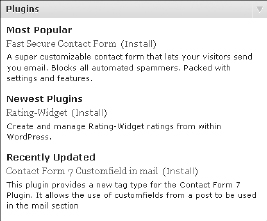
The Plugins module doesn't have an Edit link, so you can't customize the information that it displays. Use this module to discover new plugins that can help you do some fun and exciting things with your blog.
The Plugins module does have a very exciting feature that you can use to install, activate, and manage plugins on your blog. Just follow these steps to make it happen:
- Click the Install link next to the title of the plugin.
The Plugin Information pop-up window opens. It displays the various bits of information about the plugin you chose, such as title, description, version, author, date last updated, and the number of times the plugin was downloaded.
- Click the Install Now button.
This button appears at the top right of the Plugin Information window.
The Plugin Information window closes, and the Install Plugins page in your WordPress Dashboard opens, displaying a confirmation message that the plugin has been downloaded, unpacked, and successfully installed.
- Specify whether to activate the plugin or proceed to the Plugins page.
Two links appear below the confirmation message:
- Activate Plugin: Activate the plugin you just installed on your blog.
- Return to Plugins Page: Go to the Manage Plugins page.
We cover the installation and activation of WordPress plugins in further depth in Book VII.
- Click the Dashboard link to return to the Dashboard.
The Dashboard link appears at the top of the left menu on every page of your WordPress Dashboard.
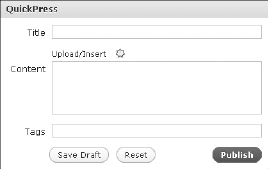
QuickPress
The QuickPress module, shown in Figure 1-6, is a handy form that allows you to write, save, and publish a blog post right from your WordPress Dashboard. The options are similar to the ones we cover in Book IV, Chapter 1.
Figure 1-6: The QuickPress module in the Dashboard.
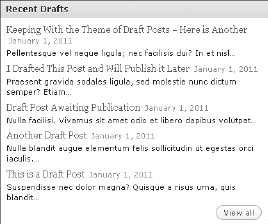
Recent Drafts
If you're using a brand-new WordPress blog and this is a new installation, the Recent Drafts module displays the message There Are No Drafts at the Moment because you haven't written any drafts. As time goes on, however, and you write a few posts in your blog, you may save some of those posts as drafts — to be edited and published later. Those drafts show up in the Recent Drafts module.
The Recent Drafts module displays up to five drafts, showing for each the title of the post, the date it was last saved, and a short excerpt. A View All link also appears; click that link to go the Manage Posts page, where you can view, edit, and manage your blog posts (check out Book IV, Chapter 2 for more information). Figure 1-7 displays the Recent Drafts module, with five posts in draft status, awaiting publication.
Figure 1-7: The Recent Drafts module in the Dashboard
WordPress Blog
When you first install WordPress, by default, the WordPress Development Blog module displays the two most recent updates from the official WordPress Development Blog at http://wordpress.org/news. You see the title of the last post, the date it was published, and a short excerpt of the post. Click a title to go directly to that post on the WordPress Development Blog.
![]() We highly recommend following the updates of the WordPress Development Blog. Every single time you log in to your WordPress Dashboard, a glance at this section informs you about any news, updates, or alerts from the makers of WordPress. You can find out about any new versions of the software, security patches, or other important news regarding the software you're using to power your blog.
We highly recommend following the updates of the WordPress Development Blog. Every single time you log in to your WordPress Dashboard, a glance at this section informs you about any news, updates, or alerts from the makers of WordPress. You can find out about any new versions of the software, security patches, or other important news regarding the software you're using to power your blog.
Although we recommend that you keep the WordPress Development Blog updates in this section, the WordPress platform lets you change this module to display posts from another blog of your choosing. You can accomplish this change by following these steps:
- Hover your mouse over the WordPress Development Blog module title and click the Configure link that appears to the right.
The module changes to display several options for adjusting the information contained in the module (see Figure 1-8).
Figure 1-8: Options to change the feed title and URL of the WordPress Blog module.
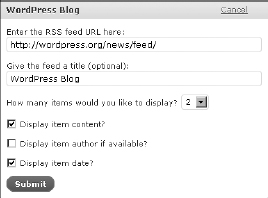
- Type your preferred RSS feed in the Enter the RSS Feed URL Here text box.
- Type your preferred title in the Give the Feed a Title (Optional) text box.
- Select a number from the How Many Items Would You Like to Display drop-down list.
The default is 2, but you can display up to 20 by making a different selection from the drop-down list.
- Specify whether you want to display the item's content.
Item content refers to the text content of the post. If you don't select the Display Item Content check box, WordPress doesn't display an excerpt of the post — only the post title.
- Specify whether you want to display the name of the person who wrote the post.
Leave the Display Item Author if Available check box unchecked if you don't want the author's name displayed.
- Specify whether you want to display the date.
Leave the Display Item Date check box unchecked if you don't want the date displayed.
- Click the Submit button to save your changes.
The Dashboard page refreshes with your new changes.
![]() If you change your mind, click the Cancel link that appears to the right of the WordPress Development Blog title. Clicking Cancel discards any changes you made and keeps the original settings intact.
If you change your mind, click the Cancel link that appears to the right of the WordPress Development Blog title. Clicking Cancel discards any changes you made and keeps the original settings intact.
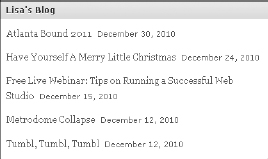
The title of the WordPress Development Blog module changes to the title you chose in Step 3 of the preceding list. Figure 1-9 shows that we changed the title to Lisa's Blog, which now displays the RSS Feed from Lisa's blog, using the Feed URL: http://lisasabin-wilson.com/feed.
Figure 1-9: The WordPress Blog module changes based on the options you set.
Other WordPress News
The Other WordPress News module of the Dashboard pulls in posts from a site called WordPress Planet (http://planet.wordpress.org). By maintaining the default setting in this area, you stay in touch with several posts made by folks who are involved in WordPress development, design, and troubleshooting. You can find many interesting and useful tidbits if you keep this area intact. Quite often, we find great information about new plugins or themes, problem areas and support, troubleshooting, and new ideas, so we tend to stick with the default setting.
WordPress is all about user experience, however, so you can change the options to specify what appears in this area. You can change the items in this module in the same way that you change the options for the WordPress Development Blog module (see the preceding section).