
Solving Multiple-Variable Problems with Solver
If you find Goal Seek useful, but you need more power, you'll want to download and use Solver for Excel for Mac 2011. Solver is a free add-in that lets you change multiple variables, which enables you to ask more complex questions of your data.
Downloading and Installing Solver
To download and install Solver for Excel for Mac 2011, follow these steps:
- Open your Web browser and go to the Solver for Macintosh Excel 2011 web site (
http://www.solver.com/mac/). - Follow the link for downloading Solver. You need to register using an e-mail address.
- Double-click the
Solver.pkgfile you downloaded to launch the Install Solver application, and then follow through its steps. Install Solver uses a standard installation routine, in which you need to provide an administrator password for your Mac. - In Excel, choose Tools
 Add-Ins from the menu bar to display the Add-Ins dialog box (see Figure 11–18).
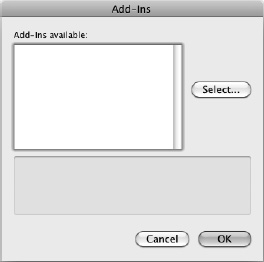
Figure 11–18. In the Add-Ins dialog box, click the Select button to display the Choose an Add-In dialog box.
- Click the Select button to display the Choose an Add-In dialog box, which is a renamed version of the standard Open dialog box.
- Navigate to the
/Applications/Solver/folder, and then click theSolver.xlamitem. - Click the Open button. Excel closes the Choose an Add-In dialog box and returns you to the Add-Ins dialog box, which now shows the
Solver.Xlamitem in the Add-ins available list box. - Make sure the check box for the
Solver.Xlamitem is selected. - Click the OK button to close the Add-Ins dialog box. Excel loads Solver.
Using Solver
You can now use Solver like this:
- Open the workbook and activate the worksheet that contains the data.
- Make active the cell that contains the formula you want to analyze.
- Choose Tools Solver from the menu bar to display the Solver Parameters dialog box (see Figure 11–19).
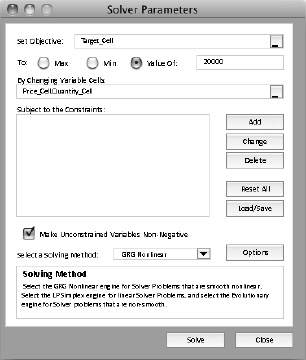
Figure 11–19. In the Solver Parameters dialog box, set the parameters for the problem you want Solver to solve.
- Make sure the Set Objective box shows the cell you want to analyze. (This box shows the cell you selected in step 2.) If it's the wrong cell, click in the Set Objective box, and then click the right cell.
- You can click the Collapse Dialog button at the right end of the Set Objective box if you want to collapse the Solver Parameters dialog box out of the way.
- You can also type the cell reference or cell name in the Set Objective box.
- In the To area, select the Max option button, the Min option button, or the Value Of option button. If you select the Value Of option button, type the value in the box to its right.
- In the By Changing Cells box, enter the references or names of the cells you want Solver to change. You can click the cells in the worksheet (either collapsing the Solver Parameters dialog box or working around it) or type in the references or names.
- If you want to constrain what Solver can do with the cell values, work with the controls to the right of the Subject to the Constraints box:
- Click the Add button to display the Add Constraint dialog box (see Figure 11–20).
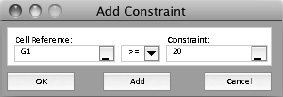
Figure 11–20. Use the Add Constraint dialog box to set up any constraints needed for the calculation.
- Enter a cell reference or name in the Cell Reference box.
- Choose the comparison in the pop-up menu in the middle.
- Enter the constraint in the Constraint box. You can enter a value or the reference or name of the cell in which you'll enter the value.
- Click the Add button if you want to add another constraint. Otherwise, click the OK button to close the Add Constraint dialog box. The constraints you added appear in the Subject to the Constraints list box.
- Click the Add button to display the Add Constraint dialog box (see Figure 11–20).
- Select the Make Unconstrained Variables Non-Negative check box if you want Solver to use only non-negative (positive or zero) values for variables you haven't constrained.
- In the Select a Solving Method pop-up menu, choose GRG Nonlinear, Simplex LP, or Evolutionary, as needed. If you're not familiar with different solving methods, start with GRG Nonlinear.
NOTE: Solver uses the Simplex method to solve linear problems (ones in which the change between two related quantities is directly proportional) and the Generalized Reduced Gradient (GRG) Nonlinear method to solve nonlinear problems (ones in which the change between the related quantities isn't directly proportional). The Evolutionary method uses genetic algorithms.
- If you need to control how Solver performs the calculation, click the Options button, and then choose options on the three tabs of the Options dialog box (shown in Figure 11–21).
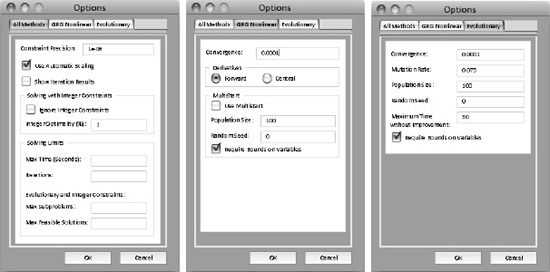
Figure 11–21. You can choose advanced options on the three tabs of the Options dialog box for Solver.
- Click the Solve button to set Solver analyzing the problem. If Solver finds a solution, it displays the Solver Results dialog box with the message “Solver found a solution” (see Figure 11–22).
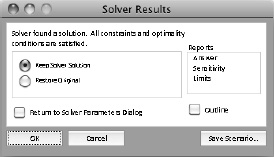
Figure 11–22. From the Solver Results dialog box, you can choose whether to keep Solver's solution or restore the original solution.
NOTE: If Solver can't find a solution to the problem, select the Return to Solver Parameters Dialog check box in the Solver Results dialog box, and then click the OK button. In the Solver Parameters dialog box, change the parameters, and try solving the problem again.
- Select the Keep Solver solution option button if you want to keep the solution Solver found. Otherwise, select the Restore Original option button.
- Click the OK button to close the Solver Results dialog box.