
Making Your Worksheets Print Correctly
To print from Excel, you use the Print dialog box. But before you print, you need to tell Excel which part of the workbook to print. You may also want to check the page setup to make sure the page breaks fall where you want them to fall.
Telling Excel Which Part of the Worksheet to Print
Given that each worksheet contains billions of cells, you seldom need to print the whole of a worksheet—you want to print only the range of cells you've used, or perhaps only a small subset of that range. So when you're printing, the first thing to do is tell Excel which part of the worksheet you want to print. Excel calls this setting the print area. You can set a separate print area for each worksheet.
CAUTION: Until you set the print area, Excel assumes you want to print all the cells you've used on the worksheet—even if there are huge amounts of blank space between them. So, it's a good idea always to set the print area before printing.
To set the print area, follow these steps:
- Click the worksheet whose print area you want to set.
- Select the range of cells you want to print.
- Choose File
 Print Area Set Print Area. Excel displays a dotted blue line around the print area to indicate that it is set.
 - If you need to add a new area to the existing print area, select the range of cells you want to add, then choose File Print Area Add to Print Area.
NOTE: When you create a print area that consists of multiple ranges of cells, the ranges don't need to be contiguous. Excel prints each separate range on a separate page.
If you need to change the print area altogether, select a new range of cells, then give the File ![]() Print Area
Print Area ![]() Set Print Area command again.
Set Print Area command again.
If you need to clear the print area so that the worksheet has no print area set, click the worksheet, then choose File ![]() Print Area
Print Area ![]() Clear Print Area.
Clear Print Area.
Checking the Page Layout and Where the Page Breaks Fall
When printing a large worksheet, check the page layout of the worksheet and adjust it as needed. Follow these steps:
- Switch to Page Layout view by clicking the Page Layout View button at the left end of the status bar, choosing Layout View Page Layout from the Ribbon, or choosing View Page Layout from the menu bar.
- Click the Layout tab of the Ribbon to show its controls. Figure 13–1 shows a worksheet in Page Layout view with the Layout tab displayed.
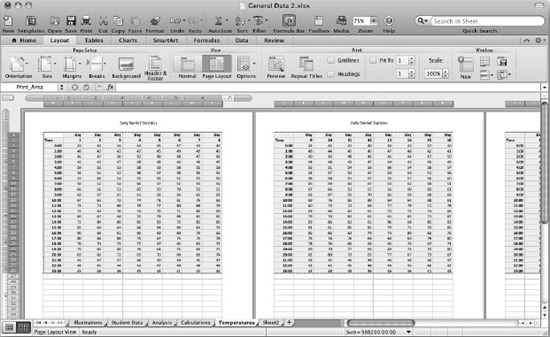
Figure 13–1. To see a worksheet's pages laid out, switch to Page Layout view. You can then use the controls on the Layout tab of the Ribbon to refine the layout.
- Use the controls in the Page Setup group to change the page setup as needed:
- Change the margins. Open the Margins pop-up menu, then click Normal, Wide, or Narrow. For greater control, click Custom Margins, work on the Margins tab of the Page Setup dialog box, then click the OK button.
NOTE: If you prefer to work in Normal view, you can still adjust the page breaks—drag the dotted lines that represent them, or use the controls in the Page Setup group.
- Change the orientation. Open the Orientation pop-up menu, then click Portrait or Landscape.
- Change the paper size. Open the Size pop-up menu, then click the paper size.
- Insert a page break. Click the column before which you want to insert a manual page break. Open the Breaks pop-up menu, then click Insert Page Break.
- Change the margins. Open the Margins pop-up menu, then click Normal, Wide, or Narrow. For greater control, click Custom Margins, work on the Margins tab of the Page Setup dialog box, then click the OK button.
NOTE: If you put a page break in the wrong place, click the column after it, then choose Layout ![]() Page Setup
Page Setup ![]() Breaks
Breaks ![]() Remove Page Break from the Ribbon. To restore all page breaks to where Excel had placed them, choose Layout
Remove Page Break from the Ribbon. To restore all page breaks to where Excel had placed them, choose Layout ![]() Page Setup
Page Setup ![]() Breaks
Breaks ![]() Reset All Page Breaks.
Reset All Page Breaks.
When you have finished laying out the pages, it's a good idea to save the workbook—for example, click the Save button on the Standard toolbar, or press Cmd+S—to store the print settings.
TIP: To see a full preview of the printout, click the Preview button. Excel creates a preview and displays it in the Preview application, where you can see clearly what will print and how the pages will flow. When you've finished previewing the printout, click the Print button to print it.
Printing a Worksheet or Workbook
After you've set the print area for each worksheet you want to print, you can print a worksheet or workbook like this:
- If you want to print anything less than a whole workbook, choose what you want to print:
- Print a worksheet. Make that worksheet active. For example, click its worksheet tab.
- Print multiple worksheets. Make all those worksheets active by selecting their worksheet tabs.
- Print a selection of cells. Select the cells.
TIP: When you've set up a worksheet to print exactly the way you want it, you can print it quickly by clicking the Print button on the Standard toolbar. Clicking the Print button sends the print job straight to the printer without displaying the Print dialog box.
- Choose File Print or press Cmd+P to display the Print dialog box. If the Print dialog box opens at its smaller size, click the down-arrow button to the right of the Printer pop-up menu to expand the dialog box to its larger size.
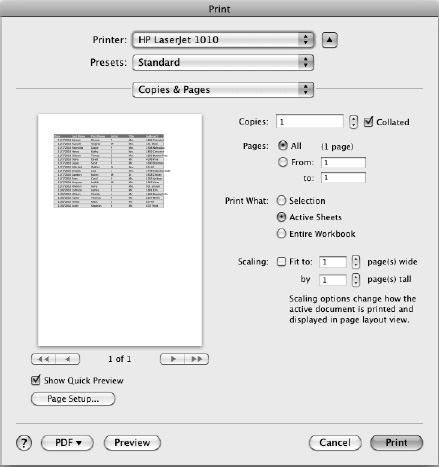
- Make sure the Copies & Pages item is selected in the pop-up menu under the Presets pop-up menu. Figure 13–2 shows the Print dialog box with the Copies & Pages item selected.
- In the Print What area, choose what to print:
- Selection. Select this option button to print only the cells you've selected. This option is useful for printing smaller amounts without resetting the print area.
- Active Sheets. Select this option button to print the active worksheet (if you've selected only one) or active worksheets (if you selected more than one).
- Entire Workbook. Select this option button to print every worksheet in the workbook. Normally, you'll use this option only for small workbooks.
- Check that the preview of the printout looks right. If you need to change the scaling to make the printout fit the paper better, select the Scaling check box, then set the number of pages in the Fit to N page(s) wide box and the by N page(s) tall box. For example, you might choose Fit to 1 page(s) wide by 2 page(s) tall.
- Click the Print button to print the worksheets.