
Sharing Your Workbooks with Your Colleagues
You may create some workbooks on your own, but for others, you'll probably need to work with colleagues to collect, enter, and analyze data. You can either share a workbook on the network so that one person can work on it at a timeor turn on Excel's sharing features that enable you and your colleagues to work on the workbook at the same time.
Before sharing a workbook, you may choose to protect it with a passwordor to allow your colleagues to make only some types of changes to it.
Protecting a Workbook or Some of Its Worksheets
Before sharing a workbook with your colleagues for editing individually on a network, you may want to restrict the changes your colleagues can make in the workbook or on some of its worksheets. Excel calls this protecting the workbook or worksheets.
Protecting a Workbook
To protect a workbook, follow these steps:
- Choose Review
 Protection Workbook from the Ribbon or Tools Protection Workbook from the menu bar to display the dialog box shown in Figure 13–8.
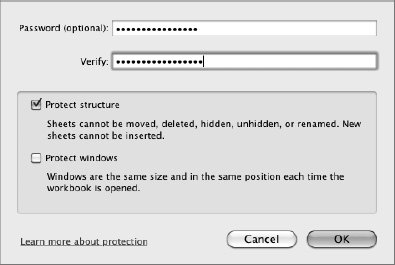
Figure 13–8. When protecting a workbook, you'll normally want to protect the structure but not the windows.
- Select the Protect structure check box to prevent your colleagues from inserting, deleting, or otherwise changing whole worksheets.
- Select the Protect windows check box only if you need to prevent your colleagues from changing the number or sizes of windows that you're using for the workbook. Normally, you don't need to do this if your colleagues will work conventionally in the workbook.
- Type a password in the Password text box and in the Verify text box.
- Click the OK button to close the dialog box.
- Save the workbook. For example, click the Save button on the Standard toolbar or press Cmd+S.
NOTE: To unprotect a workbook, choose Review ![]() Protection
Protection ![]() Workbook. Excel displays a dialog box prompting you for the password. Type it, click the OK button, then save the changes to the workbook.
Workbook. Excel displays a dialog box prompting you for the password. Type it, click the OK button, then save the changes to the workbook.
Protecting a Worksheet
When you need to limit the changes your colleagues can make to a particular worksheet, apply protection to it. Follow these steps:
- Click the worksheet to activate it.
- Choose Review Protection Sheet to display the Protect the sheet and contents of locked cells dialog box (shown in Figure 13–9 with settings chosen).
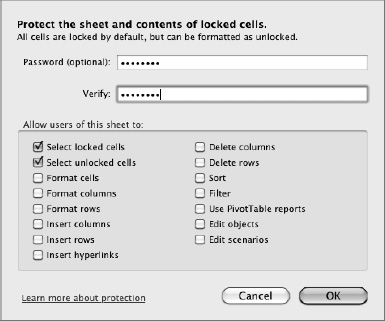
Figure 13–9. Protect a worksheet when you need to prevent your colleagues from making specific types of changes to it.
- Type a password in the Password text box and the Verify text box.
- In the Allow users of this sheet to box, select each check box for actions you want your colleagues to be able to take. Clear the other check boxes.
- Click the OK button. Excel closes the dialog box and applies the protection
- Save the workbook. For example, press Cmd+S or click the Save button on the Standard toolbar.
Tracking Changes to a Workbook
When you share a workbook with other people, you may need to track the changes they make to it so that you can easily review them without having to compare old and new versions of the worksheet. To track the changes, you turn on the Track Changes feature. When you turn on Track Changes, Excel automatically shares the workbook for you.
To turn on Track Changes and share a workbook, follow these steps:
- Choose Review Share Track Changes Highlight Changes from the Ribbon or Tools Track Changes Highlight Changes from the menu bar to display the Highlight Changes dialog box (see Figure 13–10).
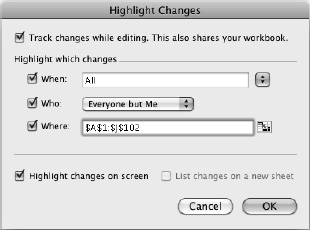
Figure 13–10. In the Highlight Changes dialog box, select the Track changes while editing check box, then choose which changes to save and whether to highlight them on screen.
- Select the Track changes while editing check box. Excel then enables the other controls in the dialog box.
- To specify the time period over which to track the changes, select the When check box, open the pop-up menu, then click the appropriate item:
- Since I last saved. Select this item to track only the changes since you last saved the workbook. If you save the workbook only after reviewing the changes, this can be a good way of keeping the number of changes down to a manageable level.
- All. Select this item to track all the changes.
- Not yet reviewed. Select this item to track changes only until you review them. This is another approach to keeping down the number of changes that remain in the workbook.
- Since date. Select this item if you want to specify the date at which to begin tracking the changes. Excel suggests the current date, but you can change it as needed.
- To choose whose changes Excel tracks, select the Who check box, open the pop-up menu, then click the Everyone item or the Everyone but me item, as needed. (The idea is that you may not need to see the changes you yourself have made.)
- To specify the range for which to track the changes, select the Where check box, then drag through the range in the worksheet to enter it in the text box. If you need to get the Highlight Changes dialog box out of the way, click the Collapse Dialog button, but usually it's easier just to work around it.
- Select the Highlight changes on screen check box if you want Excel to highlight the changes on screen. This is usually helpful.
- Select the List changes on a new sheet check box if you want Excel to create a new worksheet and put a list of the changes on it. Creating this list can be a handy way of reviewing the changes, as you can add comments next to them if you need to.
NOTE: Excel makes the List changes on a new sheet check box available only when you've turned on Track Changes and the workbook contains at least one tracked change. This means that you'll need to close the Highlight Changes dialog box, make some tracked changes, then open the dialog box again before you can select the List changes on a new sheet check box.
- Click the OK button to close the Highlight Changes dialog box. Excel prompts you to save the workbook (see Figure 13–11).
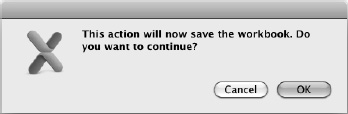
Figure 13–11. After turning on Track Changes, Excel prompts you to save the workbook. Click the OK button.
- Click the OK button. Excel saves the workbook and shares it.
After sharing a workbook by turning on Track Changes, you may need to adjust the sharing. To do so, follow the instructions in the next section.
Sharing a Workbook So That Your Colleagues Can Edit It
When you need to be able to work on a workbook with your colleagues, turn on sharing. Follow these steps:
- Open the workbook.
- Choose Review Share Share Workbook Share Workbook from the Ribbon to display the Share Workbook dialog box. The left screen in Figure 13–12 shows the Editing tab of the Share Workbook dialog box, which is where you start the sharing process.
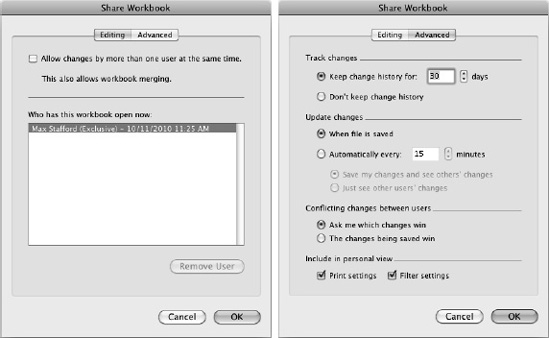
Figure 13–12. On the Editing tab (left) of the Share Workbook dialog box, select the Allow changes by more than one user at the same time check box. You can then choose options on the Advanced tab (right).
- Select the Allow changes by more than one user at the same time check box on the Editing tab.
- Check the Who has this workbook open now list box. It should show only your name and should include the word Exclusive to indicate that you've got sole access to the workbook.
- Click the Advanced tab to display its contents (shown on the right in Figure 13–12).
- In the Track Changes area, choose how long to keep the change history for the workbook:
- Normally, you'll want to select the Keep change history for option button and set the number of days in the days box.
- The default setting is 30 days, but if you develop your workbooks quickly, you may want to reduce the interval to 7 days or 14 days to prevent Excel from keeping large amounts of history you don't need.
- The alternative is to select the Don't keep change history option button, but usually it's best to keep change history so that you can unravel any mysterious changes.
- In the Update changes area, choose when to update the changes to the workbook:
- The default setting is the When file is saved option button, which generally works pretty well.
- The alternative is to select the Automatically every option button and set the number of minutes in the minutes box. The default setting is 15 minutes; if you work fast, you may want to shorten the interval to 5 or 10 minutes.
- If you select the Automatically every option button, you can choose between the Save my changes and see others' changes option button (usually the better choice) and the Just see other users' changes option button.
- In the Conflicting changes between users area, choose how to handle conflicting changes to the workbook. Normally, you'll want to select the Ask me which changes win option button so that you can decide which of the conflicting changes to keep. The alternative is to select the option button called The changes being saved win, which tells Excel to overwrite the conflicting changes with the latest changes.
- In the Include in personal view area, select the Print settings check box if you want to include print settings in your view of the workbook. Select the Filter settings check box if you want to include filter settings. (See Chapter 10 for instructions on filtering an Excel database table.)
- Click the OK button to close the Share Workbook dialog box. Excel then displays a dialog box telling you that it will save the workbook.
- Click the OK button. Excel sets up the sharing and adds “[Shared]” to the workbook's title bar so that you can easily see it's shared.
TIP: When you store workbooks in a shared folder, either on your Mac or on a network, you may need to protect them with passwords so that only authorized people can open them. To apply a password to open or a password to modify, use the procedure described in the section “Protecting a Workbook with Automatic Backups and Passwords” in Chapter 3.
Working in a Shared Workbook
Once you've shared a workbook or someone else has shared it, you can perform basic editing in it much as normal. You can enter data and formulas in cells or edit their existing contents, format cells, and use both drag and drop and cut, copy, and paste. You can also insert rows, columns, and even whole worksheets.
Beyond these basics, Excel prevents you from making changes that may cause problems with the sharing. These are the main restrictions:
- Apply conditional formatting. If your workbook needs conditional formatting, apply it before sharing the workbook.
- Insert objects. You can't insert pictures, SmartArt, charts, hyperlinks, or various other objects.
- Insert or delete blocks of cells. You can insert or delete a whole row or column, but you can't insert or delete a block of cells. You also can't merge cells together.
- Delete a worksheet.You can't delete a worksheet from the shared workbook.
- Protect a sheet with a password. Any protection you've applied before sharing the workbook remains in force, but you can't apply protection to a sheet in a shared workbook.
- Outline the workbook.You can't create an outline in a shared workbook. See the section “Creating a Collapsible Worksheet by Outlining It” in Chapter 3 for information on outlining a workbook.
Resolving Conflicts in a Shared Workbook
If you choose the Ask me which changes win option button when sharing the workbook, Excel prompts you to deal with conflicts that arise between the changes you're saving and the changes that your colleagues have already saved. The Resolve Conflicts dialog box (see Figure 13–13) takes you through each of the changes in turn, showing the change you made and the conflicting change.
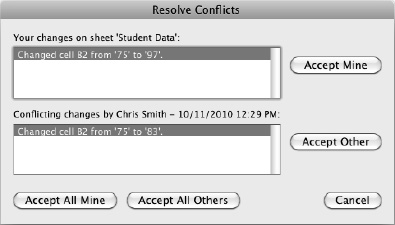
Figure 13–13. When you and another user have changed the same cells, the Resolve Conflicts dialog box walks you through each change in turn. You can accept all your changes, all your colleagues' changes, or some of each.
For each change, you can click the Accept Mine button to accept your change or click the Accept Other button to accept your colleague's change. To clear all the changes at once, click the Accept All Mine button or the Accept All Others button. Excel closes the Resolve Conflicts dialog box automatically when you've finished reviewing the conflicts.
Reviewing Tracked Changes in a Shared Workbook
When you've tracked changes in a shared workbook, you can review them, accepting the changes you want to keep and rejecting the other changes.
To review the tracked changes, follow these steps:
- Open the shared workbook if it's not already open.
- Choose Review Share Track Changes Accept or Reject Changes from the Ribbon or Tools Track Changes Accept or Reject Changes from the menu bar to display the Select Changes to Accept or Reject dialog box (see Figure 13–14).
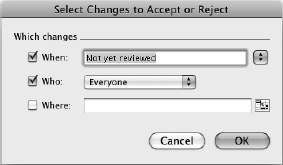
Figure 13–14. In the Select Changes to Accept or Reject dialog box, choose which changes you want to review, then click the OK button.
- Use the controls in the Which changes area to choose which changes Excel presents for your review:
- When. Select this check box to specify a date range. Then open the pop-up menu and choose the Not yet reviewed item if you want to review all the changes you haven't yet reviewed, or select the Since date item and enter the date in the text box.
- Who. Select this check box if you want to specify whose changes you'll review. Then open the pop-up menu and choose Everyone, Everyone but Me, or a user name.
- Where. Select this check box if you want to see the changes in only part of the workbook. Then click in the text box and drag through the range in the worksheet.
- Click the OK button to close the Select Changes to Accept or Reject dialog box. Excel displays the Accept or Reject Changes dialog box (see Figure 13–15), which shows the number of changes and the details of the first change.
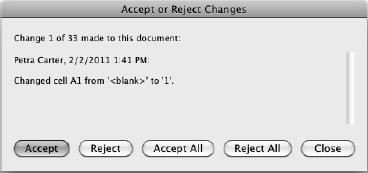
Figure 13–15. Use the Accept or Reject Changes dialog box to work your way through the tracked changes in a shared workbook.
- Work through the changes using the Accept button and the Reject button. You can also take the nuclear option and click the Accept All button if you decide all the changes are worthwhile or the Reject All button if you decide they're worthless; if you click either button, Excel closes the Accept or Reject Changes dialog box for you.
- When you've worked your way through the changes, click the Close button to close the Accept or Reject Changes dialog box.