
Consolidating Multiple Worksheets into a Single Worksheet
When you work with many worksheets, you may need to consolidate worksheets of the same type into a single worksheet. For example, if you have a year's worth of weekly spreadsheets containing sales figures, you may want to consolidate them to get yearly figures.
Excel enables you to consolidate worksheets that have the same layout or worksheets that have different layouts but the same row labels or column labels. You can consolidate up to 255 source worksheets into the destination worksheet, either linking the destination worksheet to the source worksheets or copying the data from the source worksheets to the destination worksheet but not creating a link.
Preparing to Consolidate Worksheets
To consolidate worksheets, you need to open the destination worksheet so that you can enter information in it.
When you're consolidating just a few workbooks, you'll usually also want to open the source workbooks so that you can create references to them easily; while you can create the references without opening the source worksheets, it's more work, because you need to type in the references. When you're consolidating dozens of workbooks, having them all open at once tends to be awkward, and you will usually find it easier to create the references using a single source workbook, then copy the references and edit them for the other workbooks.
Consolidating Worksheets by Their Position
When the worksheets you want to consolidate have the same layout, you can consolidate them by position. Consolidating by position essentially means getting data from the same cell address in each of the source worksheets.
CAUTION: For consolidating by position to work, the worksheets must have identical layouts. If any of the worksheets has a different layout, it won't work—even if the difference is as little as a single row or column having been added or deleted.
To consolidate worksheets by their position, follow these steps:
- Open the workbooks that contain the source worksheets. If you're consolidating source worksheets that are in the destination workbook, skip this step.
- Open the destination workbook and activate the destination worksheet. If necessary, add a worksheet that will become the destination worksheet.
- Make active the upper-left cell of the range you want to put the consolidated data in.
- Choose Data
 Tools Consolidate to display the Consolidate dialog box (shown in Figure 13–16 with settings chosen).
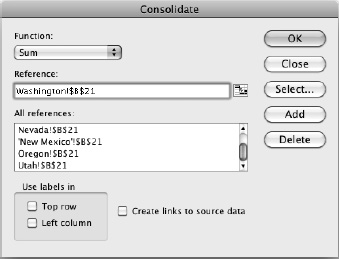
Figure 13–16. In the Consolidate dialog box, set up the references to the source worksheets you want to consolidate into the destination worksheet.
- Open the Function pop-up menu and choose the function to use for the consolidation:
- Sum. This function adds the numbers. This is the default function for consolidation.
- Count. This function counts the number of items.
- Average. This function returns the average of the values.
- Max. This function returns the largest value.
- Min. This function returns the smallest value.
- Product. This function returns the product of multiplying the numbers.
- Count Numbers. This function returns the count of numerical values.
- StdDev. This function returns the standard deviation of the values.
- StdDevp. This function returns the standard deviation based on an entire population.
- Var. This function returns the variance based on a sample.
- Varp. This function returns the variance based on an entire population.
- Add the references to the All references list box. Follow these steps:
- Click in the Reference box to place the focus there.
- If you need to move the Consolidate dialog box out of the way, click the Collapse Dialog button. If you've got space to work around the dialog box, you don't need to collapse it.
- If the source worksheet is in another workbook, activate that workbook. For example, click its window or use the Window menu to switch to it.
NOTE: If you need to open a workbook to add its reference, click the Select button in the Consolidate dialog box to display the Choose a Workbook dialog box. Click the workbook, and then click the OK button.
- Click the source worksheet's tab to display the source worksheet.
- Select the cell or range on the worksheet.
- If you collapsed the Consolidate dialog box, restore it by clicking the Collapse Dialog button.
- Click the Add button to add the cell or range address to the All references list box.
- Repeat these steps to add further references. On the assumption that you're consolidating worksheets by position, Excel automatically suggests the same cell or range in each worksheet, so you don't have to select the cell or range.
- In the Use labels in area at the bottom of the Consolidate dialog box, clear the Top row check box and Left column check box.
- Select the Create links to source data check box if you want Excel to create links to the source worksheets.
- Click the OK button to close the Consolidate dialog box. Excel consolidates the data into the cell.
Consolidating Worksheets by Category
If the worksheets you want to consolidate don't have identical layouts, but do have the same labels, you can use the labels to consolidate by category.
For example, look at the two months of production results shown in Figure 13–17. The names in the Staff column appear in a different order in each, so you can't consolidate by position. But because the labels are the same, you can consolidate by category. In effect, you're telling Excel “give me the Week 1 result for Cheung's row, whichever row that is” rather than “give me cell B1.”

Figure 13–17. When the source worksheets have consistent labels but a different layout, you can consolidate the worksheets by category.
To consolidate worksheets by category, follow these steps:
- Open the workbooks that contain the source worksheets. If you're consolidating source worksheets that are in the destination workbook, skip this step.
- Open the destination workbook and activate the destination worksheet. If necessary, add a worksheet that will become the destination worksheet.
- Make active the upper-left cell of the range you want to put the consolidated data in.
- Choose Data Tools Consolidate to display the Consolidate dialog box (shown in Figure 13–16, earlier in this chapter).
- In the Use labels in area, select the Top row check box if the labels are in the top row. Select the Left column check box if the labels are in the left column, as in the example.
- Open the Function pop-up menu and choose the function. In this example, you'd select the Sum function, which is the default function.
- Click in the Reference box to place the focus there.
- Add the references using the method explained in step 7 of the list in the previous section. Select the consolidation range manually on each source worksheet.
- Select the Create links to source data check box if you want Excel to create links to the source worksheets.
- Click the OK button to close the Consolidate dialog box. Excel consolidates the data into the cell.
TIP: To update a consolidation, select the range that contains it, choose Data ![]() Tools
Tools ![]() Consolidate to display the Consolidate dialog box, then click the OK button. Excel updates the consolidation.
Consolidate to display the Consolidate dialog box, then click the OK button. Excel updates the consolidation.