
Recording Macros
When you need to quickly automate a task, you can record a macro using the Macro Recorder. Follow these steps:
- Plan the actions you'll take in the macro. You may find it helpful to write them down so that you can perform them in the right sequence when recording the macro.
- Launch Excel if it's not running, or activate it if it is running.
- Set up a workbook with the conditions you need to perform the actions in the macro. For example, if the macro will move some data from one worksheet to another, enter some sample data to move, and make sure that the workbook contains a worksheet you can use as the destination.
- Choose
Developer
Visual Basic Recordfrom the Ribbon orTools Macro Record New Macrofrom the menu bar to display the Record Macro dialog box (shown in Figure 14-2 with settings chosen for recording a macro).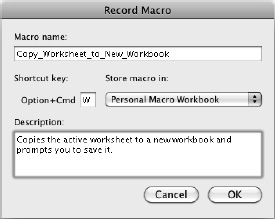
Figure 14-2. In the Record Macro dialog box, name the macro, choose where to store it, and give it a helpful description. You can also create a keyboard shortcut for running the macro.
- In the Macro name text box, type the name for the macro. The Macro Recorder suggests a default name, such as Macro1 or Macro2, but it's better to give the macro a descriptive name that will help you identify it. Follow these naming rules:
- The first character must be a letter.
- The remaining characters can be letters, numbers, or underscores in whatever combination you find most helpful. You can use uppercase and lowercase letters. You can't use symbols, spaces, or punctuation marks.
- The name can be up to 80 characters long, but it's better to keep names much shorter so that they appear in full in the Macro dialog box. Otherwise, the names can be hard to read.
TIP:To make your macro names easy to read, start each main word with a capital letter, and separate words with underscores. For example, Format_Workbook is easier to read than FormatWorkbook, which in turn is clearer than formatworkbook.
- If you want to create a keyboard shortcut for running the macro, click in the Shortcut key box, then press the key you want to use. Excel creates the shortcut using Cmd+Option, so if you press w, the keyboard shortcut is Cmd+Option+W. If you want to add Shift to the keyboard shortcut, hold down Shift as you press the key. You'll see the shifted version of the character in the Shortcut key box, and Excel creates the keyboard shortcut using Cmd+Option+Shift—for example, Cmd+Option+Shift+W.
NOTE: If you plan to create just a few macros, creating a keyboard shortcut for each one you need to run frequently is useful. But if you plan to create many macros, you may need to move them from the default location that the Macro Recorder puts them in. When you move a macro, you break its existing keyboard shortcut—so in this case, it's better not to create keyboard shortcuts when you record your macros, but create them later when you have put the macros where you intend to keep them.
- In the Store macro in pop-up menu, choose where to store the macro. You have three choices:
- Personal Macro Workbook. The Personal Macro Workbook is a special workbook that Excel uses for storing macros. Any macro you store in the Personal Macro Workbook is available all the time Excel is running, so this is the best place to store general-purpose macros. If you open a workbook on another computer, these macros aren't available.
- This workbook. Select this item to store the macro in the active workbook, making the macro available only when this workbook is open. This is good for macros you create in a macro-enabled workbook that you will share with your colleagues—even if you transfer the workbook to a different computer, the macro is available.
- New workbook. Select this item to create a new workbook and store the macro in it. You can then save the workbook and use it to distribute the macro as needed. This approach tends to be less useful than using the Personal Macro Workbook or the active workbook.
- In the Description text box, type a description of what the macro does. The description helps you and other people identify the macro afterward, so it's worth spending a few seconds putting together a clear description.
- Click the OK button. When you do so, you may see the dialog box shown in Figure 14-3, telling you that the operating system has reserved the keyboard shortcut you've chosen. If this happens, click the OK button to return to the Record Macro dialog box, choose a different keyboard shortcut, then click the OK button again.
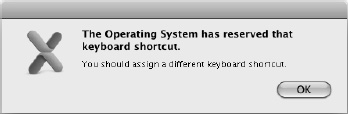
Figure 14-3. If this dialog box appears, click the OK button to return to the Record Macro dialog box, then choose another keyboard shortcut for running the macro.
- After you close the Record Macro dialog box, Excel starts the Macro Recorder, which records the macro. Excel displays a Recording readout on the status bar, and if you've added the Developer tab to the Ribbon, you'll see that the Record button appears as a black square denoting “Stop” rather than the red circle meaning “Record.” But apart from these visual cues, the Excel window appears as normal, and it's easy enough to forget you're recording a macro, especially if someone distracts you.
- Take the actions you want to record into the macro. We'll look at a specific example in a moment, but these are the general rules to follow:
- You can give commands using the Ribbon, toolbars, or menu bar as usual.
- To select cells and ranges, you can use the mouse or the keyboard.
- To switch between recording absolute references and recording relative references, choose
Developer Visual Basic Relative Reference. When the Relative Reference button appears to be pushed in, the Macro Recorder records relative references; when the button has its normal, undifferentiated look, the Macro Recorder records absolute references.
- To stop recording the macro, choose
Developer Visual Basic Recordfrom the Ribbon orTools Macro Stop Recordingfrom the menu bar.