
Running a Macro
After you record a macro (or create it from scratch, as described later in this chapter), you can run it as needed by pressing its keyboard shortcut, adding it to a toolbar or menu, or by attaching it to an object in a worksheet.
For you to be able to run the macro, the workbook that contains it must be open. If you stored the macro in the Personal Macro Workbook, you can run it at any time, because, after you create the Personal Macro Workbook, Excel keeps the Personal Macro Workbook open in the background whenever you run Excel. If you stored the macro in a workbook, you must open that workbook before you can run the macro.
Running a Macro from the Macro dialog Box
You can run any macro from the Macro dialog box. This is useful for macros that you haven't assigned a means of running and for macros whose keyboard shortcut or menu command you've forgotten.
To run a macro from the Macro dialog box, follow these steps:
- Choose
Developer
Visual Basic Macrosfrom the Ribbon orTools Macro Macrofrom the menu bar to display the Macro dialog box (see Figure 14-4).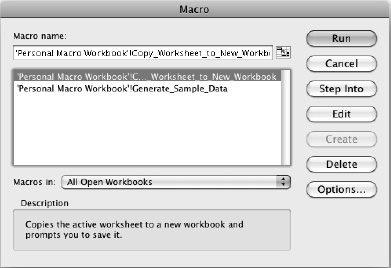
Figure 14-4. From the Macro dialog box, you can run any macro. You can also open a macro for editing, delete it, or open the Options dialog box.
- Open the Macros in pop-up menu and choose which workbooks you want to see the macros for:
- All Open Workbooks. Choose this item to see the macros in the Personal Macro Workbook and all the workbooks you've opened. When you have only a few macros, this is the best choice. When you have more macros, seeing all available macros can make it hard to find the macro you need.
- Personal Macro Workbook. Choose this item to see only the macros in the Personal Macro Workbook.
- An open workbook. Click the name of the open workbook whose macros you want to see.
- In the Macro name list box, click the macro you want to run.
- Click the Run button. Excel closes the Macro dialog box and runs the macro.
Running a Macro Using Its Keyboard Shortcut
If you assigned a keyboard shortcut to a macro you recorded, you can run the macro by pressing that keyboard shortcut.
If you didn't assign a keyboard shortcut, you can create one. Follow these steps:
- As described in the previous section, open the Macro dialog box.
- Choose the workbook or workbooks in the Macros in pop-up menu.
- Click the macro in the Macro name list box.
- Click the Options button to display the Macro Options dialog box (see Figure 14-5).
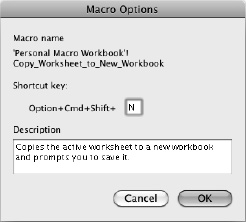
Figure 14-5. Use the Macro Options dialog box to assign a keyboard shortcut to a macro or to edit its description.
- Click in the Shortcut key box, then press the letter you want.
- Excel creates the shortcut using Cmd+Option, so if you press n, the keyboard shortcut is Cmd+Option+N.
- If you want toadd Shift to the keyboard shortcut, hold down Shift as you press the key. You'll see the shifted version of the character in the Shortcut key box, and Excel creates the keyboard shortcut using Cmd+Option+Shift—for example, Cmd+Option+Shift+N.
- If you want to edit the description of the macro, do so in the Description box.
- Click the OK button to close the Macro Options dialog box.
- Click the Cancel button to close the Macro dialog box.
Running a Macro from a Toolbar Button or Menu Item
To make a macro easy to run, you can create a toolbar button or a menu item for it. Follow these steps:
- Ctrl-click or right-click a toolbar, then click Customize Toolbars and Menus on the context menu to display the Customize Toolbars and Menus dialog box. Alternatively, choose
View Toolbars Customize Toolbars and Menusfrom the menu bar. - If you want to create a toolbar button, and the toolbar on which you want to put it isn't displayed, click the Toolbars and Menus tab to display its contents. Select the toolbar's check box in the Show column to display the toolbar.
TIP: If you want to create a new toolbar to add the macro button to, click the New button, type the toolbar name in the Add a Toolbar dialog box, then click the OK button.
- Click the Commands tab to display its contents.
- In the Categories list box on the left, scroll down, then click the Macros item. Rather than display a list of the macros in the Commands list box on the right, Excel displays two items—one called Custom Menu Item and the other called Custom Button.
- Drag the Custom Menu Item object to a menu, or drag the Custom Button object to a toolbar.
- If you created a toolbar button, click the OK button to close the Customize Toolbars and Menus dialog box. If you created a menu item, leave the dialog box open.
- Ctrl-click or right-click the toolbar button or menu item, then click Assign Macro on the context menu. Excel displays the Assign Macro dialog box (see Figure 14-6).
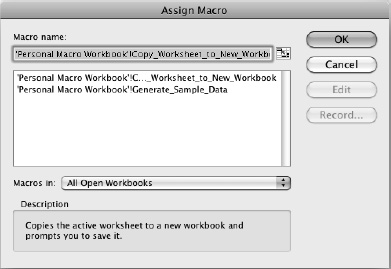
Figure 14-6. In the Assign Macro dialog box, choose the macro you want to assign to the toolbar button or menu item you created.
- In the Macro name list box, click the macro you want to assign to the toolbar button or menu item. If necessary, open the Macros in pop-up menu and choose which workbook or workbooks you want to see the macros for—All Open Workbooks, Personal Macro Workbook, or a particular open workbook.
- Click the OK button to close the Assign Macro dialog box.
- Ctrl-click or right-click the toolbar button or menu item again, then click Properties on the context menu to display the Command Properties dialog box (see Figure 14-7).
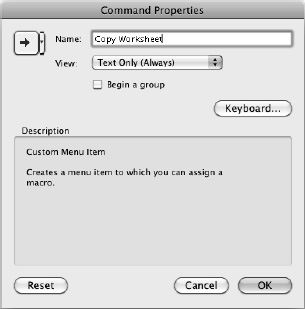
Figure 14-7. In the Command Properties dialog box, type the name for the command, then choose an icon to represent it graphically.
- In the Name text box, type the name you want to display for the menu item or toolbar button.
- In the View pop-up menu, choose how you want the toolbar button or menu item to appear:
- Default Style. Choose this item to make a toolbar button appear using the default style you've set for toolbars. (If you've chosen to show icons and text, the button appears as an icon with text beside it; if you've chosen to show only icons, just the icon appears.) A menu item appears as text with an icon if the command has an associated icon.
- Text Only (Always). Choose this item to make the toolbar button or menu item appear as text without an icon.
- Text Only (in Menus). Choose this item to make a menu item appear only as text.
- Image and Text. Choose this item to make the toolbar button or menu item appear as an icon with text beside it.
- If you want to change the icon, click the arrow button to the left of the Name box, then click the icon you want on the pop-up menu.
- Select the Begin a group check box if you want to place a divider line before the item. This is useful when you want to put different groups of items in different sections of the menu or toolbar.
- Click the OK button to close the Command Properties dialog box.
- If you just created a menu item, click the OK button to close the Customize Toolbars and Menus dialog box unless you want to customize further items.
Running a Macro from an Object in a Worksheet
Toolbar buttons, menu items, and keyboard shortcuts are all easy ways to run macros, but Excel also gives you another way: you can assign a macro to a worksheet object such as a button or a shape. When a user clicks the object, the macro runs.
Assigning a macro to an object can be a great way of making macros easily available to users who might not find them otherwise. For example, if you create a large, friendly button named Recalculate Total (as in Figure 14-8) and put it right next to the cells the user will be looking at, they'll have to work hard to miss it, whereas missing it on a toolbar or menu is easier than falling off a log.
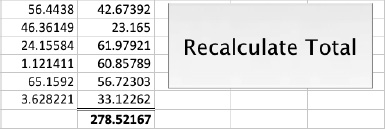
Figure 14-8. You can assign a macro to a worksheet object, such as the button shown here, to give users an easy way to run the macro.
To assign a macro to an object in a worksheet, follow these steps:
- Place the object in the worksheet. For example, choose
Developer Form Controls Button, then click and drag in the worksheet to create the button. Select the button's default name, then type the name you want (for example, Recalculate Total). - Ctrl-click or right-click the object, then click Assign Macro on the context menu to display the Assign Macro dialog box (shown in Figure 14-6, earlier in this chapter).
- If necessary, open the Macros in pop-up menu and choose which workbook or workbooks you want to see the macros for—All Open Workbooks, Personal Macro Workbook, or a particular open workbook.
- Click the macro you want to assign.
- Click the OK button.
You can now click the button in the worksheet to run the macro.