
Making the Toolbox Work Your Way
Like the other Office applications, Excel has a tool palette called the Toolbox. The Toolbox floats freely rather than being docked to the application window, so you can position it wherever is best for you.
In Excel, the Toolbox contains four palettes:
- Scrapbook. The Scrapbook is a storage area for collecting items you want to be able to paste easily into your workbooks. We'll look at the Scrapbook later in this chapter.
- Reference Tools. The References Tools palette gives you quick access to an online thesaurus, dictionary, bilingual dictionary, translation engine, and Web search.
- Formula Builder. The Formula Builder is a tool for inserting functions and formulas. I'll show you how to use the Formula Builder in Chapter 5.
- Compatibility Report. You use the Compatibility Report palette to review possible problems when saving Excel workbooks in older file formats (for example, so that people with older versions of Excel can use them). Chapter 3 shows you how to use the Compatibility Report palette.
To display the Toolbox's palettes, choose View ![]()
Formula Builder, View ![]()
Scrapbook, View ![]()
Reference Tools, or View ![]()
Compatibility Report from the menu bar. The Toobox opens, showing the palette you chose. You can also click the Toolbox button on the Standard toolbar, go to the tab bar to the top of the Toolbox, and then click the tab button for the tab you want.
TIP: Press Shift+F3 to display the Formula Builder or Cmd+Option+R to display the Reference Tools palette
To hide the Toolbox, you can click its Close button (the red button in its title bar) or give the View menu command again—for example, when the Scrapbook palette is displayed, choose View ![]()
Scrapbook to hide the Toolbox. Or you may want to make the Toolbox collapse, fade, or close after you've left it unused for a number of seconds. To set it to take one of these actions, follow these steps:
- Click the Toolbox Settings button, the curling-arrow button in the upper-right corner of the Toolbox. The Toolbox flips over and displays the Toolbox Settings palette (see Figure 1–9).
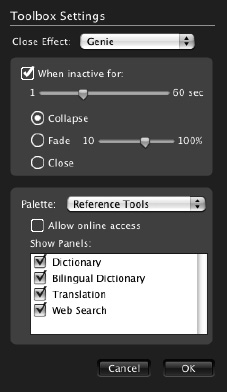
Figure 1–9. The Toolbox Settings palette on the back of the Toolbox lets you make the Toolbox collapse, fade, or close automatically after a period of inactivity.
- In the Close Effect pop-up menu, choose the effect you want to use for closing the Toolbox: Genie, Scale, or None. (Genie and Scale are the same effects used for minimizing applications to the Dock.)
- Select the When inactive for check box.
- Drag the slider to set the number of seconds of inactivity—from 1 to 60.
- Select the appropriate option button:
- Collapse. Select this option button to make the Toolbox collapse to just its title bar and the tab bar. The Toolbox expands again when you click a tab button.
- Fade. Select this option button to make the Toolbox fade. Drag the slider to set the fade percentage—from 10 percent (almost invisible) to 100 percent (fully there). The Toolbox reappears when you move the mouse pointer over it.
- Close. Select this option button to make the Toolbox actually close.
NOTE: In the lower part of the Toolbox Settings palette, you can choose which items appear in the Reference Tools palette. Make sure that Reference Tools is selected in the Palette pop-up menu, and then select or clear the check boxes in the Show Panels list box as needed. Select the Allow online access check box if you want the reference tools to be able to look up material on the Internet.
- Click the OK button to close the Toolbox Settings palette. The Toolbox flips over and displays the palette that was displayed before.
ODDITIES OF THE TOOLBOX