
Controlling How the Excel Window Appears
In this section, I show you where to find the options that control how the Excel window appears.
Start by displaying the General preferences (see Figure 2–2) and then set the following preferences:
- Use R1C1 reference style. Make sure this check box is cleared unless you want to use R1C1 references, in which both the columns and the rows are identified by number. For example, the reference for cell A1 is R1C1 (row 1, column 1), and the reference for cell E2 is R2C5.
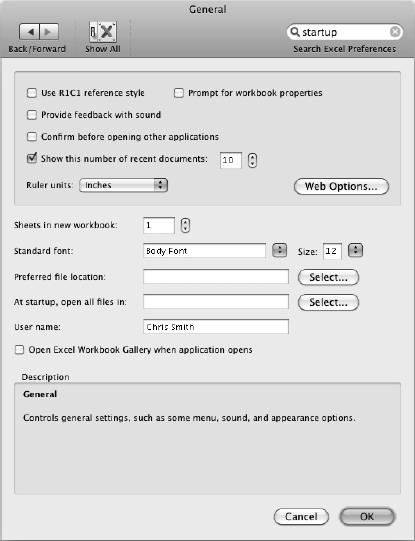
Figure 2–2. In the General preferences pane, you can choose essential settings including the number of recent documents to show in the File menu, the number of sheets in a workbook, your standard font and font size, and your preferred file location.
- Standard font. In this pop-up menu, choose the font you want to use as the default, the one that Excel uses until you apply a different font. If you choose the Body Font item, Excel uses the font that's set as the Body Font in the workbook's theme.
- Size. In this pop-up menu, choose the default font size.
- User name. Use this box to make sure Excel shows your name the way you want it.
- Open Excel Workbook Gallery when application opens. Select this check box if you want Excel to display the Excel Workbook Gallery dialog box on launch. Clear this check box if you don't need the Excel Workbook Gallery displayed at first.
Now click the Show All button to go back to the Overview screen, then click the View icon to display the View preferences pane (see Figure 2–3).
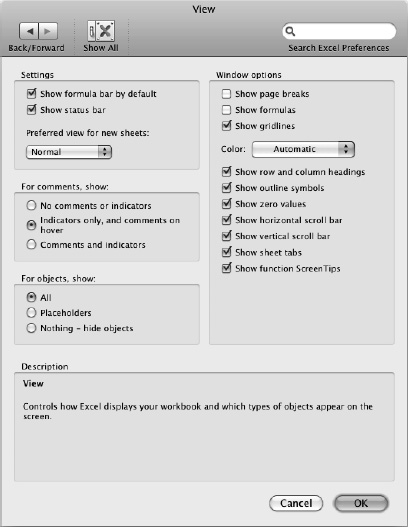
Figure 2–3. The settings in the View preferences pane let you control the display of the formula bar and status bar, choose your preferred view, control how comments and objects appear, and decide which options to display in windows.
You can now choose settings as described in the following subsections.
Choosing Options in the Settings Area of View Preferences
The Settings area of the View preferences pane contains three preferences you'll want to make sure are set the way you like:
- Show formula bar by default. Select this check box to make Excel show the formula bar, which is typically useful.
- Show status bar. Select this check box to make Excel show the status bar. This too is usually helpful.
- Preferred view for new sheets. In this pop-up menu, click Normal if you want to use Normal view for each new sheet you add to a workbook. Click Page Layout if you want Excel to use Page Layout view for new sheets.
Choosing How to Display Comments
In the “For comments, show” area of the View preferences pane, select the option button that describes how you want to display comments attached to cells:
- No comments or indicators. Select this option button when you need to simplify a worksheet's look by hiding the comments.
- Indicators only, and comments on hover. Select this option button to display a comment indicator (a red triangle in the upper-right corner of the cell) for each comment, and to display the comment in a balloon when the user hovers (holds) the mouse pointer over the cell. This is the default setting and is usually the best choice for regular work.
- Comments and indicators. Select this option button to display both comment indicators and comment balloons all the time. Use this setting when you want to make certain you see all the comments in a worksheet.
Choosing How to Display Objects
In the “For objects, show” area of the View preferences pane, select the appropriate option button to control how objects such as pictures and command buttons appear in the worksheets:
- All. Select this option button to display all graphical objects in the workbook. This setting lets you see where everything in the workbook is, but it may make Excel display or scroll worksheets with many graphical objects more slowly.
- Placeholders. Select this option button to display empty-rectangle placeholders instead of pictures, but show command buttons.
- Nothing – hide objects. Select this option button to hide all objects so you can see the data without distractions.
NOTE: The “For objects, show” setting applies only to the active workbook, not to all workbooks.
Choosing Window Options
In the Window options area of the View preferences pane, choose which of the window options to display and which to hide. Here are the details:
- Show page breaks. Select this check box to make Excel display where page breaks fall. Usually, you need to see page breaks only right before printing, so you'll probably want to clear this check box.
- Show formulas. Select this check box to make Excel display the formulas rather than the values they produce. Showing the formulas is helpful when you're troubleshooting calculations, but there's an easier way to show them, as you'll see in Chapter 4. Normally, you want to keep this check box cleared.
- Show gridlines. Select this check box to make Excel display the gridlines around the cells. These are usually helpful, but you may sometimes want to switch them off for special effects.
- Color. In this pop-up palette, click the color you want to use for the gridlines (when you're displaying them). The Automatic setting is usually the best choice unless you need a specific color (for example, red or blue).
- Show row and column headings. Select this check box to display the row and column headings. You almost always want to display these, except when you're sharing a worksheet in which you've hidden some rows and columns but you don't want the missing row numbers or column letters to alert your audience to what you've hidden.
- Show outline symbols. Select this check box to display the symbols that indicate you've created an outline in the worksheet (as discussed in Chapter 3). Normally, you want to display these symbols so that users can expand and collapse the outline as needed—but you may sometimes need to hide the outlining.
- Show zero values. Select this check box to display a 0 (zero) in each cell whose value is zero. Showing zero values is usually helpful; if you need to suppress zero values, clear this check box.
- Show horizontal scroll bar. Select this check box to display the horizontal scroll bar. This too is usually helpful.
- Show vertical scroll bar. Select this check box to display the vertical scroll bar. Normally you need this UI feature.
- Show sheet tabs. Select this check box to display the bar of sheet tabs at the bottom of the window to enable you and your colleagues to navigate easily from one worksheet to another.
- Show function ScreenTips. Select this check box to have Excel display a ScreenTip showing the arguments of a function you're typing into a cell. These ScreenTips are usually helpful, but you can clear this check box if they bug you.