
Setting Preferences for Creating and Saving Your Workbooks
One thing you're pretty much certain to do in Excel is create workbooks and save them. So it's worth spending a minute or two to set Excel to create workbooks with the right number of worksheets, using the folder and workbook format you prefer. You'll also want to choose where to save your workbooks and whether to keep automatic backups as you work. You can also have Excel prompt you to enter property information in your workbooks to make them easier to identify.
Creating Workbooks with the Number of Worksheets You Need
When you create a new workbook, Excel gives it a single worksheet by default. You can add as many other worksheets as you need by clicking the Insert Sheet button, but if you usually need multiple worksheets in each workbook, you can have Excel add them for you.
To control how many worksheets Excel gives each workbook, set the number in the Sheets in new workbook box in the General preferences pane.
Choosing the Default Folder for Opening and Saving Workbooks
Next, set the default folder to save workbooks in. This is the folder that Excel displays each time you open the Open dialog box and the first time you open the Save As dialog box in an Excel session. (After that, if you've saved a workbook, the Save As dialog box displays the workbook's folder.)
To set the default folder, go to the General preferences pane and click the Select button to the right of the Preferred file location box. In the Choose a Folder: Microsoft Excel dialog box that opens, click the folder and then click the Choose button. The folder name appears in the Preferred file location box.
Choosing the Default Format for Saving Workbooks
Next, make sure Excel is set to save workbooks in the format you prefer. To do this, go to the Compatibility preferences pane (see Figure 2–5), open the Save files in this format pop-up menu, and then click the format.
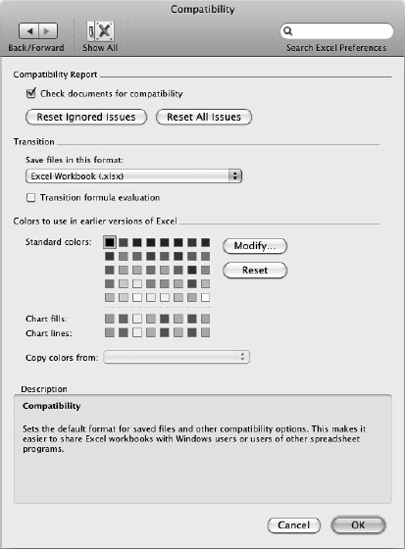
Figure 2–5. In the Compatibility pane, select the Check documents for compatibility check box to make sure Excel alerts you to compatibility issues. In the Save files in this format pop-up menu, pick your default format for saving workbooks.
Excel typically provides more than two dozen formats, but you're likely to use one of these four formats as your standard format:
- Excel Workbook. This is Excel's default format. Use it if you will be the only person to use the workbooks or if your colleagues have Office 2011, Office 2008 for Mac, Office 2010 for Windows, or Office 2007 for Windows. Anyone with Office 2004 for Mac or Office 2003 for Windows will need to install filters (file converters) to be able to open the workbooks.
- Excel Macro-Enabled Workbook. Use this format if you need to include macros in your workbooks to perform custom actions. Again, your colleagues will need to have Office 2011, Office 2008, Office 2010, Office 2007, or either Office 2004 or Office 2003 with filters installed to open these workbooks.
NOTE: Office 2008 for Mac doesn't include VBA. So although you can include macros in an Excel Macro-Enabled Workbook file, Excel 2008 users won't be able to run them.
- Excel Binary Workbook. Use this format if you create large and complex workbooks and need to improve performance. Once more, your colleagues will need to have Office 2011, Office 2008, Office 2010, Office 2007, or either Office 2004 or Office 2003 with filters installed to work with these workbooks.
- Excel 97–2003 Workbook. Use this format if your colleagues have Office 2004 for Mac, Office 2003 for Windows, or an earlier version of Office. You can also use this format for greater compatibility with other spreadsheet applications, such as older versions of OpenOffice.org Calc (the latest version can handle the Excel Workbook format).
While you're in the Compatibility preferences pane, make sure that the Check documents for compatibility check box at the top of the pane is selected. This setting ensures that when you save a workbook in Excel 97–2003 or another format with fewer capabilities than the Excel Workbook format, Excel warns you about information that may not appear correctly in that format.
NOTE: In the Compatibility Report area at the top of the Compatibility preferences pane, you can click the Reset Ignored Issues button to reset the warnings for any compatibility issues you've ignored when performing a compatibility check. You can click the Reset All Issues button if you want to force Excel to recheck all aspects of a workbook's compatibility.
Setting AutoRecover to Keep Backups of Your Workbooks for Safety
Next, decide whether to keep AutoRecover files of your workbooks. AutoRecover is a safety net that automatically saves a copy of each open workbook every few minutes in case Excel or your Mac crashes and loses the changes you've made. After such a crash, when Excel restarts automatically or you restart it manually, it opens the latest AutoRecover files for you so you can choose which versions to keep. If you save your workbooks and then quit Excel normally (for example, by choosing Excel ![]()
Quit), Excel gets rid of the saved AutoRecover files.
CAUTION:Never rely on AutoRecover as protection against disasters. When AutoRecover works as it should, it can save your bacon, but sometimes it doesn't save everything, especially if Excel or your Mac crashes shortly before an AutoRecover save is due. So, you should always save your workbooks frequently while working on them and use AutoRecover only if disaster strikes. You can save a workbook at any time by pressing Cmd+S, clicking the Save button on the Standard toolbar, or choosing File ![]()
Save from the menu bar.
To choose AutoRecover settings, follow these steps:
- Display the Save preferences pane.
- Select or clear the Save AutoRecover information after this number of minutes check box.
- If you select the check box, enter the number of minutes in the text box.
- You can set any interval from 1 minute to 120 minutes.
- An interval of around 3 minutes usually works well, because it saves information frequently enough to avoid disaster but doesn't overly interrupt your work by saving constantly.
- If you edit workbooks that contain many worksheets and lots of data, saving the AutoRecover files may take long enough to interrupt your work. In this case, either increase the AutoRecover interval to make the interruptions less frequent or turn AutoRecover off and save the workbook manually whenever is convenient.
Making Excel Prompt You to Enter Workbook Properties
In each workbook you save, you can store extra information to help yourself and your colleagues identify the workbook, its purpose, and its status. Excel provides slots called properties to contain such information.
Excel fills in some properties for you—for example, it enters your user name in the Author property, fills in the Created property with the time you first saved the workbook, and updates the Modified property each time you save the document. But filling in the rest of the properties is up to you. The best time to get started filling in the properties is when you save the workbook for the first time.
To make Excel automatically display the Properties dialog box when you save a workbook for the first time, select the Prompt for workbook properties check box at the top of the General preferences pneral preferences pane.
NOTE: You can open the Properties dialog box at any point by choosing File ![]()
Properties. We look at the Properties dialog box in Chapter 3.