
Customizing the Toolbars with the Commands You Need
To make the toolbars work the way you prefer, you can customize them. You can either change the buttons that appear on the Standard toolbar and Formatting toolbar, or you can create custom toolbars of your own and give them only the buttons they need.
NOTE: You can also customize both the menus and the menu bar, as you'll see later in this chapter. For example, you can add extra commands to the menus, remove commands you don't use, or create custom menus of your own. To customize the menus and the menu bar, you use the same techniques as for the toolbar, because the menu bar is technically the same type of object (a “command bar”) as the toolbars, even though it looks and acts differently.
Getting Ready to Customize the Toolbars
To prepare to customize the toolbars, open the Customize Toolbars and Menus dialog box and display the toolbar you will customize. Follow these steps:
- Open Excel, or activate Excel if it's already running.
- Right-click the Standard toolbar or the Formatting toolbar, and then click the Customize Toolbars and Menus item on the context menu to display the dialog box. You can also choose
View
Toolbars Customize Toolbars and Menus. - If the Toolbars and Menus tab isn't already at the front, click it to bring it to the front. Figure 2–7 shows the Customize Toolbars and Menus dialog box with the Toolbars and Menus tab at the front. The Formatting toolbar is undocked and appears above the dialog box.
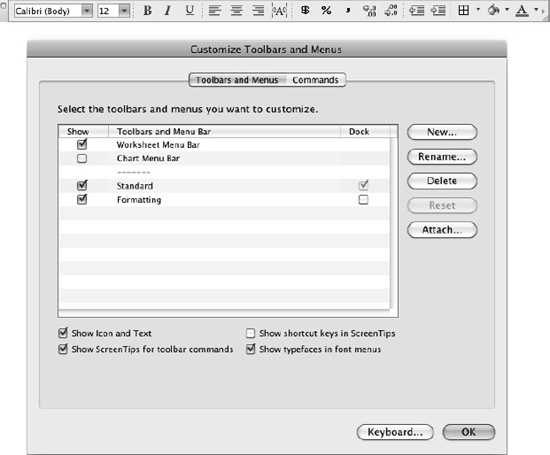
Figure 2–7. On the Toolbars and Menus tab of the Customize Toolbars and Menus dialog box, select the Show check box for each toolbar or menu you want to display so that you can customize it. The toolbar above the dialog box here is the Formatting toolbar, undocked from the window.
- In the Show column, select the check box for each toolbar or menu bar you want to customize. For example, if you want to customize the Formatting toolbar, select the Show check box in the Formatting row to make the Formatting toolbar appear.
- In the Dock column, select the Dock check box if you want to dock the toolbar; clear this check box if you want the toolbar to float. The Dock check box appears only for the Standard toolbar and the Formatting toolbar, not for custom toolbars you create. But because the Dock check box for the Standard toolbar is selected and unavailable, the Formatting toolbar is the only toolbar for which you can use this setting.
You're now ready to create a new toolbar or customize the toolbars as discussed in the following sections.
Creating a New Toolbar
To create a new toolbar, click the New button on the Toolbars and Menus tab of the Customize Toolbars and Menus dialog box. In the Add a Toolbar dialog box that opens, type the name you want to give the toolbar, and then click the OK button.
The new toolbar appears as a small floating window (it's small because it doesn't yet contain any buttons or other controls). You can then add commands to the new toolbar as described in the section after next.
Finding the Commands to Add to the Toolbars or Menus
To find the commands you want to add to the toolbars or menus, follow these steps:
- Click the Commands tab of the Customize Toolbars and Menus dialog box to display its contents (see Figure 2–8).
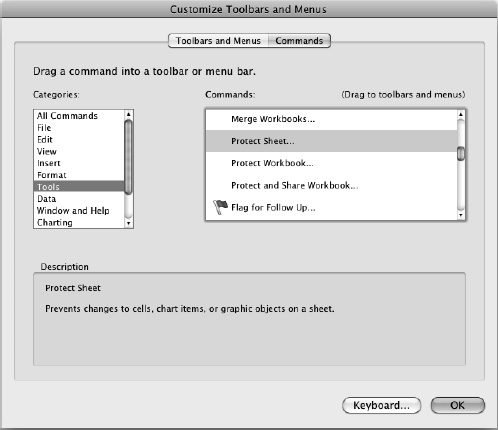
Figure 2–8. On the Commands tab of the Customize Toolbars and Menus dialog box, click the category that contains the command you want to add to a toolbar or menu.
- In the Categories list box, click the category of commands you want. For example, click the File category to see the commands associated with the application's File menu.
- In the Commands box, locate the command you want to add to the toolbar or menu.
You're now ready to add the command to a toolbar, as described in the following sections.
Adding an Item to a Toolbar
To add a command to a toolbar, drag the command from the Commands list box on the Commands tab of the Customize Toolbars and Menus dialog box to the toolbar. Excel shows a light blue line where the button will appear. If the toolbar is positioned horizontally, the blue line is vertical; if the toolbar is positioned vertically, the blue line is horizontal.
Removing an Item from a Toolbar
To remove an item from a toolbar, drag the item off the toolbar and either into the document area of the window or over the Customize Toolbars and Menus dialog box. The item disappears from the toolbar.
Repositioning Items on a Toolbar
To reposition an item on a toolbar, drag it from its current position to where you want it to appear. You can drag an item from one toolbar to another if you want. For example, you can drag a button from the Standard toolbar to the Formatting toolbar to move it from one to the other, or drag it to a custom toolbar that you create.
Changing How a Toolbar Button Appears
When you add a button to a toolbar, Excel uses the item's regular icon, text, or both. To make the button easier to identify, you can change the icon and text. To do so, follow these steps:
- Ctrl+click or right-click the toolbar button, and then click Properties on the context menu. Excel displays the Command Properties dialog box (see Figure 2–9).
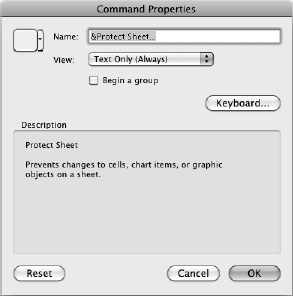
Figure 2–9. Use the Command Properties dialog box when you want to change the icon, text, or both that appear for a toolbar button. The icon to the left of the Name box shows the current icon for the command (if any).
- In the Name text box, type the name you want to display for the toolbar button.
NOTE: Some commands display an ampersand character (&) in the Name text box—for example, in Figure 2–9, the Protect Sheet command appears as &Protect Sheet. This character is used in Windows to control the letter used as an access key for the command—for instance, when you press Alt+F to display the File menu, F is the access key. The ampersand character doesn't work like this on the Mac, so you don't need to include it in names you type. An ellipsis (…) at the end of a command's name means that the command displays a dialog box, just like on the menus.
- In the View pop-up menu, choose how you want the toolbar button or menu item to appear:
- Default Style. Choose this item to make a toolbar button appear using the default style you've set for toolbars. (If you've chosen to show icons and text, the button appears as an icon with text beside it; if you've chosen to show only icons, just the icon appears.) A menu item appears as text with an icon if the command has an associated icon.
- Text Only (Always). Choose this item to make the toolbar button or menu item appear as text without an icon.
- Text Only (in Menus). Choose this item to make a menu item appear only as text.
- Image and Text. Choose this item to make the toolbar button or menu item appear as an icon with text beside it.
- If you want to change the icon, click the arrow button to the left of the Name box, and then click the icon you want on the pop-up menu.
TIP: If you want to use the icon from another toolbar button or menu item, click the Cancel button to close the Command Properties dialog box. Ctrl+click or right-click the item with the icon and click Properties from the context menu to display the Command Properties dialog box for that command. Click the arrow button to the left of the Name box, and then click Copy Button Image on the pop-up menu. Click the Cancel button to close the Command Properties dialog box. Now open the Command Properties dialog box for the other item, click the arrow button to the left of the Name box, and then click Paste Button Image on the pop-up menu. This description is a bit long-winded, but once you know what to do, you can perform the moves in seconds.
- Select the Begin a group check box if you want to place a divider line before the item. This is useful when you want to put different groups of items in different sections of the menu or toolbar.
- Click the OK button to close the Command Properties dialog box.
Adding a Built-in Menu to a Toolbar
One customization that can be a great help is adding one or more of the built-in menus to a toolbar. You may find this handy if you like to give commands using the menus but you find moving the mouse all the way up and across to the menu wastes time—on a large monitor, for example, or with a multimonitor setup.
To add a built-in menu to a toolbar, follow these steps:
- On the Commands tab of the Customize Toolbars and Menus dialog box, scroll down to the bottom of the Categories list box.
- Click the Built-in Menus item to display the list of menus in the Commands box.
- Drag the menu to the toolbar and drop it where you want it to appear.