
Customizing the Menus and the Menu Bar
The Ribbon is a neat addition to Excel 2011, but you may find the menus are still the most convenient way to give many commands. If so, you probably want to customize the menus to put the commands you need the most within easy reach, add specialized commands you find useful, and strip out the commands you seldom or never use.
To customize the menus and the menu bar, open the Customize Toolbars and Menus dialog box and display the toolbar for the standard menu bar like this:
- Right-click the Standard toolbar or the Formatting toolbar, then click the Customize Toolbars and Menus item on the context menu to display the Customize Toolbars and Menus dialog box. You can also choose
View
Toolbars Customize Toolbars and Menus. - If the Toolbars and Menus tab isn't already at the front, click it to bring it to the front.
- Select the Worksheet Menu Bar check box if it's not already selected. Excel displays the toolbar for the standard menu bar (the one you see when working with worksheets rather than charts) on the screen.
You can now add commands to the menus or to the menu bar, as described next.
Customizing the Menus
To customize the menus, follow these steps with the Customize Toolbars and Menus dialog box open and the Worksheet Menu Bar toolbar displayed:
- Click the Commands tab to bring it to the front of the Customize Toolbars and Menus dialog box.
- Using the techniques described earlier in this chapter, find the command you want to add to a menu.
- Click the command, and then drag it to the appropriate menu on the Worksheet Menu Bar toolbar. Excel displays the menu.
- Still holding down the mouse button, drag the command to where you want it on the menu. Figure 2–10 shows an example of dragging a command to a menu.
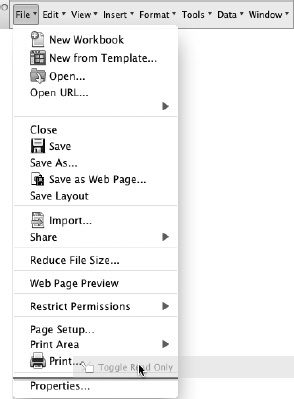
Figure 2–10. To add a command to a menu, drag the command to the toolbar that represents the menu bar, and then drag the command to where you want it on the menu.
- When you drop the command, it appears on the menu. You can then customize the menu item by Ctrl-clicking or right-clicking it and working in the Command Properties dialog box, as discussed for customizing toolbars earlier in this chapter.
Customizing the Menu Bar
To customize the menu bar, open the Customize Toolbars and Menus dialog box and display the Worksheet Menu Bar toolbar. You can then customize the menu bar in these ways:
- Add a new menu. To do so, follow these steps:
Scroll down to the bottom of the Categories list box and click the New Menu item. The Commands list box displays a single item, New Menu.
In the Commands list box, click the New Menu item and then drag it to the menu bar. When Excel displays a vertical blue line between the menus where you want to place the new menu, release the mouse button. Excel adds a new menu named New Menu to the menu bar.
NOTE: If you want to add the new menu as a submenu on an existing menu, drag the New Menu item to the existing menu. Still holding down the mouse button, wait for the menu to open, and then drag to the position you want before releasing the mouse button.
Ctrl-click or right-click the New Menu item, and then click Command Properties to display the Command Properties dialog box.
In the Name box, type a name for the new menu.
Select the Begin a group check box if you want to put a vertical separator line before the menu name. Separator lines tend to be less useful on the menu bar than on the toolbars, but you may like the look.
Click the OK button to close the Command Properties dialog box.
Add commands to the new menu as discussed in the previous section. Figure 2–11 shows a custom menu in place with a new command being added.
Figure 2–11. After adding a new menu and naming it, drag commands to it from the Customize Toolbars and Menus dialog box.
- Change an existing menu. Ctrl-click or right-click the menu on the Worksheet Menu Bar toolbar, then click Command Properties to display the Command Properties dialog box. You can then change the menu's name or select the Begin a group check box to put a separator line before the menu. Click the OK button.
- Delete an existing menu. Ctrl-click or right-click the menu on the Worksheet Menu Bar toolbar, and then click Delete Command on the pop-up menu.
- Move an existing menu. Click the menu on the Worksheet Menu Bar toolbar, and then drag the menu to where you want it to appear.
When you've finished customizing the menus and menu bar, click the OK button to close the Customize Toolbars and Menus dialog box. Your changes then appear in Excel's main menu bar.
NOTE: The Workbook Menu Bar toolbar represents the standard Excel menu bar that appears when you're working with anything except a chart. When a chart or chart element is selected, Excel displays the chart menu bar instead. To customize the chart menu bar, select the Chart Menu Bar check box on the Toolbars and Menus tab of the Customize Toolbars and Menus check box, and then work with the command bar that appears.