
Making a Picture Look the Way You Want It
After you insert a picture, you can use the controls that appear on the Format Picture tab of the Ribbon to make the picture look the way you want it. You can adjust the picture's colors, apply a picture style to the picture, or crop the picture so that only part of it shows.
Adjusting a Picture's Sharpness, Brightness, Contrast, and Colors
To adjust the sharpness, brightness, or contrast in a picture, click the picture to select it, and then choose Format Picture ![]()
Adjust ![]()
Corrections to open the Corrections panel (see Figure 9–16). Click the color correction you want.
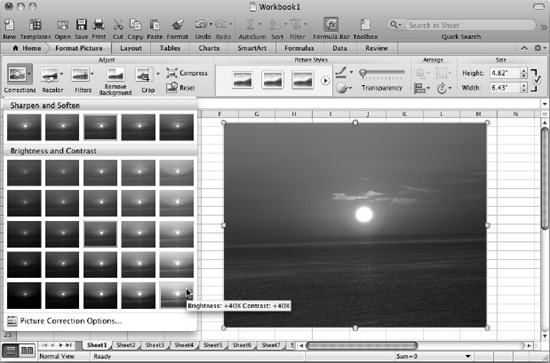
Figure 9–16. To fix problems with a picture's sharpness, brightness, or contrast, open the Corrections panel and choose the look you want.
To change the colors in a picture, click it, choose Format Picture ![]()
Adjust ![]()
Recolor, and then click the effect you want. The Color drop-down panel has different sections for Color Saturation, Color Tone, and Recolor (for example, Grayscale or Sepia).
To apply an effect such as paint strokes or a light screen to a picture, click the picture, choose Format Picture ![]()
Adjust ![]()
Filters, and then click the effect you want.
To reset a picture to its original look, choose Format Picture ![]()
Adjust ![]()
Reset.
Applying a Picture Style
To apply a picture style to a picture, click the picture, click the Format Picture tab of the Ribbon to display it, and then click the picture style you want. If the picture style appears in the Quick Styles box in the Picture Styles group, click it there; otherwise, move the mouse pointer over the Quick Styles box so that the panel button appears, click the panel button, and then click the picture style on the panel (see Figure 9–17).
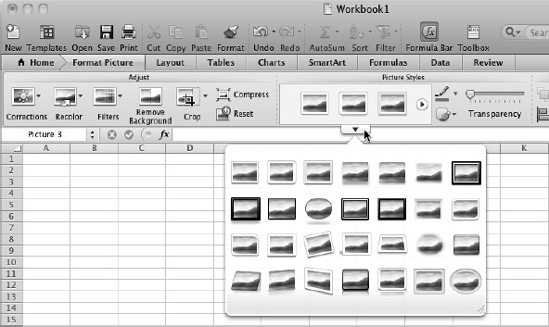
Figure 9–17. Choose the picture style from the Quick Styles box or panel in the Picture Styles group of the Format Picture tab on the Ribbon.
Cropping a Picture
If you need the workbook to show only part of a picture rather than the whole picture, you can crop off the parts you don't want.
Excel lets you crop a picture in several ways, but this way is usually the easiest:
- Click the picture to select it. Excel adds the Format Picture tab to the Ribbon.
- Click the Format Picture tab if Excel has not displayed it.
- Choose
Format Picture
Adjust Crop, clicking the top part of the Crop button rather than the drop-down button. Excel displays crop handles on the picture (see Figure 9–18).
Figure 9–18. The quick way of cropping is to drag the crop handles until they encompass the part of the picture you want to keep.
- Drag the crop handles to make the cropping area contain the part of the picture you want to show:
- Shift+drag to crop the image proportionally.
- Option+drag to crop the image evenly around its center point.
- Option+Shift+drag to crop the image proportionally around its center point.
- Cmd+drag to crop the image in increments of worksheet cells.
TIP: If you make the crop area exactly the size you need, you can click and drag within the crop area to make a different part of the picture appear in it. You move the picture, not the crop area—much as if you were to reach through a window and move the landscape until the window displayed the part you wanted to see.
- Click the Crop button again to turn off the Crop tool, or click elsewhere in the workbook to deselect the picture. Excel applies the cropping to the picture.
NOTE: You can also crop a picture to fit into a shape. To do this, choose
Format Picture
Adjust Crop, clicking the Crop pop-up arrow button rather than the top part of the button. On the pop-up menu that appears, choose Mask to Shape, and then click the shape you want.
Saving Space by Compressing Pictures
When you insert pictures in a workbook (rather than linking them, as discussed earlier in this chapter), Excel saves a copy of each picture in the workbook. This can greatly increase the file size of the workbook.
To keep the workbook's file size down, you can compress the pictures and delete the cropped areas of them. To do so, follow these steps:
- Click a picture to make Excel add the Format Picture tab to the Ribbon.
- Choose
Format Picture Adjust Compressto display the Reduce File Size dialog box (see Figure 9–19).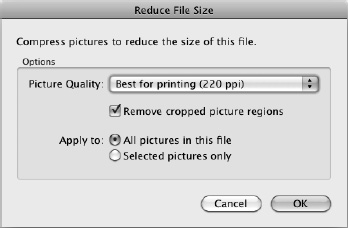
Figure 9–19. Use the Reduce File Size dialog box when you want to reduce the file size of one or more pictures or when you want to delete the cropped areas of pictures.
- In the Picture Quality pop-up menu, select the picture quality you want:
- Best for printing (220 ppi). Compresses the pictures only a little, leaving them high enough quality for most purposes.
- Best for viewing on screen (150 ppi). Compresses the pictures a bit further but leaves them looking good enough for use on the screen.
- Best for sending in e-mail (96 ppi). Compresses the pictures to the extent that they start to look bad but are OK for viewing on the screen at small sizes.
- Keep current resolution. Keeps the pictures at their current resolution. You'd use this setting for removing the cropped parts of pictures without changing the resolution.
- In the Apply to area, select the Selected Pictures Only option button if you want to affect only the picture you've selected. Normally, you'll want to select the All Pictures In This File option button to make Excel compress all the pictures in the workbook.
- Select the Remove Cropped Picture Regions check box if you want to get rid of the areas you've cropped off. This is a good idea once you're sure you won't need to adjust the cropping of any pictures in the workbook to reveal more.
NOTE: Removing the cropped picture regions not only reduces the file size, but it can save embarrassment if the cropped areas contain sensitive information.
- Click the OK button. Excel closes the Reduce File Size dialog box and changes the quality or cropping as you specified.