The process used to create full clone desktop pools is similar to that used to create a linked clone pool. As discussed previously, it is assumed that you already have a virtual desktop master image that you have converted to a vSphere template.
In addition, if you wish for Horizon to perform the virtual machine customization, you will need to create a Customization Specification using the vCenter Customization Specifications Manager. The Customization Specification is used by the Windows Sysprep utility to complete the guest customization process. Visit the VMware vSphere virtual machine administration guide (https://docs.vmware.com/en/VMware-vSphere/index.html) for instructions on how to create a Customization Specification.
The following steps outline the process used to create the full clone desktop pool. Screenshots are included only when the step differs significantly from the same step in the Creating a pool using Horizon Composer linked clones section:
- Log on to the Horizon Administrator console using an AD account that has administrative permissions within Horizon.
- Open the Catalog | Desktop Pools window within the console.
- Click on the Add... button in the Desktop Pools window to open the Add Desktop Pool window.
- In the Desktop Pool Definition | Type window, select the Automated Pool radio button and then click on Next.
- In the Desktop Pool Definition | User Assignment window, select the Dedicated radio button, check the Enable automatic assignment checkbox, and then click on Next.
- In the Desktop Pool Definition | vCenter Server window, click the Full virtual machines radio button, highlight the desired vCenter server, and then click on Next.
- In the Setting | Desktop Pool Identification window, populate the pool ID: and Display Name: fields and then click on Next.
- In the Setting | Desktop Pool Settings window, configure the various settings for the desktop pool. These settings can also be adjusted later if desired. When finished, click on Next >.
- In the Setting | Provisioning Settings window, configure the various provisioning options for the desktop pool that include the desktop naming format and number of desktops. When finished, click on Next >.
- In the Setting | Storage Optimization window, we configure whether our desktop storage is provided by VMware Virtual SAN. When finished, click on Next >.
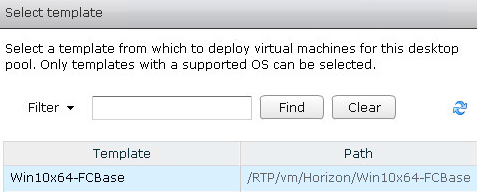
- In the Setting | vCenter Settings window, we will need to configure settings that set the virtual machine template, which vSphere folder to place the desktops in, which ESXi server or cluster to deploy the desktops to, and which datastores to use. Other than the Template setting described in the following step, each of these settings is identical to those seen when creating a Horizon Composer-linked clone pool. Click on the Browse... button next to each of the settings in turn and select the appropriate options.
- To configure the Template: setting, select the vSphere template that you created from your virtual desktop master image as shown in the following screenshot, and then click OK to return to the previous window:

- Once all the settings in the Setting | vCenter Settings window have been configured, click on Next >.
- In the Setting | Advanced Storage Options window, if desired, select and configure the Use View Storage Accelerator radio buttons and configure Blackout Times. When finished, click on Next >.
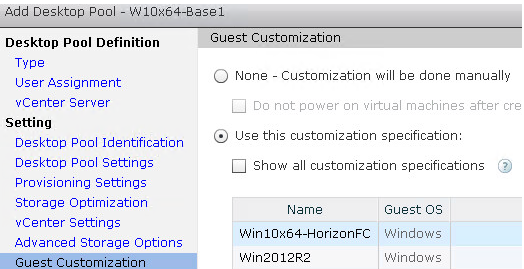
- In the Setting | Guest Customization window, select either the None - Customization will be done manually or Use this customization specification: radio button, and if applicable select a customization specification. When finished, click on Next >. In the following screenshot, we have selected the Win10x64-HorizonFC customization specification that we previously created within vCenter:

- In the Setting | Ready to Complete window, verify that the settings we selected were correct, using the < Back button if needed to go back and make changes. If all the settings are correct, click on Finish to initiate the creation of the desktop pool.
The desktop pool and virtual desktops will now be created. To monitor the creation of the desktops, review the Monitoring the desktop creation process section of this chapter. Also located in this chapter is the Managing Horizon Desktop Pool Entitlements section that outlines how to grant users access to the desktop pools that we have created.
