The Horizon Connection Server software is delivered as a single executable (EXE) file, named in a format similar to VMware-Horizon-Connection-Server-x86_64-x.x.x-yyyyyy.exe. This installer is used for all four Horizon Connection Server types, which include Standard, Replica, Security, and Enrollment.
The following steps outline the installation process:
- Double-click on the Horizon Connection Server installer EXE file to launch the installer.
- In the Welcome to the Installation Wizard for VMware Horizon 7 Connection Server window, click on Next>.
- Review the License Agreement section, select the I accept the terms in the license agreement radio button, and click on Next>.
- Select the installation directory and click on Next>.
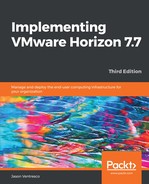
- Highlight the Horizon Connection Server instance type. Since this is the first Horizon Connection Server in the environment, we will choose Horizon 7 Standard Server as shown in the following screenshot, and then click on Next>:
- Enter a data recovery password and an optional password reminder and click on Next>. Record this password, as it will be required for any future restores of this Horizon Connection Server configuration. We will review how to standardize this password across all Horizon Connection Servers in this Pod later on in this chapter.
- Select the Configure Windows Firewall automatically option and click on Next >.
Windows Firewall must be enabled and properly configured to ensure that communications between Horizon Security Servers and the Connection Server can be encrypted.
- Select the Authorize a specific domain user or domain group radio button, enter either a single AD account or AD security group that is designated as the Horizon Administrator, and click on Next>. As shown in the following screenshot, we will use the AD security group titled Horizon-Admins in the VJASON domain in the format domain-namegroup-name:

- Configure the drop-down menus for the User Experience Improvement Program, or uncheck the Participate anonymously in the user experience improvement program checkbox, and click on Next >.
- Review the final installation screen to ensure that the installation directory is correct. If changes are required, click on the < Back button to reach the necessary configuration screen and make the required changes. Assuming that the settings are correct, click on Install to begin the automated installation process.
- Click on Finish when prompted at the completion of the installation process.
The installation process will install all the components required for a Horizon Standard Connection Server, including the Connection Server software and the AD LDS database used to store configuration information. The final configuration steps will be completed in the Horizon Administrator console, and will be detailed in the next section.