Detaching the persistent disk from a desktop allows it to remain managed by Horizon while discarding the linked clone files that are no longer required. If the persistent disk is needed again at a later date, a desktop can be quickly deployed and the persistent disk is associated with it.
The following steps describe how to detach a persistent disk using the Horizon Administrator console:
- Log into the Horizon Administrator console using an AD account that has administrative permissions within Horizon.
- Go to Resources and open the Persistent Disks window within the console.
- Highlight the persistent disk that you wish to detach. In the following example, we have highlighted the persistent disk associated with the APPV10-1 desktop, belonging to the user called vjason.localCharles. Click on the Detach button to open the Detach Persistent Disk window:

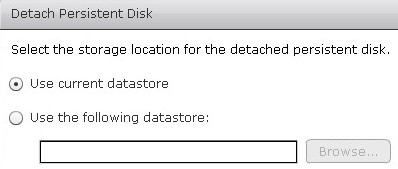
- In the Detach Persistent Disk window (shown in the following screenshot), select where to store the persistent disk. In this example, we will leave it on the current datastore, although organizations may choose to move the disk elsewhere for organizational or archival purposes. Click on OK to detach the disk:
The persistent disk will be detached from the linked clone it was associated with, the linked clone will be deleted, and a new unassigned one will be deployed in its place. The detached persistent disk can be found under the Persistent Disks window's Detached tab, as shown in the following screenshot:

Horizon maintains the information required to quickly recreate the linked clone desktop, including the desktop pool and user it was assigned to.