App Volumes AppStacks may be assigned to individual users, AD security groups, or even AD organizational units. Additionally, the prefix of the computer name can be used to further restrict the AppStack assignments.
The following steps outline the procedure used to assign an AppStack:
- Log in to the App Volumes Manager console (https://rtpappv01.vjason.local) using an account that has administrator permissions.
- Click on the Volumes tab, and then AppStacks.
- Click the + button to the left of an AppStack to display additional information and options, as shown in the following screenshot, and then click Assign:

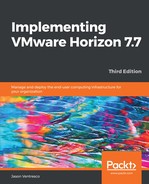
- Search for the object or objects you wish to assign the AppStack to, click the checkbox to the right of it (or them), and then click Assign. In the following screenshot, the AppVolumes_NotepadPlus AD group was selected:

- In the Confirm Assign pop-up window shown in the following screenshot, use the default option, Attach AppStacks on next login or reboot, and then click Assign:
The AppStack assignment process has now been completed, and the selected clients will attach to the AppStack the next time they log in. In the next section, we will delete AppStacks assignments.