
Using Visual Formula
Use Visual Formula to test the values you generate when you square the sum of two terms. Here is the equation for working with the square of the sum of two terms:
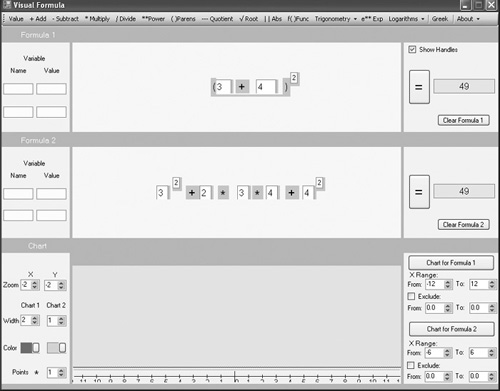
(a + b)2 = a2 + 2ab + b2
Assume that you are dealing with the expression (3 + 4)2 and that you want to test whether both sides of the standard equation for quadratics of this type does, indeed, render equal values.
To implement the left side of the equation, refer to Figure 8.5 and use the following steps:
For starters, position the cursor on the top of the Cartesian plane. When it turns into parallel bars, pull the Cartesian plane down so that you do not see it. You are interested in this session only in the values that appear in the Solution panels on the right side of the equation composition areas.
Click the ()Parens menu item and position the parentheses in the upper equation composition area. Pull the parentheses far enough apart to accommodate two fields and a plus sign.
Click the Value menu item. Position the field just to the right of the left parentheses. Click in this field and type 3.
Click the Add menu item and position the plus sign to the right of the Value field.
Click the Value menu item again and position the field after the plus sign and inside the closing parenthesis after the plus sign. Click in this field and type 4.
Now implement the right side of the equation in the lower equation composition area. The form the expression on the right assumes is a2 + 2ab + b2. Refer to Figure 8.5 and follow these steps:
For five fields in succession, click on the Value menu item, and then place the field in the lower equation composition area. Position the fields so that you leave space for an exponent field and an operator between the first and second fields.
Starting on the right, type 3 in the first field, 2 in the second, 3 in the third, and 4 in the fourth and fifth fields. Verify your work with Figure 8.5.
Click the Power menu item and to the upper right of the first field, position the exponent field. The value in this field is by default 2. Do not change this value.
Click the Add menu item, and to the right of the exponent field and in line with the base field, position the plus sign.
Click the Multiply menu item and place a multiplication sign after the second field. Click the Multiply menu item again and place a multiplication sign after the third field.
Click the Add menu item, and between the fourth and last field, place a plus sign.
Click the Power menu item and place the exponent to the right and just above the last menu item. Do not change the default value of 2.
Set the Chart 1 Width field to 2.
Click the button with the equal sign in the lower Solution panel. Confirm that the value you see in the field matches the value in the upper Solution panel.