
Organizing the Worksheets in a Workbook
When you create a blank workbook, Excel gives it the number of sheets set in the Sheets in new workbook box in the General preferences pane—by default, a single worksheet. If you need more worksheets, you can easily insert them. And you can get rid of any worksheets you no longer need.
Excel gives each worksheet a default name at first—Sheet1, Sheet2, and so on. Usually, you want to give the worksheets descriptive names so you can easily identify them. You may also need to rearrange the worksheets into a different order.
Inserting a New Worksheet
To insert a new worksheet, take one of these actions:
- Insert a new worksheet after the last existing worksheet. Click the Insert Sheet button that appears on the tab bar after the last worksheet tab.
- Insert a new worksheet after a particular worksheet. Ctrl+click or right-click the existing worksheet, and then click Insert Sheet on the context menu.
TIP:Excel's default keyboard shortcut for inserting a new worksheet after the active worksheet is Shift+F11. This keyboard shortcut works only if Mac OS X isn't using F11 for a different purpose, such as the Show Desktop feature in Exposé. If Mac OS X is already using F11, you need to map the Insert Sheet command to a different keyboard shortcut using the technique explained in the section “Creating Custom Keyboard Shortcuts” in Chapter 2. Alternatively, you can change the Mac OS X feature that's using F11.
Naming a Worksheet
To make a worksheet easier to identify, give it a descriptive name. Double-click the worksheet's tab to select the default name, type the name you want, and then press Return to apply the name. You can use up to 31 characters in the name—enough for several words.
Changing a Worksheet's Tab Color
If you want to make a worksheet's tab stand out, Ctrl+click or right-click the tab, click Tab Color to display the Tab Color window, and then click the color for the tab. Click the Close button (the button at the left end of the title bar) to close the Tab Color window.
NOTE: If you copy a worksheet, the copy gets the same tab color as the original—so you may want to change the color to make the copy easier to distinguish.
Deleting a Worksheet
To delete a worksheet, Ctrl+click or right-click its tab, and then click Delete on the context menu. Excel displays a dialog box (see Figure 3–10) to double-check that you're prepared to delete it; click the Delete button to go ahead.
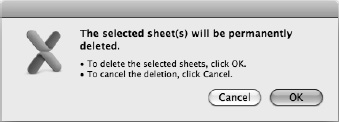
Figure 3–10. Click the OK button to confirm that you want to delete the worksheet.
Rearranging the Worksheets in a Workbook
To get a workbook's worksheets in the order you want, you can rearrange them.
The quick way to move a worksheet is to click its tab, drag it left or right until Excel displays a downward arrow between the worksheets where you want to place it, and then drop it.
TIP:To move two or more worksheets, select them first. To select a range of worksheets that appear next to each other, click the first worksheet's tab, and then Shift+click the tab for the worksheet at the other end of the range. To select worksheets that aren't next to each other, click the first worksheet's tab, and then Cmd+click each other worksheet's tab in turn.
Dragging a worksheet tab is easy for short distances, but when you need to move a worksheet further, use the Move or Copy dialog box instead. You can also use the Move or Copy dialog box to move or copy worksheets to a different workbook. Follow these steps:
- If you want to move or copy the worksheets to a different workbook, open that workbook.
- In the source workbook, Ctrl+click or right-click the worksheet's tab to display the context menu. To move multiple worksheets, select them, and then Ctrl+click or right-click one of the selected tabs.
- On the context menu, click the Move or Copy item to display the Move or Copy dialog box (see Figure 3–11).
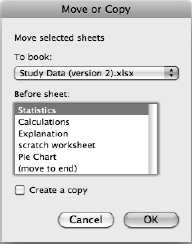
Figure 3–11. Use the Move or Copy dialog box to move one or more worksheets farther than you can comfortably drag within a workbook, or to move or copy worksheets to another open workbook.
- In the To book pop-up menu, make sure the current workbook is selected unless you want to move the worksheet to another workbook—in which case, select that workbook.
- In the Before sheet list box, click the worksheet before which you want to position the worksheet you're moving. If you want to put the worksheets at the end of the workbook, select the (move to end) item.
- Select the Create a copy check box if you want to copy the worksheet to the destination rather than move it. Copying tends to be most useful when the destination is another workbook, but you can copy within a workbook as well.
- Click the OK button to close the dialog box. Excel moves or copies the worksheet to the destination you chose.